
This guide will show you how to configure Active Directory authentication in Apache on Ubuntu 20.04. These instruction can also be applied if you are running a Ubuntu 18.04, Debian 9, or Debian 10 on your system.
Prerequisites
To follow this tutorial along, you will need one (physical or virtual) machine installed with Ubuntu 20.04.
We have also created a video to avoid any confusion while performing these configuration steps:
Login to your Ubuntu system and set correct hostname and timezone with below command:
Install Apache
You can install Apache on your Ubuntu/Debian with below command:
Configure Apache
We will create a directory under /var/www/html to store our web contents.
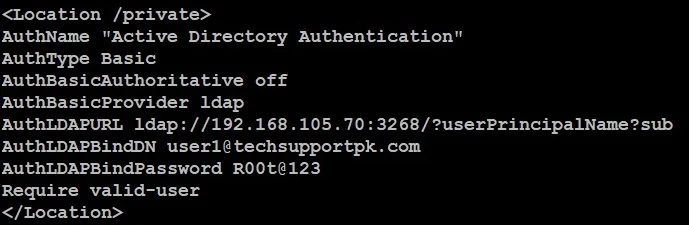
We will create AD-ldap.conf file under /etc/apache2/conf-available location like an example below:
add configuration directives like an example below:
Make sure you replace highlighted text with yours.
By default Windows Active Directory doesn't allow anonymous lookup for LDAP database, so we have to put AuthLDAPBinDN and AuthLDAPBindPassword directive to allow Apache to search Active Directory for users credentials.
Make sure you keep port 3268
in your configuration, because LDAP communication to a Active Directory
global catalog server occurs over TCP 3268 port, and if you try to
connect LDAP using port like 389 or 686, your Apache authentication will
fail.
Save and close the editor when you are finished.
With this configuration, we secures everything under /private, providing access to all valid active directory users.
The actual AD-ldap.conf file in our environment looks like below:
Verify your Apache configuration file syntax with below command:
This will return Syntax OK in the output if everything was setup correctly. If there is any error, fix them first then move to next step.
Execute below command to activate your Apache configuration:
Restart Apache to make changes effect:
We will create a simple index.html page under /var/www/html/private directory to test our Apache and Active Directory authentication functionality.
Add below simple html code in it:
Save and close the editor when you are finished.
Test Apache & Active Directory Authentication
Open up your preferred web browser, and navigate to:
http://your_server_name-OR_IP/private
or
https://your_server_name-OR_IP/private
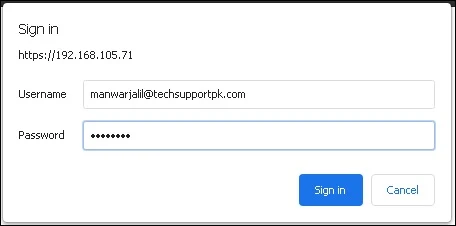
You will get credentials popup as shown in screenshot below:

Enter your Active Directory username and password like example below:
Upon successful login with your AD credentials, you should see the webpage like an example below:

Check your Apache access_log with below command:
You will see your Active Directory username in logs as shown in screenshot below:

At this stage, you have successfully implemented Active Directory authentication in your Apache.
Troubleshooting
If you get 500 Internal Server Error in browser, you should check the Apache error_log using tail -f /var/log/apache2/error.log to identify the root cause.
Conclusion
By leveraging the central user management of Windows Active Directory, you don’t need to worry about usernames or passwords for your Apache web server anymore.
I've used several tutorials, it always point me to the point of failure, when I open the test page I get the following error:
ReplyDeleteInternal Server Error
The server encountered an internal error or misconfiguration and was unable to complete your request.
Please contact the server administrator at webmaster@localhost to inform them of the time this error occurred, and the actions you performed just before this error.
More information about this error may be available in the server error log.
Apache/2.4.41 (Ubuntu) Server at 192.168.83.11 Port 80
And checking the log it says:
AH01796: AuthType Basic configured without corresponding module
The "AH01796: AuthType Basic configured without corresponding module" error log is not descriptive and it is not helpful most of the time. Make sure you have loaded the corresponding module to the Apache using "sudo a2enmod authnz_ldap" command. If you are stuck and unable to figure out what causing the issue, you can ask for my help over the remote using Anydesk or Teamviewer and we will fix it together.
ReplyDeleteSame error "AH01796: AuthType Basic configured without corresponding module"
ReplyDeleteI am not sure about ?userPrincipalName?sub
I encountered the same error
ReplyDeleteAH01796: AuthType Basic configured without corresponding module
I solved changing
AuthLDAPURL ldap://MYIP:3268/?sAMAccountName?sub
Thank you for your contribution, and happy to see, you resolved the issue.
Delete