
This guide will walk you through the steps to set up a scalable, and highly available PostgreSQL database cluster from scratch using docker on an Ubuntu 20.04.
The following set of software will be used to build a fault-tolerant, high availability cluster for PostgreSQL:
- Docker is a set of platform as a service products that use OS-level virtualization to deliver software in packages called containers.
- Patroni is a cluster manager used to customize and automate deployment and maintenance of PostgreSQL HA (High Availability) clusters.
- etcd is a strongly consistent, distributed key-value store that provides a reliable way to store data that needs to be accessed by a distributed system or cluster of machines
- PgBouncer is an open-source, lightweight connection pooler for PostgreSQL.
- HAProxy is a free and open source software that provides a high availability load balancer and proxy server for TCP and HTTP-based applications that spreads requests across multiple servers.

We will use following information throughout this tutorial to run a PostgreSQL high availability cluster under docker container:
Container Name		IP Address	Service
postgres1		172.20.0.10	PostgreSQL, patroni, etcd, pgbouncer
postgres2		172.20.0.11	PostgreSQL, patroni, etcd, pgbouncer
postgres3		172.20.0.12	PostgreSQL, patroni, etcd, pgbouncer

haproxy1		172.20.0.100	HAProxy
To follow this tutorial along, you will need a (physical or virtual) machine installed with Ubuntu 20.04.
Prepare Ubuntu to run docker
sudo timedatectl set-timezone Asia/KarachiMake sure you replace highlighted text with yours.
Remove if there is any older version of docker exists on your Ubuntu:
sudo apt autoremove docker docker-compose docker.io containerd runc
sudo apt install ca-certificates curl gnupg lsb-release

curl -fsSL https://download.docker.com/linux/ubuntu/gpg | sudo gpg --dearmor -o /etc/apt/trusted.gpg.d/docker.gpg

echo "deb [arch=$(dpkg --print-architecture) signed-by=/etc/apt/trusted.gpg.d/docker.gpg] https://download.docker.com/linux/ubuntu $(lsb_release -cs) stable" | sudo tee /etc/apt/sources.list.d/docker.list > /dev/null
Update APT cache:
sudo apt update
Install latest available release of docker on your Ubuntu:
sudo apt install -y docker-ce docker-ce-cli containerd.io docker-compose docker-compose-plugin
Add your Ubuntu user to docker group in order to execute docker command without sudo:
sudo usermod -aG docker $USER
Restart docker to make changes effect:
sudo systemctl restart docker
Reboot your Ubuntu machine:
sudo shutdown -r now
Log in to docker hub from your Ubuntu command line:
docker login
username: your_docker_hub_username
password: your_password

docker pull ubuntu:20.04
Prepare a docker container with all the required packages
docker run -it --name postgres_release12 -e DEBIAN_FRONTEND=noninteractive ubuntu:20.04
apt update; apt install -y nano wget ca-certificates curl gnupg lsb-release

curl -fsSL https://www.postgresql.org/media/keys/ACCC4CF8.asc | gpg --dearmor -o /etc/apt/trusted.gpg.d/postgresql.gpg

sh -c 'echo "deb http://apt.postgresql.org/pub/repos/apt/ $(lsb_release -cs)-pgdg main" >> /etc/apt/sources.list.d/pgdg.list'

apt update
We will install PostgreSQL release 12. If you wish, you can install any other version of your choice to meet your environment need.
Type following command on docker container shell prompt to install PostgreSQL release 12:
apt -y install postgresql-12Type following command on docker container shell prompt to install latest available release of etcd:
ln -s /usr/lib/postgresql/12/bin/* /usr/sbin/
rm -rf /var/lib/postgresql/12/main/*
apt install -y etcd
apt -y install python3 python3-pip python3-dev libpq-dev python3-etcd

ln -s /usr/bin/python3 /usr/bin/python

pip3 install launchpadlib --upgrade setuptools psycopg2

apt install -y patroni
apt install -y pgbouncer
nano /etc/environment
export PGDATA="/var/lib/postgresql/12/main"
export ETCDCTL_API="3"
export PATRONI_ETCD_URL="http://127.0.0.1:2379"
export PATRONI_SCOPE="pg_cluster"
postgres1=172.20.0.10
postgres2=172.20.0.11
postgres3=172.20.0.12
ENDPOINTS=$postgres1:2379,$postgres2:2379,$postgres3:2379
exit

Save a docker container to an image
docker commit postgres_release12 postgres12_ha_image

docker rm postgres_release12
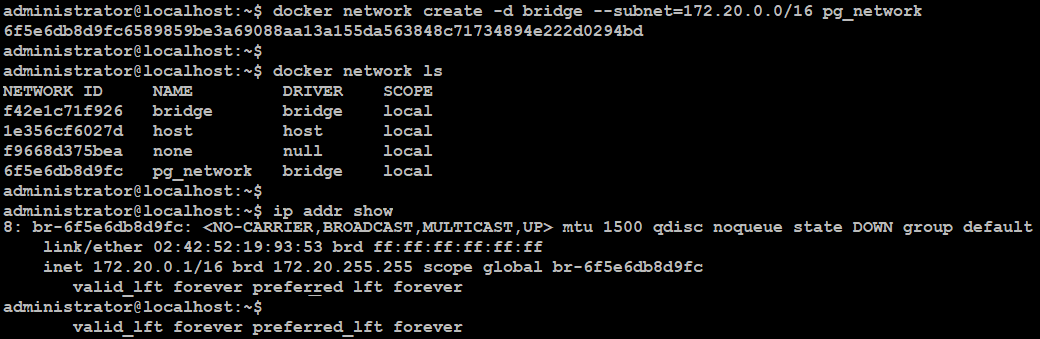
Create a docker network
Create a separate docker network to be used only with PostgreSQL HA cluster:docker network create -d bridge --subnet=172.20.0.0/16 pg_network
docker network ls
ip addr show
Create three docker containers from image
docker create -it --network pg_network --ip 172.20.0.10 -h postgres1 --name postgres1 postgres12

docker create -it --network pg_network --ip 172.20.0.11 -h postgres2 --name postgres2 postgres12

docker create -it --network pg_network --ip 172.20.0.12 -h postgres3 --name postgres3 postgres12
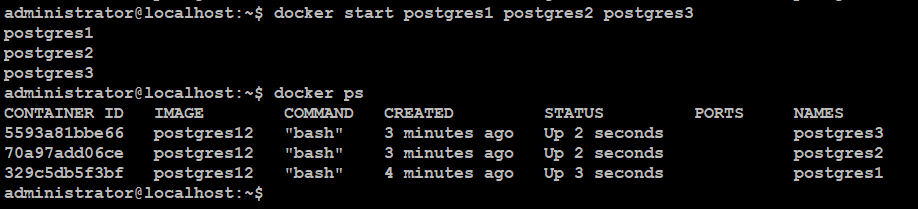
Start all three containers at the same time:
docker start postgres1 postgres2 postgres3
Check running docker containers:
docker ps
docker exec -it postgres1 bash -c "nano /etc/hosts"
172.20.0.10    localhost

172.20.0.10    postgres1
172.20.0.11    postgres2
172.20.0.12    postgres3
Configure ETCD cluster in docker container
docker exec -it postgres1 bash -c "mv /etc/default/etcd /etc/default/etcd-orig"Add following configuration:
docker exec -it postgres1 bash -c "nano /etc/default/etcd"
ETCD_NAME=postgres1Save and close the editor when you are finished.
ETCD_DATA_DIR="/var/lib/etcd/postgres1"
ETCD_LISTEN_CLIENT_URLS="http://0.0.0.0:2379"
ETCD_INITIAL_ADVERTISE_PEER_URLS="http://172.20.0.10:2380"
ETCD_INITIAL_CLUSTER="postgres1=http://172.20.0.10:2380,postgres2=http://172.20.0.11:2380,postgres3=http://172.20.0.12:2380"
ETCD_INITIAL_CLUSTER_STATE="new"
ETCD_INITIAL_CLUSTER_TOKEN="etcd-cluster"
ETCD_ADVERTISE_CLIENT_URLS="http://0.0.0.0:2379"
ETCD_ENABLE_V2="true"
Configure patroni cluster in docker container
docker exec -it postgres1 bash -c "nano /etc/patroni/postgres.yml"
Add following configuration:
scope: pg_cluster
namespace: /service/
name: postgres1

restapi:
    listen: postgres1:8008
    connect_address: postgres1:8008

etcd:
    hosts: postgres1:2379,postgres2:2379,postgres3:2379

bootstrap:
  dcs:
    ttl: 30
    loop_wait: 10
    retry_timeout: 10
    maximum_lag_on_failover: 1048576
    postgresql:
      use_pg_rewind: true
      use_slots: true
      parameters:

  initdb:
  - encoding: UTF8
  - data-checksums

  pg_hba:
  - host replication replicator 127.0.0.1/32 md5
  - host replication replicator 0.0.0.0/0 md5
  - host all all 0.0.0.0/0 md5

  users:
    admin:
      password: admin
      options:
        - createrole
        - createdb

postgresql:
  listen: postgres1:5432
  connect_address: postgres1:5432
  proxy_address: postgres1:6432
  data_dir: /var/lib/postgresql/12/main
  bin_dir: /usr/lib/postgresql/12/bin
  pgpass: /tmp/pgpass
  authentication:
    replication:
      username: replicator
      password: replicator
    superuser:
      username: postgres
      password: postgres
    rewind:
      username: rewind
      password: rewind

tags:
    nofailover: false
    noloadbalance: false
    clonefrom: false
    nosync: false
Configure pgbouncer in docker container
docker exec -it postgres1 bash -c "nano /etc/pgbouncer/pgbouncer.ini"
In the [databases] section, add database info like below:
* = host=postgres1 port=5432 dbname=postgres
Locate listen_addr=localhost and change it to:
listen_addr = *In the [pgbouncer] section, add following, but below to auth_file = /etc/pgbouncer/userlist.txt line:
auth_user = pgbouncer
auth_query = SELECT p_user, p_password FROM public.lookup($1)
docker exec -it postgres2 bash -c "nano /etc/hosts"
172.20.0.11    localhost

172.20.0.10    postgres1
172.20.0.11    postgres2
172.20.0.12    postgres3
docker exec -it postgres2 bash -c "mv /etc/default/etcd /etc/default/etcd-orig"Add following configuration:
docker exec -it postgres2 bash -c "nano /etc/default/etcd"
ETCD_NAME=postgres2Save and close the editor when you are finished.
ETCD_DATA_DIR="/var/lib/etcd/postgres2"
ETCD_LISTEN_CLIENT_URLS="http://0.0.0.0:2379"
ETCD_INITIAL_ADVERTISE_PEER_URLS="http://172.20.0.11:2380"
ETCD_INITIAL_CLUSTER="postgres1=http://172.20.0.10:2380,postgres2=http://172.20.0.11:2380,postgres3=http://172.20.0.12:2380"
ETCD_INITIAL_CLUSTER_STATE="new"
ETCD_INITIAL_CLUSTER_TOKEN="etcd-cluster"
ETCD_ADVERTISE_CLIENT_URLS="http://0.0.0.0:2379"
ETCD_ENABLE_V2="true"
docker exec -it postgres2 bash -c "nano /etc/patroni/postgres.yml"
Add following configuration:
scope: pg_cluster
namespace: /service/
name: postgres2

restapi:
    listen: postgres2:8008
    connect_address: postgres2:8008

etcd:
    hosts: postgres1:2379,postgres2:2379,postgres3:2379

bootstrap:
  dcs:
    ttl: 30
    loop_wait: 10
    retry_timeout: 10
    maximum_lag_on_failover: 1048576
    postgresql:
      use_pg_rewind: true
      use_slots: true
      parameters:

  initdb:
  - encoding: UTF8
  - data-checksums

  pg_hba:
  - host replication replicator 127.0.0.1/32 md5
  - host replication replicator 0.0.0.0/0 md5
  - host all all 0.0.0.0/0 md5

  users:
    admin:
      password: admin
      options:
        - createrole
        - createdb

postgresql:
  listen: postgres2:5432
  connect_address: postgres2:5432
  proxy_address: postgres2:6432
  data_dir: /var/lib/postgresql/12/main
  bin_dir: /usr/lib/postgresql/12/bin
  pgpass: /tmp/pgpass
  authentication:
    replication:
      username: replicator
      password: replicator
    superuser:
      username: postgres
      password: postgres
    rewind:
      username: rewind
      password: rewind

tags:
    nofailover: false
    noloadbalance: false
    clonefrom: false
    nosync: false
docker exec -it postgres1 bash -c "nano /etc/pgbouncer/pgbouncer.ini"
In the [databases] section, add database info like below:
* = host=postgres2 port=5432 dbname=postgres
Locate listen_addr=localhost and change it to:
listen_addr = *In the [pgbouncer] section, add following, but below to auth_file = /etc/pgbouncer/userlist.txt line:
auth_user = pgbouncer
auth_query = SELECT p_user, p_password FROM public.lookup($1)
docker exec -it postgres2 bash -c "nano /etc/hosts"
172.20.0.12    localhost

172.20.0.10    postgres1
172.20.0.11    postgres2
172.20.0.12    postgres3
docker exec -it postgres3 bash -c "mv /etc/default/etcd /etc/default/etcd-orig"Add following configuration:
docker exec -it postgres3 bash -c "nano /etc/default/etcd"
ETCD_NAME=postgres3Save and close the editor when you are finished.
ETCD_DATA_DIR="/var/lib/etcd/postgres3"
ETCD_LISTEN_CLIENT_URLS="http://0.0.0.0:2379"
ETCD_INITIAL_ADVERTISE_PEER_URLS="http://172.20.0.12:2380"
ETCD_INITIAL_CLUSTER="postgres1=http://172.20.0.10:2380,postgres2=http://172.20.0.11:2380,postgres3=http://172.20.0.12:2380"
ETCD_INITIAL_CLUSTER_STATE="new"
ETCD_INITIAL_CLUSTER_TOKEN="etcd-cluster"
ETCD_ADVERTISE_CLIENT_URLS="http://0.0.0.0:2379"
ETCD_ENABLE_V2="true"
docker exec -it postgres3 bash -c "nano /etc/patroni/postgres.yml"
Add following configuration:
scope: pg_cluster
namespace: /service/
name: postgres3

restapi:
    listen: postgres3:8008
    connect_address: postgres3:8008

etcd:
    hosts: postgres1:2379,postgres2:2379,postgres3:2379

bootstrap:
  dcs:
    ttl: 30
    loop_wait: 10
    retry_timeout: 10
    maximum_lag_on_failover: 1048576
    postgresql:
      use_pg_rewind: true
      use_slots: true
      parameters:

  initdb:
  - encoding: UTF8
  - data-checksums

  pg_hba:
  - host replication replicator 127.0.0.1/32 md5
  - host replication replicator 0.0.0.0/0 md5
  - host all all 0.0.0.0/0 md5

  users:
    admin:
      password: admin
      options:
        - createrole
        - createdb

postgresql:
  listen: postgres3:5432
  connect_address: postgres3:5432
  proxy_address: postgres3:6432
  data_dir: /var/lib/postgresql/12/main
  bin_dir: /usr/lib/postgresql/12/bin
  pgpass: /tmp/pgpass
  authentication:
    replication:
      username: replicator
      password: replicator
    superuser:
      username: postgres
      password: postgres
    rewind:
      username: rewind
      password: rewind

tags:
    nofailover: false
    noloadbalance: false
    clonefrom: false
    nosync: false
docker exec -it postgres3 bash -c "nano /etc/pgbouncer/pgbouncer.ini"
In the [databases] section, add database info like below:
* = host=postgres3 port=5432 dbname=postgres
Locate listen_addr=localhost and change it to:
listen_addr = *In the [pgbouncer] section, add following, but below to auth_file = /etc/pgbouncer/userlist.txt line:
auth_user = pgbouncer
auth_query = SELECT p_user, p_password FROM public.lookup($1)
Start ETCD cluster in docker container
When you are finished configuring (etcd, patroni, pgbouncer) on each container as described, execute following command to start etcd cluster:
docker exec -it postgres1 bash -c "service etcd start"

docker exec -it postgres2 bash -c "service etcd start"

docker exec -it postgres3 bash -c "service etcd start"
Check etcd cluster member:
docker exec -it postgres1 bash -t -c "etcdctl member list"

docker exec -it postgres1 bashAs you can see in the screenshot below, etcd cluster is healthy and active.
source /etc/environment
etcdctl endpoint status --write-out=table --endpoints=$ENDPOINTS

exit
Start patroni cluster in docker container
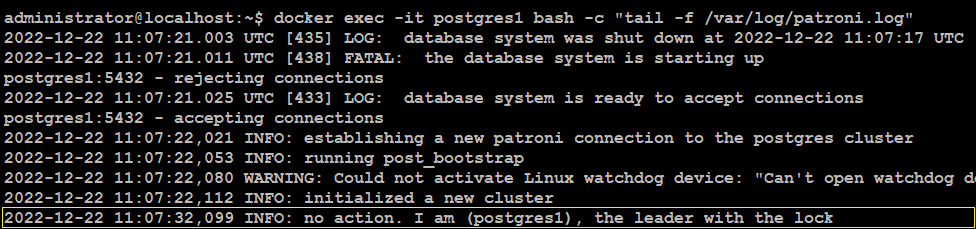
docker exec -it postgres1 bash -c "service patroni start"
docker exec -it postgres1 bash -c "tail -f /var/log/patroni.log"
docker exec -it postgres2 bash -c "service patroni start"

docker exec -it postgres3 bash -c "service patroni start"
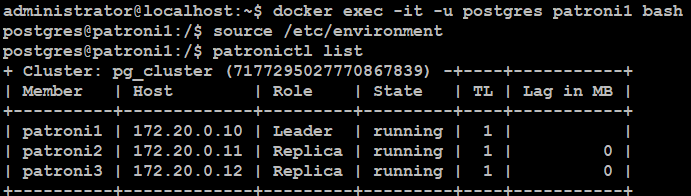
Check patroni cluster member:
source /etc/environment

patronictl list
As you can see in the screenshot below, (postgres1)is elected as the leader, and (postgres2, postgres3) are replica in the cluster.
Type exit on container's shell prompt to return to your host machine:
exit
Configure pgbouncer authentication
docker exec -it postgres1 bash -c "psql -h postgres1 -p 5432 -U postgres"
Run the following:
CREATE ROLE pgbouncer LOGIN with encrypted password "TypeYourPasswordHere";

CREATE FUNCTION public.lookup (
	INOUT p_user     name,
	OUT   p_password text
) RETURNS record
LANGUAGE sql SECURITY DEFINER SET search_path = pg_catalog AS
$$SELECT usename, passwd FROM pg_shadow WHERE usename = p_user$$;
select * from pg_shadow;

\q
docker exec -ti postgres1 bash -c "nano /etc/pgbouncer/userlist.txt"
"pgbouncer" "PasteEncryptedPasswordHere"Save and close the editor when you are finished.
Start pgbouncer in docker container
When you are finished configuring pgbouncer authentication, execute following command to start pgbouncer:
docker exec -it postgres1 bash -c "service pgbouncer start"

docker exec -it postgres2 bash -c "service pgbouncer start"

docker exec -it postgres3 bash -c "service pgbouncer start"
Test pgbouncer authentication
docker exec -ti postgres1 bash -c "psql -h postgres1 -p 6432 -U postgres"

docker exec -ti postgres2 bash -c "psql -h postgres1 -p 6432 -U postgres"

docker exec -ti postgres3 bash -c "psql -h postgres1 -p 6432 -U postgres"
When you are finished with pgbouncer authentication configuration, proceed to next step.
Run HAProxy load balancer in a docker container
docker create -it --network pg_network --ip 172.20.0.100 -h haproxy1 -p 5000:5000 -p 5001:5001 -p 7000:7000 --name haproxy1 ubuntu:20.04
We have exposed few ports of HAProxy that are required from outside network for database clients and applications.
- Port 5000 will be used to connect to back-end database via pgbouncer port 6432 for database reads/writes-requests.
- Port 5001 will be used to connect to back-end database via pgbouncer port 6432 for database reads-requests only.
- Port 7000 will be used to access HAProxy stats dashboard via HTTP.
docker start haproxy1

Execute following command to install HAProxy in a docker container:
docker exec -it haproxy1 bash -c "apt update; apt install -y haproxy nano"
Edit haproxy.cfg to make required configuration:
docker exec -it haproxy1 bash -c "mv /etc/haproxy/haproxy.cfg /etc/haproxy/haproxy.cfg.orig"Add following configuration:
docker exec -it haproxy1 bash -c "nano /etc/haproxy/haproxy.cfg"
global
     log 127.0.0.1   local2
     chroot /var/lib/haproxy
     stats socket /run/haproxy/admin.sock mode 660 level admin expose-fd listeners
     stats timeout 30s
     user haproxy
     group haproxy
     maxconn 100
     daemon

defaults
    mode                    tcp
    log                     global
    option                  tcplog
    retries                 3
    timeout queue           1m
    timeout connect         10s
    timeout client          1m
    timeout server          1m
    timeout check           10s
    maxconn                 100

listen stats
    mode http
    bind *:7000
    stats enable
    stats uri /

listen primary
    bind *:5000
    option httpchk OPTIONS /master
    http-check expect status 200
    default-server inter 3s fall 3 rise 2 on-marked-down shutdown-sessions
    server postgres1 172.20.0.10:6432 maxconn 100 check port 8008
    server postgres2 172.20.0.11:6432 maxconn 100 check port 8008
    server postgres3 172.20.0.12:6432 maxconn 100 check port 8008

listen replicas
    bind *:5001
    balance roundrobin
    option httpchk OPTIONS /replica
    http-check expect status 200
    default-server inter 3s fall 3 rise 2 on-marked-down shutdown-sessions
    server postgres1 172.20.0.10:6432 maxconn 100 check port 8008
    server postgres2 172.20.0.11:6432 maxconn 100 check port 8008
    server postgres3 172.20.0.12:6432 maxconn 100 check port 8008
We have included all three database nodes in primary, and replicas sections: that is because each database node is potential candidate to be either primary or replica. Patroni provides a built-in REST API support for health check monitoring that works perfectly with HAproxy. HAProxy will send an HTTP request to port 8008 of patroni to know which role each node currently has.
Start haproxy service:
docker exec -ti haproxy1 bash -c "service haproxy start"
Navigate to HAProxy stats dashboard via http://your_host_machine_ip:7000/ from any of your preferred web browser.

The HAProxy stats dashboard will look similar to like as shown in image below:
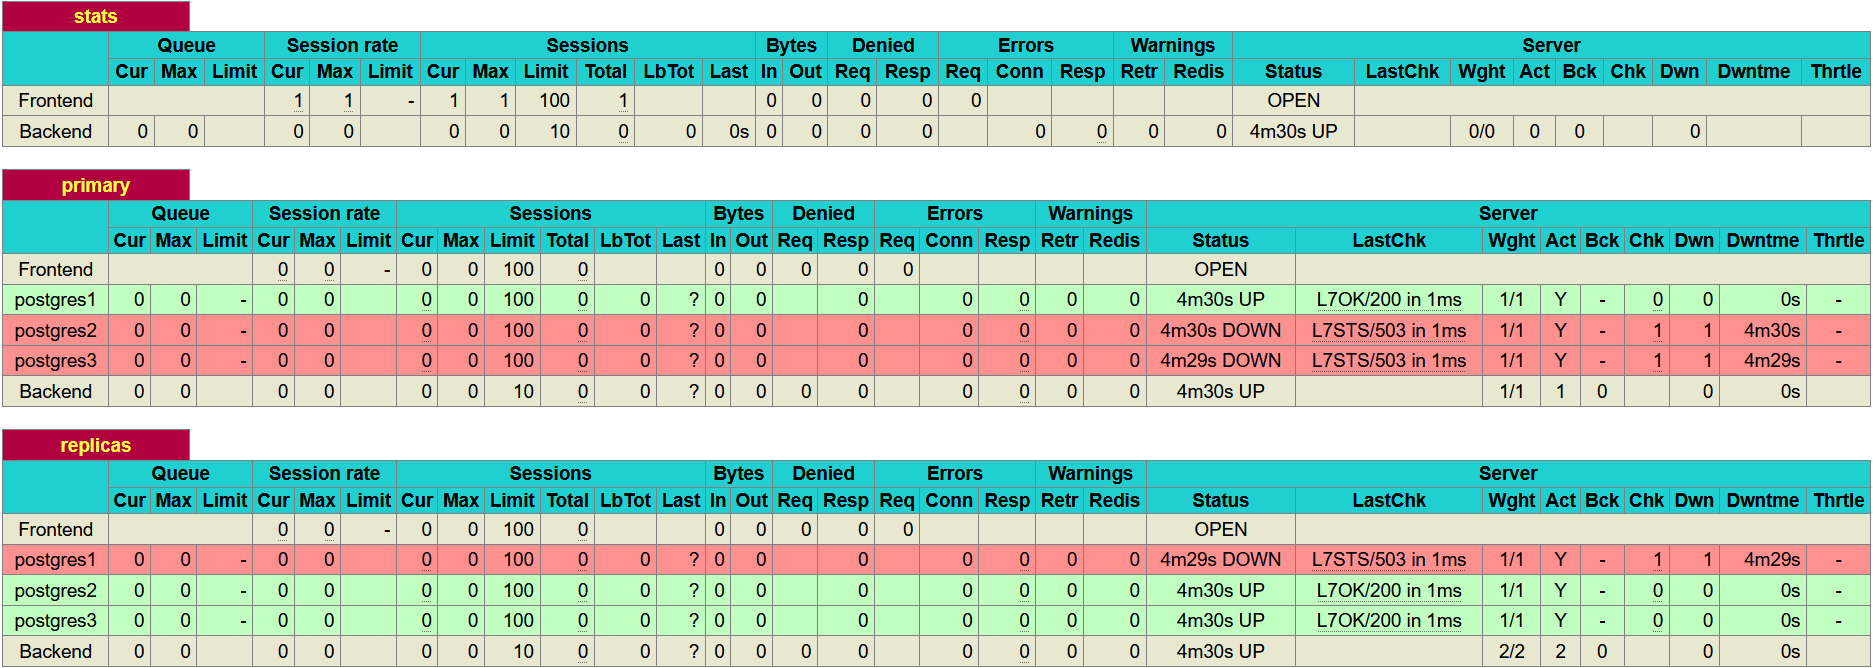
In the primary section, the (postgres1) row is highlighted as green. This indicates that 172.20.0.10 is currently a leader node in the
cluster.
In the replicas section, (postgres2, and postgres3) row is highlighted as green. This indicates that the both are replica nodes and will only serve reads-requests.
Test PostgreSQL High Availability (HA) Cluster
You can begin testing your PostgreSQL HA cluster by initiating a connection request from your host machine using (psql) via haproxy port 5000, and 5001.
Install PostgreSQL client, Python connector on your Ubuntu:
sudo apt install -y postgresql-client python3-psycopg2Create a .pgpass file with database credentials on your Ubuntu:
echo "localhost:5000:*:postgres:postgres" >> ~/.pgpass

echo "localhost:5001:*:postgres:postgres" >> ~/.pgpass

chmod 0600 ~/.pgpass

Execute a read-request on your Ubuntu to verify HAProxy load balancing:
psql -h localhost -p 5001 -U postgres -t -c "select inet_server_addr()"
Execute the same read-request second time:
psql -h localhost -p 5001 -U postgres -t -c "select inet_server_addr()"
This should return both of your PostgreSQL replica containers IP in the output as shown in image below:

HAProxy perfectly balancing load across PostgreSQL replica nodes as intended.
Next, execute a write-request using same command but with port 5000:
psql -h localhost -p 5000 -U postgres -t -c "select inet_server_addr()"
This should return PostgreSQL master node IP in the output as shown in the image below:

Test PostgreSQL High Availability (HA) Cluster Replication
psql -h localhost -p 5000 -U postgres -c "create database testdb;"Connect to your testdb, and create a dummy table:
psql -h localhost -p 5000 -U postgres -c "create user testuser with encrypted password 'TypeYourPassword';"
psql -h localhost -p 5000 -U postgres -c "grant all privileges on database testdb to testuser;"
echo "localhost:5000:*:testuser:TypeYourPassword" >> ~/.pgpass

echo "localhost:5001:*:testuser:TypeYourPassword" >> ~/.pgpass

psql -h localhost -p 5000 -U testuser -d testdb -c "CREATE TABLE logbook (guest_email text, guest_id serial, date timestamp, message text);"

psql -h localhost -p 5000 -U testuser -d testdb -c "INSERT INTO logbook (guest_email, date, message) VALUES ('guest1@emailaddress.com', current_date, 'This is just to test database replication.');"
psql -h localhost -p 5001 -U testuser -c "select * from logbook,inet_server_addr();"

As you can see in the above screenshot, read-request return logbook output from 172.20.0.11 which is postgres2 a replica node.
Execute same read-request again to verify database replication for second node:
psql -h localhost -p 5001 -U testuser -c "select * from logbook,inet_server_addr();"

This time, read-request return logbook output from 172.20.0.12 which is postgres3 a second replica node.
Simulate PostgreSQL High Availability (HA) Cluster Workload
git clone https://github.com/manwerjalil/pgscripts.git

chmod +x ~/pgscripts/pgsqlhatest.py
Edit pgsqlhatest.py to make the required changes:
nano ~/pgscripts/pgsqlhatest.py
Replace following with yours:
host = "TypeHAProxyIPHere"
password = "TypeYourPassswordHere"
Save and close the editor when you are finished.
Create a target table "PGSQLHATEST" in your postgres database by executing the following command from your host machine:
psql -h localhost -p 5000 -U postgres -c "CREATE TABLE PGSQLHATEST (TM TIMESTAMP);"

psql -h localhost -p 5000 -U postgres -c "CREATE UNIQUE INDEX idx_pgsqlhatext ON pgsqlhatest (tm desc);"
When you are done creating target table as described, proceed with the following.
We highly recommend to use tmux terminal in order to use multiple tabs on a single screen so that you can continuously monitor PostgreSQL cluster behavior in real time.
Type tmux on your host machine to switch to tmux terminal, then create four tabs using the key combination of Ctrl + b then Shift + " for horizontal tabs, and Ctrl + b then Shift + % for vertical tabs.
On left side of the screen, monitor your PostgreSQL cluster state:
docker exec -it postgres1 bash

watch patronictl list
On right side of the screen, execute writes-request using port 5000:
~/pgscripts/pgsqlhatest.py 5000
and execute reads-request using port 5001:
~/pgscripts/pgsqlhatest.py 5001
Execute failover:
docker exec -it postgres2 bash

patronictl failover --candidate postgres2 --force
During a master node failover process, continues writing to the database experiences a moment of disruption while PostgreSQL cluster changes its state electing a replica node as leader. The continues writing to the database restarts as soon as master database become available.
Conclusion
Now that you have created a scalable, and highly available PostgreSQL release 12 HA cluster using docker on an Ubuntu 20.04. You should add one more HAProxy container, and configure a shared IP address using keepalived or vip manager to make load balancer highly available.
We highly appreciate if you leave your thoughts about this tutorial in the comment section below.
This is great tutorial and setup. I am curious, though, how all this would look and what steps you have to repeat the setup if you want to run all this in separate VMs? - I want the 3 PGs to be in separate VMs each
ReplyDeleteThis guide will help you: https://www.techsupportpk.com/2022/01/set-up-highly-available-postgresql13-cluster-ubuntu.html
DeleteExcellent tutorial. Thanks
ReplyDeleteExcellent - Thanks for your work!
ReplyDeleteIt would be great if you add the final docker-compose file.
ReplyDelete