
This guide will walk you through the steps to set up a highly available PostgreSQL release 12 cluster using Patroni and HAProxy on CentOS 7. These steps can also be applied if you are running an earlier or later release of CentOS, RHEL or Rocky Linux in your environment.
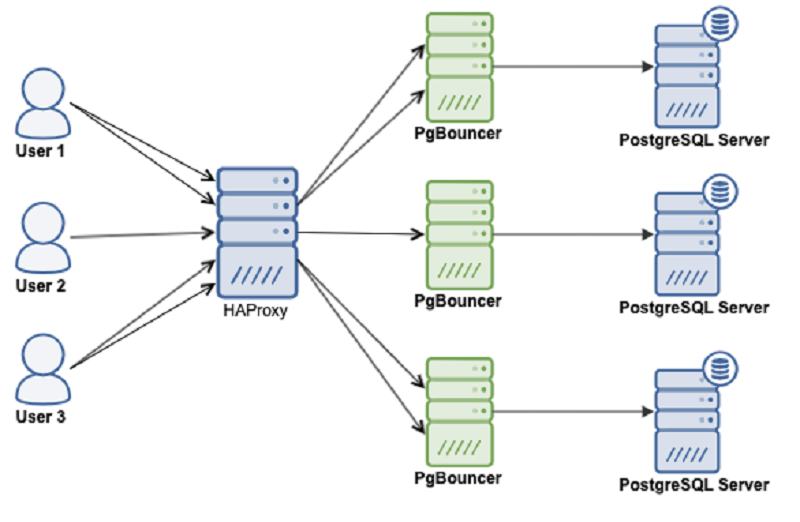
We will use following software components to set up PostgreSQL highly available, fault-tolerant cluster:
- Patroni is a cluster manager used to customize and automate deployment and maintenance of PostgreSQL HA (High Availability) clusters.
- PgBouncer is an open-source, lightweight, single-binary connection pooler for PostgreSQL. PgBouncer maintains a pool of connections for each unique user, database pair. It’s typically configured to hand out one of these connections to a new incoming client connection, and return it back in to the pool when the client disconnects.
- etcd is a strongly consistent, distributed key-value store that provides a reliable way to store data that needs to be accessed by a distributed system or cluster of machines. We will use etcd to store the state of the PostgreSQL cluster.
- HAProxy is a free and open source software that provides a high availability load balancer and reverse proxy for TCP and HTTP-based applications that spreads requests across multiple servers.
- Keepalived implements a set of health checkers to dynamically and adaptively maintain and manage load balanced server pools according to their health. When designing load balanced topologies, it is important to account for the availability of the load balancer itself as well as the real servers behind it.
The main purpose of this guide is to make PostgreSQL highly available, and to avoid any single point of failure.
Prerequisites
To follow this tutorial along, you will need a minimum of 3 (physical or virtual) machines installed with CentOS 7.
HOSTNAME	IP ADDRESS	PACKAGES TO BE INSTALLEDpatroni1	192.168.10.1	PostgreSQL, PgBouncer, Patroni, etcd, haproxy, keepalived
patroni2	192.168.10.2	PostgreSQL, PgBouncer, Patroni, etcd, haproxy, keepalived
patroni3        192.168.10.3    PostgreSQL, PgBouncer, Patroni, etcd, haproxy, keepalived
Set correct timezone on each node:
sudo timedatectl set-timezone Asia/Karachi
Set hostname on each node like below:
sudo hostnamectl set-hostname patroni1Edit /etc/hosts file:
sudo nano /etc/hosts192.168.10.1 patroni1Do not forget to replace highlighted text with yours. Save and close the editor when you are finished.
192.168.10.2 patroni2
192.168.10.3 patroni3
Make sure you repeat the same on each node before proceeding to next.
If you have all the prerequisites in place, you may proceed with the following steps to set up your PostgreSQL HA cluster.
Disable Selinux (Optional)
If
you are familiar with SELINUX, you should
configure it accordingly. If you don't have much expertise, it is
recommended to disable selinux to avoid any difficulty
during your cluster setup.
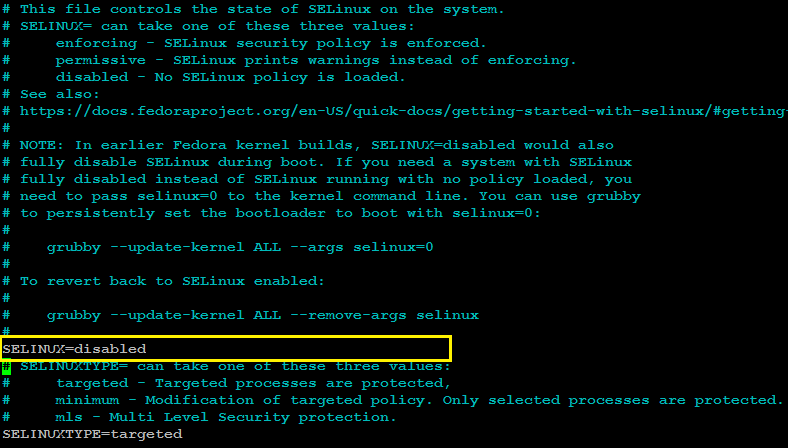
Log in to your each node with a non-root sudo user privileges and edit /etc/selinux/config file with any of your favorite text editor:
sudo nano /etc/selinux/config
SELINUX=disabledSave and close the editor when you are finished.
The /etc/selinux/config will look (after the changes) similar to like as shown in image below:
Make sure you repeat the same on each node before proceeding to next.
Reboot all nodes to make the selinux changes effect:
sudo shutdown -r nowConfigure Firewalld
The ports required for operating PostgreSQL HA cluster using (patroni/pgbouncer/etcd/haproxy) are the following:
- 5432 PostgreSQL standard port.
- 6432 PgBouncer standard port.
- 8008 patroni rest api port required by HAProxy to check the nodes status
- 2379 etcd client port required by any client including patroni to communicate with etcd
- 2380 etcd peer urls port required by the etcd members communication
- 5000 HAProxy frontend listening port, establishing connection to backend database servers via pgbouncer port 6432
- 5001 HAProxy frontend listening port, establishing connection to backend replica database servers via pgbouncer port 6432
- 7000 HAProxy stats dashboard
You can allow required ports from firewalld using the following command:
sudo firewall-cmd --zone=public --add-port=5432/tcp --permanentsudo firewall-cmd --zone=public --add-port=6432/tcp --permanentsudo firewall-cmd --zone=public --add-port=8008/tcp --permanent
sudo firewall-cmd --zone=public --add-port=2379/tcp --permanent
sudo firewall-cmd --zone=public --add-port=2380/tcp --permanent
sudo firewall-cmd --permanent --zone=public --add-service=http
sudo firewall-cmd --zone=public --add-port=5000/tcp --permanentsudo firewall-cmd --zone=public --add-port=5001/tcp --permanentsudo firewall-cmd --zone=public --add-port=7000/tcp --permanent
sudo firewall-cmd --add-rich-rule='rule protocol value="vrrp" accept' --permanent
sudo firewall-cmd --reload
Install Required Repository
Type below command to install extra packages for enterprise Linux repository:
sudo yum -y install epel-release

sudo yum -y install yum-utils
Install PostgreSQL
For this guide, we will install PostgreSQL release 13 like below:
sudo yum -y install https://download.postgresql.org/pub/repos/yum/reporpms/EL-7-x86_64/pgdg-redhat-repo-latest.noarch.rpm

sudo yum-config-manager --enable pgdg12

sudo yum -y install postgresql12-server postgresql12 postgresql12-devel

sudo ln -s /usr/pgsql-12/bin/* /usr/sbin/
Make sure you repeat the same on each node before proceeding to next.
Install etcd
Create etcd.repo file like below:
sudo nano /etc/yum.repos.d/etcd.repo
Add following:
[etcd]
name=PostgreSQL common RPMs for RHEL / Rocky $releasever - $basearch
baseurl=http://ftp.postgresql.org/pub/repos/yum/common/pgdg-rhel7-extras/redhat/rhel-$releasever-$basearch
enabled=1
gpgcheck=1
gpgkey=file:///etc/pki/rpm-gpg/RPM-GPG-KEY-PGDG
repo_gpgcheck = 1Type following command to install etcd:
sudo yum -y install etcdMake sure you repeat the same on each node before proceeding to next.
Configure etcd
Edit /etc/etcd/etcd.conf configuration file on your first node (patroni1) in our case, to make the required changes:
sudo mv /etc/etcd/etcd.conf /etc/etcd/etcd.conf.orig

sudo nano /etc/etcd/etcd.conf
Add following configuration:
ETCD_NAME=patroni1
ETCD_DATA_DIR="/var/lib/etcd/patroni1"
ETCD_LISTEN_PEER_URLS="http://192.168.10.1:2380"
ETCD_LISTEN_CLIENT_URLS="http://0.0.0.0:2379"
ETCD_INITIAL_ADVERTISE_PEER_URLS="http://192.168.10.1:2380"
ETCD_INITIAL_CLUSTER="patroni1=http://192.168.10.1:2380,patroni2=http://192.168.10.2:2380,patroni3=http://192.168.10.3:2380"
ETCD_INITIAL_CLUSTER_STATE="new"
ETCD_INITIAL_CLUSTER_TOKEN="etcd-cluster"
ETCD_ADVERTISE_CLIENT_URLS="http://0.0.0.0:2379"
ETCD_ENABLE_V2="true"
Do not forget to replace highlighted text with yours. Save and close the editor when you are finished.
Edit /etc/etcd/etcd.conf configuration file on your second node (patroni2) in our case, to make the required changes:
sudo mv /etc/etcd/etcd.conf /etc/etcd/etcd.conf.orig

sudo nano /etc/etcd/etcd.conf
Add following configuration:
ETCD_NAME=patroni2
ETCD_DATA_DIR="/var/lib/etcd/patroni2"
ETCD_LISTEN_PEER_URLS="http://192.168.10.2:2380"
ETCD_LISTEN_CLIENT_URLS="http://0.0.0.0:2379"
ETCD_INITIAL_ADVERTISE_PEER_URLS="http://192.168.10.2:2380"
ETCD_INITIAL_CLUSTER="patroni1=http://192.168.10.1:2380,patroni2=http://192.168.10.2:2380,patroni3=http://192.168.10.3:2380"
ETCD_INITIAL_CLUSTER_STATE="new"
ETCD_INITIAL_CLUSTER_TOKEN="etcd-cluster"
ETCD_ADVERTISE_CLIENT_URLS="http://0.0.0.0:2379"
ETCD_ENABLE_V2="true"
Do not forget to replace highlighted text with yours. Save and close the editor when you are finished.
Edit /etc/etcd/etcd.conf configuration file on your third node (patroni3) in our case, to make the required changes:
sudo mv /etc/etcd/etcd.conf /etc/etcd/etcd.conf.orig

sudo nano /etc/etcd/etcd.conf
Add following configuration:
ETCD_NAME=patroni3
ETCD_DATA_DIR="/var/lib/etcd/patroni3"
ETCD_LISTEN_PEER_URLS="http://192.168.10.3:2380"
ETCD_LISTEN_CLIENT_URLS="http://0.0.0.0:2379"
ETCD_INITIAL_ADVERTISE_PEER_URLS="http://192.168.10.3:2380"
ETCD_INITIAL_CLUSTER="patroni1=http://192.168.10.1:2380,patroni2=http://192.168.10.2:2380,patroni3=http://192.168.10.3:2380"
ETCD_INITIAL_CLUSTER_STATE="new"
ETCD_INITIAL_CLUSTER_TOKEN="etcd-cluster"
ETCD_ADVERTISE_CLIENT_URLS="http://0.0.0.0:2379"
ETCD_ENABLE_V2="true"
Do not forget to replace highlighted text with yours. Save and close the editor when you are finished.
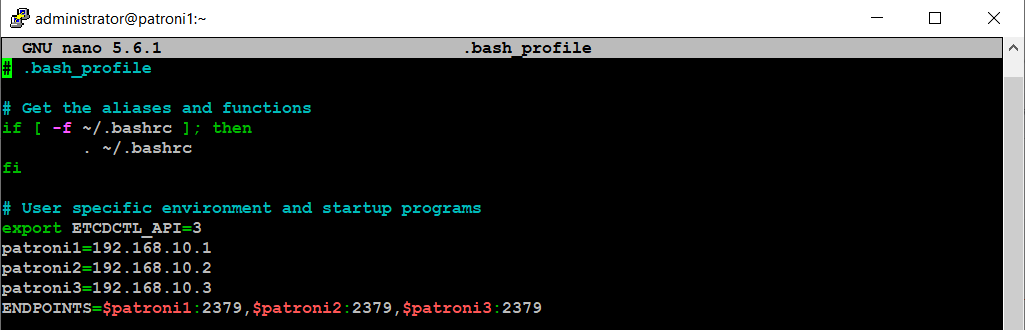
Edit .bash_profile on each node, and set environment variables like below:
cd ~
nano .bash_profile
export PGDATA="/var/lib/pgsql/12/data"
export ETCDCTL_API="3"
export PATRONI_ETCD_URL="http://127.0.0.1:2379"
export PATRONI_SCOPE="pg_cluster"
patroni1=192.168.10.1
patroni2=192.168.10.2
patroni3=192.168.10.3
ENDPOINTS=$patroni1:2379,$patroni2:2379,$patroni3:2379
With the etcd environment variable, .bash_profile will look similar to like as show in image below:
Make sure you repeat the same on each node before proceeding to next.
Type below command simultaneously on each node (patroni1, patroni2, patroni3) to start etcd cluster:
sudo systemctl start etcd
sudo systemctl start etcdCheck etcd cluster from any of your nodes:
source ~/.bash_profile

etcdctl endpoint status --write-out=table --endpoints=$ENDPOINTS
You will see the output similar to like as shown in image below:

Install Patroni
Type below command to install patroni on your first node (patroni1) in our case:
sudo yum -y install python3 python3-devel python3-pip gcc libpq-devel

sudo -H pip3 install --upgrade testresources

sudo -H pip3 install --upgrade setuptools

sudo -H pip3 install psycopg2

sudo yum -y install python3-etcd

sudo yum -y install patroni patroni-etcd watchdog
Make sure you repeat the same on each node before proceeding to next.
Configure Patroni
Create a configuration file for Patroni on your first node (patroni1) in our case, like below:
Edit the patroni.yml file with any of your favorite text editor:sudo mkdir -p /etc/patroni
sudo cp -p /usr/share/doc/patroni/postgres0.yml /etc/patroni/patroni.yml
sudo nano /etc/patroni/patroni.ymlRemove everything from this file, and add the following configuration parameters:
scope: pg_cluster
namespace: /service/
name: patroni1

restapi:
    listen: 192.168.10.1:8008
    connect_address: 192.168.10.1:8008

etcd:
    hosts: 192.168.10.1:2379,192.168.10.2:2379,192.168.10.3:2379

bootstrap:
  dcs:
    ttl: 30
    loop_wait: 10
    retry_timeout: 10
    maximum_lag_on_failover: 1048576
    postgresql:
      use_pg_rewind: true
      use_slots: true
      parameters:

  initdb:
  - encoding: UTF8
  - data-checksums

  pg_hba:
  - host replication replicator 127.0.0.1/32 md5
  - host replication replicator 192.168.10.1/0 md5
  - host replication replicator 192.168.10.2/0 md5
  - host replication replicator 192.168.10.3/0 md5
  - host all all 0.0.0.0/0 md5

  users:
    admin:
      password: admin
      options:
        - createrole
        - createdb

postgresql:
  listen: 192.168.10.1:5432
  connect_address: 192.168.10.1:5432
  data_dir: /var/lib/pgsql/12/data
  bin_dir: /usr/pgsql-12/bin
  pgpass: /tmp/pgpass
  authentication:
    replication:
      username: replicator
      password: replicator
    superuser:
      username: postgres
      password: postgres

watchdog:
  mode: required
  device: /dev/watchdog
  safety_margin: 5

tags:
    nofailover: false
    noloadbalance: false
    clonefrom: false
    nosync: false
Next, edit patroni.yml file on your second node (patroni2) in our case, and add the following configuration parameters:
scope: pg_cluster
namespace: /service/
name: patroni2

restapi:
    listen: 192.168.10.2:8008
    connect_address: 192.168.10.2:8008

etcd:
    hosts: 192.168.10.1:2379,192.168.10.2:2379,192.168.10.3:2379

bootstrap:
  dcs:
    ttl: 30
    loop_wait: 10
    retry_timeout: 10
    maximum_lag_on_failover: 1048576
    postgresql:
      use_pg_rewind: true
      use_slots: true
      parameters:

  initdb:
  - encoding: UTF8
  - data-checksums

  pg_hba:
  - host replication replicator 127.0.0.1/32 md5
  - host replication replicator 192.168.10.1/0 md5
  - host replication replicator 192.168.10.2/0 md5
  - host replication replicator 192.168.10.3/0 md5
  - host all all 0.0.0.0/0 md5

  users:
    admin:
      password: admin
      options:
        - createrole
        - createdb

postgresql:
  listen: 192.168.10.2:5432
  connect_address: 192.168.10.2:5432
  data_dir: /var/lib/pgsql/12/data
  bin_dir: /usr/pgsql-12/bin
  pgpass: /tmp/pgpass
  authentication:
    replication:
      username: replicator
      password: replicator
    superuser:
      username: postgres
      password: postgres

watchdog:
  mode: required
  device: /dev/watchdog
  safety_margin: 5

tags:
    nofailover: false
    noloadbalance: false
    clonefrom: false
    nosync: false
Next, edit patroni.yml file on your third node (patroni3) in our case, and add the following configuration parameters:
scope: pg_cluster
namespace: /service/
name: patroni3

restapi:
    listen: 192.168.10.3:8008
    connect_address: 192.168.10.3:8008

etcd:
    hosts: 192.168.10.1:2379,192.168.10.2:2379,192.168.10.3:2379

bootstrap:
  dcs:
    ttl: 30
    loop_wait: 10
    retry_timeout: 10
    maximum_lag_on_failover: 1048576
    postgresql:
      use_pg_rewind: true
      use_slots: true
      parameters:

  initdb:
  - encoding: UTF8
  - data-checksums

  pg_hba:
  - host replication replicator 127.0.0.1/32 md5
  - host replication replicator 192.168.10.1/0 md5
  - host replication replicator 192.168.10.2/0 md5
  - host replication replicator 192.168.10.3/0 md5
  - host all all 0.0.0.0/0 md5

  users:
    admin:
      password: admin
      options:
        - createrole
        - createdb

postgresql:
  listen: 192.168.10.3:5432
  connect_address: 192.168.10.3:5432
  data_dir: /var/lib/pgsql/12/data
  bin_dir: /usr/pgsql-12/bin
  pgpass: /tmp/pgpass
  authentication:
    replication:
      username: replicator
      password: replicator
    superuser:
      username: postgres
      password: postgres

watchdog:
  mode: required
  device: /dev/watchdog
  safety_margin: 5

tags:
    nofailover: false
    noloadbalance: false
    clonefrom: false
    nosync: false
Enable Watchdog
Patroni configuration will try to use /dev/watchdog on Linux if it is accessible to Patroni. For most use cases using software watchdog built into the Linux kernel is secure enough.
Edit /etc/watchdog.conf to enable software watchdog:
Edit /etc/watchdog.conf to enable software watchdog:
sudo nano /etc/watchdog.conf
Uncomment following line:
watchdog-device = /dev/watchdog
Save and close the editor when you are finished.
Execute following commands to activate watchdog:
sudo mknod /dev/watchdog c 10 130

sudo modprobe softdog

sudo chown postgres /dev/watchdog
Start Patroni Cluster
Type below command on your first node (patroni1) to start your patroni cluster:
sudo systemctl start patroni
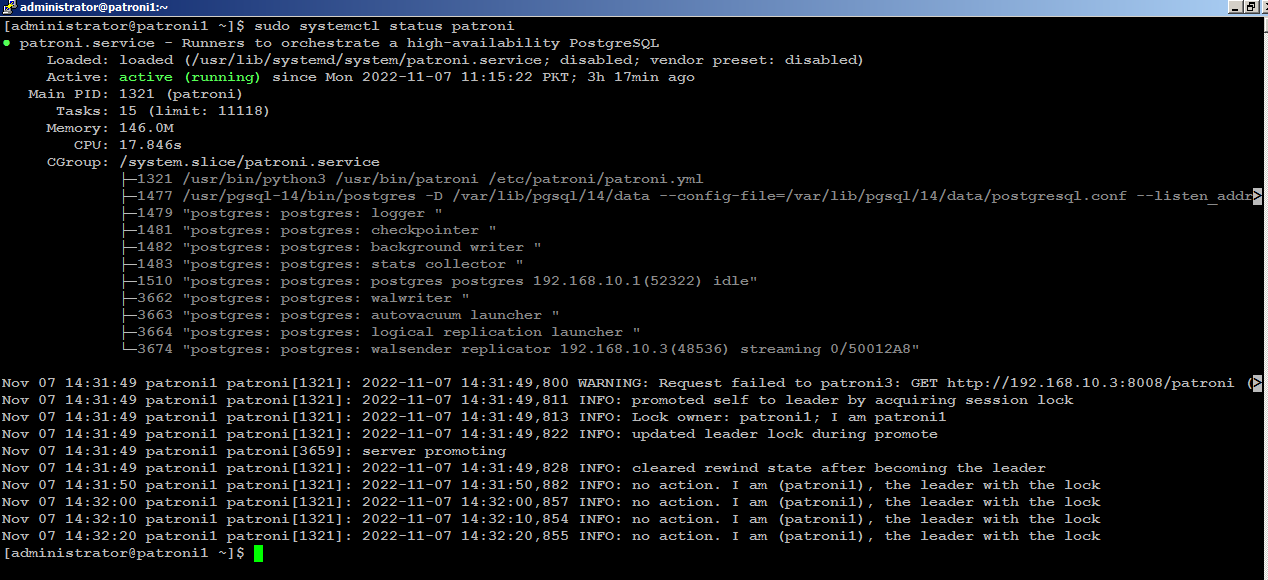
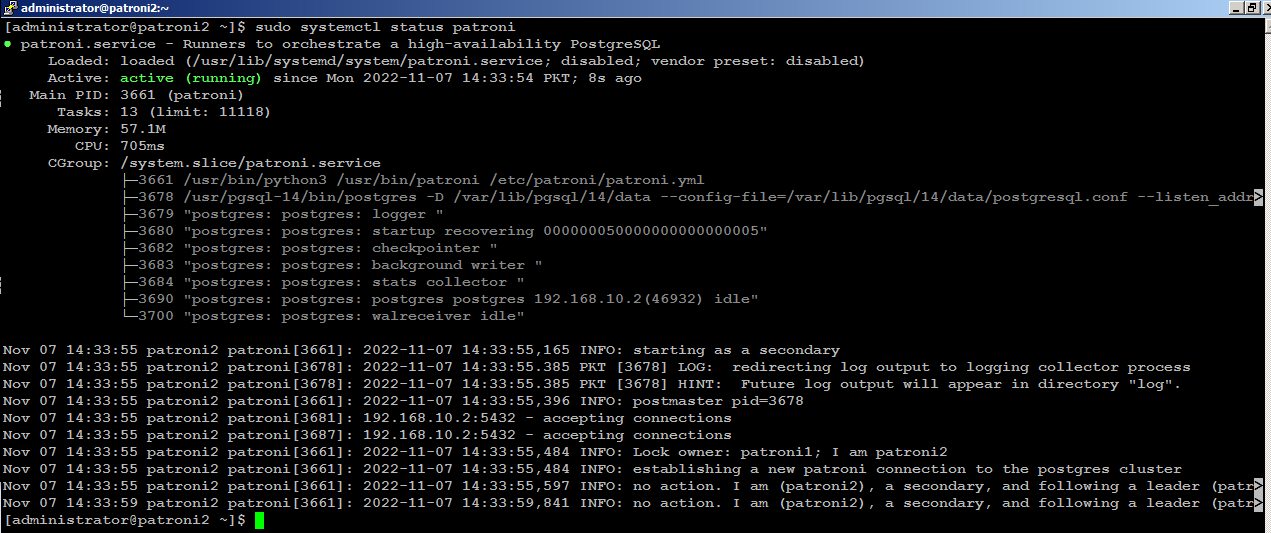
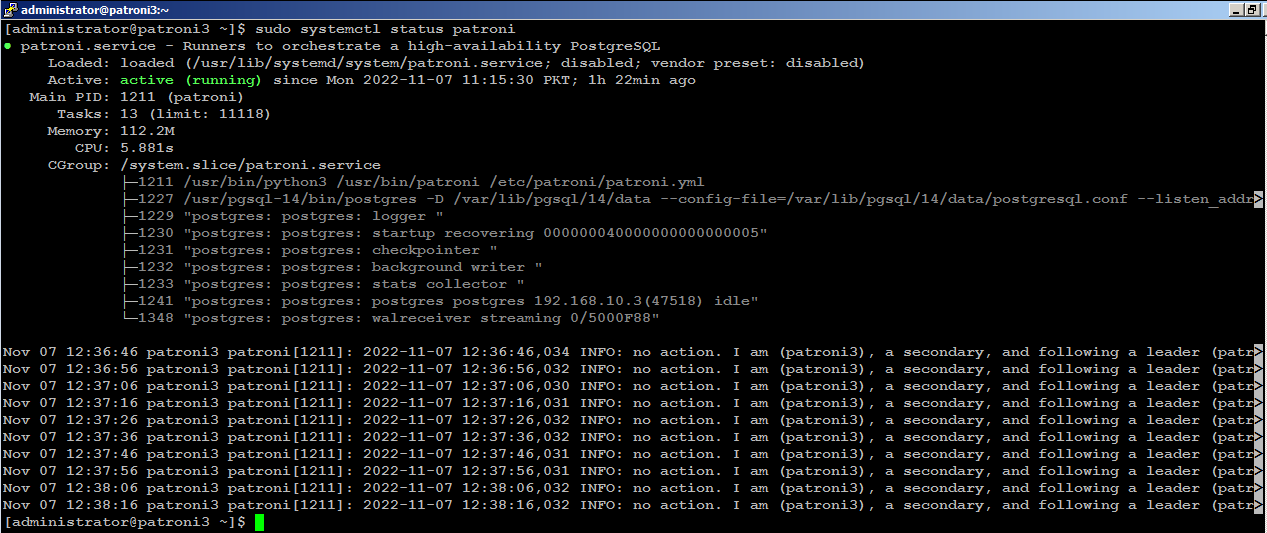
Check the patroni status with below command:
sudo systemctl status patroniIf you look carefully at the bottom of the patroni status output, you will see that the (patroni1) is acting as leader node in the cluster:
Next, start patroni on subsequent nodes, (patroni2) for example, you will see (patroni2) is acting as secondary node in the cluster:
Install PgBouncer
Type below command on your first node (patroni1) in our case to install PgBouncer:
sudo yum -y install pgbouncerMake sure you repeat the same on each node before proceeding to next.
Configure PgBouncer
Edit /etc/pgbouncer/pgbouncer.ini file on your first node (patroni1) in our case, to make the required changes:
sudo cp -p /etc/pgbouncer/pgbouncer.ini /etc/pgbouncer/pgbouncer.ini.origAdd your database in [databases] section like below:
sudo nano /etc/pgbouncer/pgbouncer.ini
and change listen_addr=localhost to listen_addr=** = host=192.168.10.1 port=5432 dbname=postgres
listen_addr = *Since clients connect to pgbouncer, it will have to be able to authenticate them. For that, we need to create a userlist.txt file in the pgbouncer configuration directory. This userlist.txt file contains the database users and their encrypted passwords.
You can write the file by hand using the information from the pg_shadow catalog table, or you can create it automatically like below:
You can write the file by hand using the information from the pg_shadow catalog table, or you can create it automatically like below:
sudo su

psql -Atq -h patroni1 -p 5432 -U postgres -d postgres -c "SELECT concat('\"', usename, '\" \"', passwd, '\"') FROM pg_shadow" >> /etc/pgbouncer/userlist.txt

exit
All the database username, and their encrypted password will be stored in /etc/pgbouncer/userlist.txt file.

This method is useful if the number of database users is small and passwords don’t change frequently. The disadvantage is whenever new user is added to PostgreSQL, the user’s username and password has to be added to userlist.txt.
Make sure you repeat the same on each node before proceeding to next.
Type below command to start PgBouncer on each node:
sudo systemctl start pgbouncerInstall Keepalived
Type below command on your first node (patroni1) in our case, to install keepalived:
sudo yum -y install keepalived
Configure Keepalived
We
will create a floating IP (192.168.10.200) to share across the nodes.
For example, if primary node (HAProxy) goes down, keepalived will
automatically configure shared IP to secondary available node in order
to keep the connectivity available and
to avoid any single point of failure.
Edit the /etc/sysctl.conf file to allow the server to bind to the virtual IP address.
sudo nano /etc/sysctl.conf
Add the net.ipv4_ip_nonlocal_bind=1
directive, which allows the server to accept connections for IP
addresses that are not bound to any of its interfaces, enabling the use
of a floating, virtual IP:
net.ipv4.ip_nonlocal_bind = 1Save and close the editor when you are finished.
net.ipv4.ip_forward = 1
Type the following command to reload settings from config file without rebooting:
sudo sysctl --system
sudo sysctl -p
Make sure you repeat the same on each node before proceeding to next.
Create /etc/keepalived/keepalived.conf file on your first node (patroni1) in our case, to make the required changes:
sudo nano /etc/keepalived/keepalived.conf
Add following configuration:
vrrp_script chk_haproxy {
        script "pkill -0 haproxy"
        interval 5
        weight -4
        fall 2
        rise 1
}

vrrp_script chk_lb {
        script "pkill -0 keepalived"
        interval 1
        weight 6
        fall 2
        rise 1
}

vrrp_script chk_servers {
        script "echo 'GET /are-you-ok' | nc 127.0.0.1 7000 | grep -q '200 OK'"
        interval 2
        weight 2
        fall 2
        rise 2
}

vrrp_instance vrrp_1 {
        interface enp0s3
        state MASTER
        virtual_router_id 51
        priority 101
        virtual_ipaddress_excluded {
                192.168.10.200
        }
        track_interface {
                enp0s3 weight -2
        }
        track_script {
                chk_haproxy
                chk_lb
        }
}
Do not forget to replace the highlighted text with yours. Save and close the editor when you are finished. sudo nano /etc/keepalived/keepalived.conf
Add following configuration:
vrrp_script chk_haproxy {
        script "pkill -0 haproxy"
        interval 5
        weight -4
        fall 2
        rise 1
}

vrrp_script chk_lb {
        script "pkill -0 keepalived"
        interval 1
        weight 6
        fall 2
        rise 1
}

vrrp_script chk_servers {
        script "echo 'GET /are-you-ok' | nc 127.0.0.1 7000 | grep -q '200 OK'"
        interval 2
        weight 2
        fall 2
        rise 2
}

vrrp_instance vrrp_1 {
        interface enp0s3
        state BACKUP
        virtual_router_id 51
        priority 100
        virtual_ipaddress_excluded {
                192.168.10.200
        }
        track_interface {
                enp0s3 weight -2
        }
        track_script {
                chk_haproxy
                chk_lb
        }
}
Do not forget to replace the highlighted text with yours. Save and close the editor when you are finished.sudo nano /etc/keepalived/keepalived.conf
Add following configuration:
vrrp_script chk_haproxy {
        script "pkill -0 haproxy"
        interval 5
        weight -4
        fall 2
        rise 1
}

vrrp_script chk_lb {
        script "pkill -0 keepalived"
        interval 1
        weight 6
        fall 2
        rise 1
}

vrrp_script chk_servers {
        script "echo 'GET /are-you-ok' | nc 127.0.0.1 7000 | grep -q '200 OK'"
        interval 2
        weight 2
        fall 2
        rise 2
}

vrrp_instance vrrp_1 {
        interface enp0s3
        state BACKUP
        virtual_router_id 51
        priority 99
        virtual_ipaddress_excluded {
                192.168.10.200
        }
        track_interface {
                enp0s3 weight -2
        }
        track_script {
                chk_haproxy
                chk_lb
        }
}
Do not forget to replace the highlighted text with yours. Save and close the editor when you are finished.sudo systemctl start keepalivedCheck on your (MASTER) node to see if your (enp0s3) network interface has configured with an additional shared IP (192.168.10.200):
ip addr show enp0s3You will see the output similar to like below:
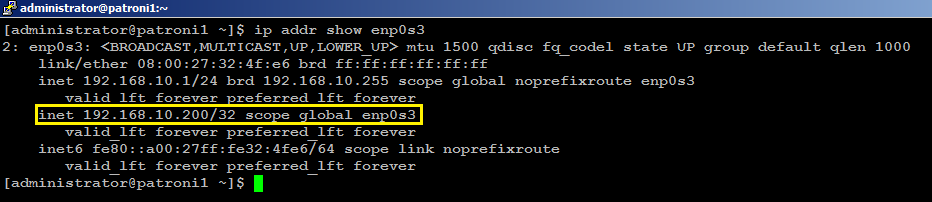
With this configuration, if haproxy goes down on your MASTER node, keepalived will automatically failover to BACKUP node, and connectivity will remain available to your clients.
Install HAProxy
With
patroni, you need a method to connect to the leader
node regardless of which of the node in the cluster is the leader.
HAProxy forwards the connection to whichever node is currently the
leader. It does this using a REST endpoint that Patroni provides.
Patroni ensures that, at any given time, only the leader node will
appear as online, forcing HAProxy to connect to the correct node. Users
or applications, (psql) for
example, will connect to haproxy, and haproxy will make sure connecting
to the leader node in the cluster.
Type below command to install haproxy on your first node (patroni1) in our case:
sudo yum -y install haproxy
Make sure you repeat the same on each node before proceeding to next.
Configure HAProxy
Edit haproxy.cfg file on your first node (patroni1) in our case, to make required changes:
sudo mv /etc/haproxy/haproxy.cfg /etc/haproxy/haproxy.cfg.orig

sudo nano /etc/haproxy/haproxy.cfg
Add following configuration:
global
    log         127.0.0.1 local2
    chroot      /var/lib/haproxy
    pidfile     /var/run/haproxy.pid
    maxconn     1000
    user        haproxy
    group       haproxy
    daemon
    stats socket /var/lib/haproxy/stats

defaults
    mode                    tcp
    log                     global
    option                  tcplog
    retries                 3
    timeout queue           1m
    timeout connect         10s
    timeout client          1m
    timeout server          1m
    timeout check           10s
    maxconn                 900

listen stats
    mode http
    bind *:7000
    stats enable
    stats uri /

listen primary
    bind 192.168.10.200:5000
    option httpchk OPTIONS /master
    http-check expect status 200
    default-server inter 3s fall 3 rise 2 on-marked-down shutdown-sessions
    server patroni1 192.168.10.1:6432 maxconn 100 check port 8008
    server patroni2 192.168.10.2:6432 maxconn 100 check port 8008
    server patroni3 192.168.10.3:6432 maxconn 100 check port 8008

listen standby
    bind 192.168.10.200:5001
    balance roundrobin
    option httpchk OPTIONS /replica
    http-check expect status 200
    default-server inter 3s fall 3 rise 2 on-marked-down shutdown-sessions
    server patroni1 192.168.10.1:6432 maxconn 100 check port 8008
    server patroni2 192.168.10.2:6432 maxconn 100 check port 8008
    server patroni3 192.168.10.3:6432 maxconn 100 check port 8008
Make sure you replace the highlighted text with yours. Save and close the editor when you are finished.
There are two sections in haproxy configuration: one is primary, using port 5000, and other is standby, using port 5001.
All three nodes are included in both sections: that is because all the nodes are potential candidates to be either primary or secondary. Patroni provides a built-in REST API support for health check monitoring that works perfectly with HAproxy. HAProxy will send an HTTP request to port 8008 of patroni to know which role each node currently has.
All three nodes are included in both sections: that is because all the nodes are potential candidates to be either primary or secondary. Patroni provides a built-in REST API support for health check monitoring that works perfectly with HAproxy. HAProxy will send an HTTP request to port 8008 of patroni to know which role each node currently has.
The
haproxy configuration will remain same on each node so make sure you
repeat the same on your remaining nodes before proceeding to next.
Type below command to start HAProxy on each node:
sudo systemctl start haproxy
Check HAProxy status:
sudo systemctl status haproxyYou can manually test keepalived failover scenario by killing haproxy on your MASTER node with sudo systemctl stop haproxy command, and within few seconds of delay 192.168.10.200 will automatically be configured on your BACKUP node.
Test Patroni Cluster
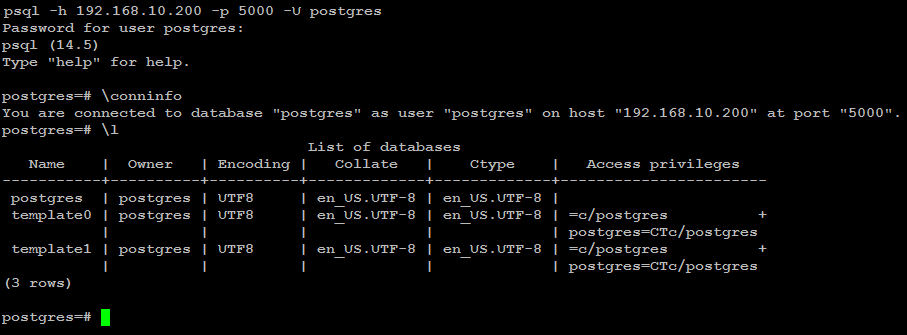
You can test your Patroni cluster by initiating a connection request from any of your applications (psql) for example to your (shared_ip:port), and see if this successfully establish connection back to the database leader node in the cluster.psql -h 192.168.10.200 -p 5000 -U postgresAs you can see in the image below, the (psql) successfully connected to database via haproxy using shared ip:
Execute two read-request to verify HAProxy round-robin mechanism is working as expected:
psql -h 192.168.10.200 -p 5001 -U postgres -t -c "select inet_server_addr()"
Execute the same read-request second time:
psql -h 192.168.10.200 -p 5001 -U postgres -t -c "select inet_server_addr()"
You can test write-request by executing same command but using port 5000:
psql -h 192.168.10.200 -p 5000 -U postgres -t -c "select inet_server_addr()"

As you can see, in the primary section (patroni1) row is highlighted in green. This indicates that 192.168.10.1 is currently a leader node in the cluster.
In the standby section, the (patroni2, patroni3) row is highlighted as green. This indicates that both nodes are replica node in the cluster.
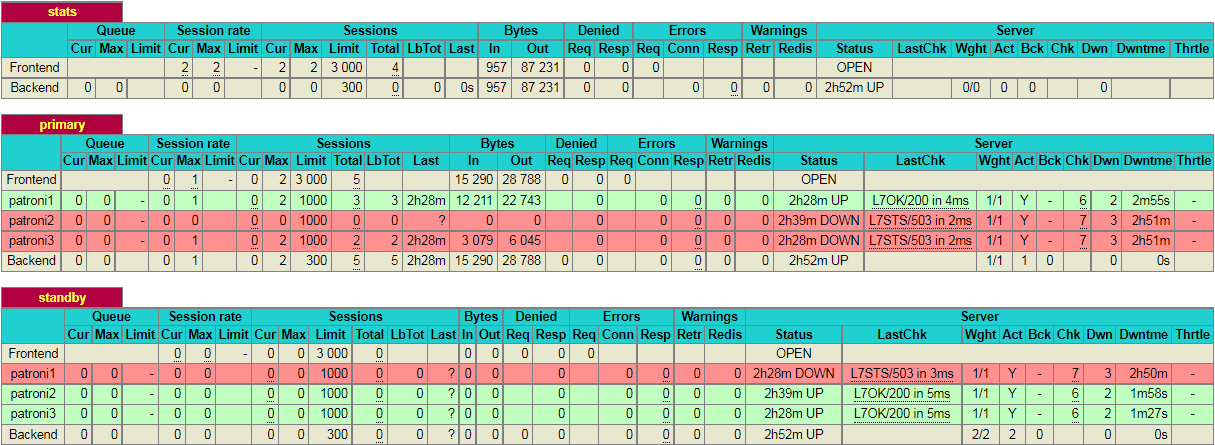
If you kill the leader node using (sudo systemctl stop patroni) or by completely shutting down the server, the dashboard will look similar to like below:
As you can see, in the primary section (patroni2) row is now highlighted in green. This indicates that 192.168.10.2 is currently a leader node in the cluster.
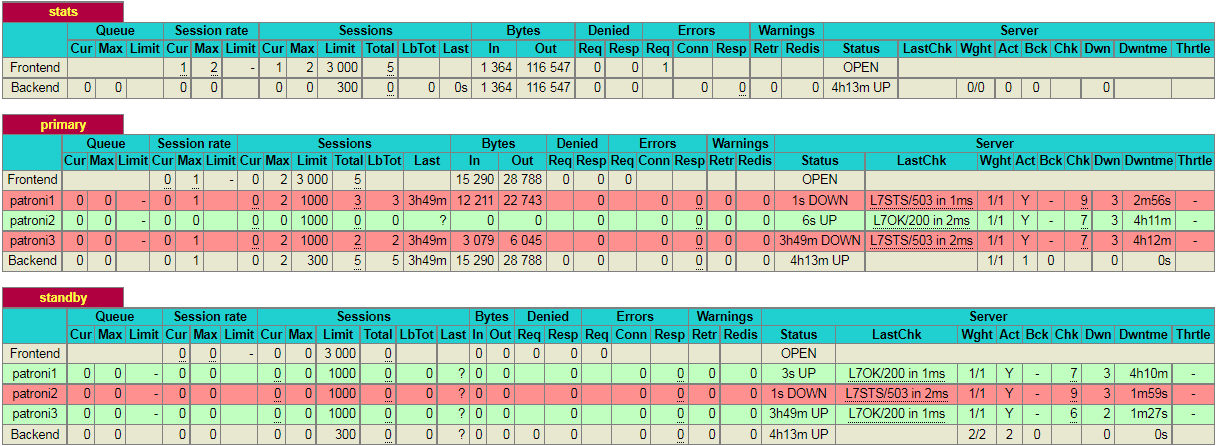
Please note that, in this particular scenario, it just so happens that the second node in the cluster is promoted to leader. This might not always be the case and it is equally likely that the 3rd node may be promoted to leader.
Test Database Replication
We will create a test database to see if it is replicated to other nodes in the cluster. For this guide, we will use (psql) to connect to database via haproxy like below:
psql -h 192.168.10.200 -p 5000 -U postgrescreate database testdb;
create user testuser with encrypted password 'mystrongpass';
grant all privileges on database testdb to testuser;
\qStop patroni on leader node (patroni1) in our case with below command:
sudo systemctl stop patronipsql -h 192.168.10.200 -p 5000 testuser -d testdb
Now bring up your first node with (sudo systemctl start patroni), and it will automatically rejoin the cluster as secondary and automatically synchronize with the leader.
Patroni Cluster Failover
With
patronictl, you can administer, manage and troubleshoot your PostgreSQL cluster. Type below command to list the options and commands you can use
with patronictl:
sudo patronictl --helpThis will show you the options and commands you can use with patronictl.
Options:
  -c, --config-file TEXT  Configuration file
  -d, --dcs TEXT          Use this DCS
  -k, --insecure          Allow connections to SSL sites without certs
  --help                  Show this message and exit.

Commands:
  configure    Create configuration file
  dsn          Generate a dsn for the provided member, defaults to a dsn of...
  edit-config  Edit cluster configuration
  failover     Failover to a replica
  flush        Discard scheduled events (restarts only currently)
  history      Show the history of failovers/switchovers
  list         List the Patroni members for a given Patroni
  pause        Disable auto failover
  query        Query a Patroni PostgreSQL member
  reinit       Reinitialize cluster member
  reload       Reload cluster member configuration
  remove       Remove cluster from DCS
  restart      Restart cluster member
  resume       Resume auto failover
  scaffold     Create a structure for the cluster in DCS
  show-config  Show cluster configuration
  switchover   Switchover to a replica
  version      Output version of patronictl command or a running Patroni
Check patroni member nodes:
patronictl -c /etc/patroni/patroni.yml list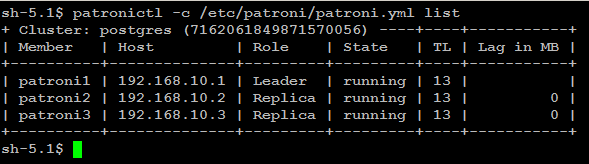
Check failover/switchover history:
patronictl -c /etc/patroni/patroni.yml history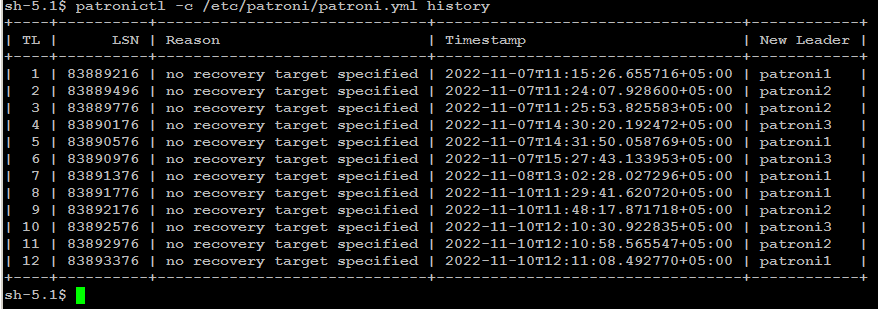
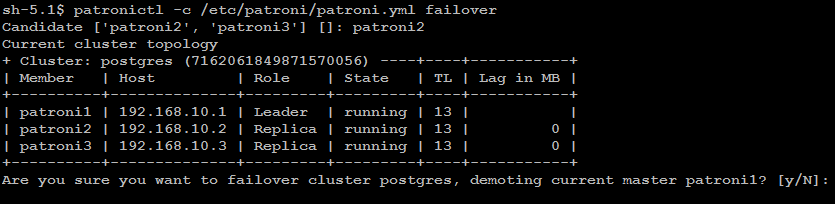
Remember: failover is executed automatically, when the Leader node is getting
unavailable for unplanned reason. If you wish to test failover across
the nodes in the cluster, you can manually initiate failover to a
replica node with below command:
patronictl -c/etc/patroni/patroni.ymlfailover
In some cases it is necessary to perform maintenance task on a single
node such as applying patches or release updates. When you manually
disable auto failover, patroni won’t change the state of the
PostgreSQL cluster.
You can disable auto failover with below command:
patronictl -c /etc/patroni/patroni.yml pausePatroni Cluster Switchover
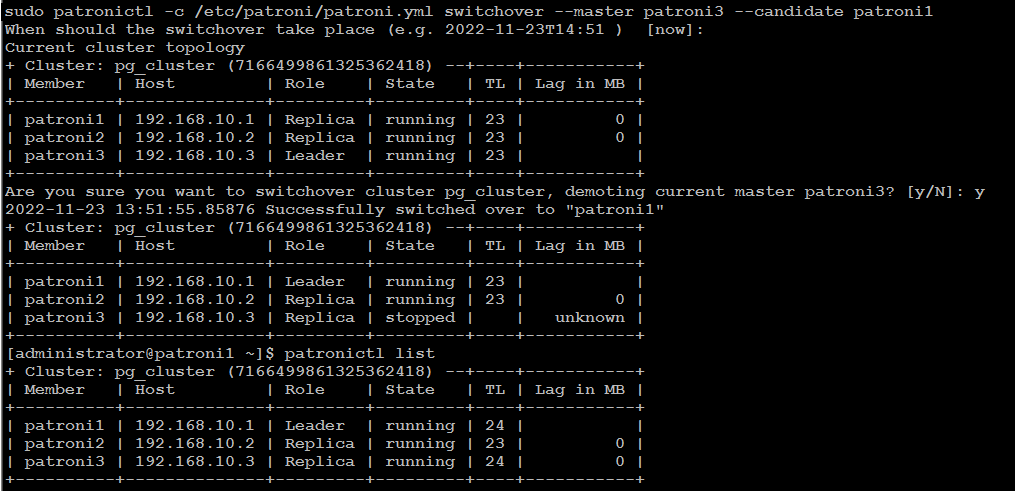
There
are two possibilities to run a switchover, either in scheduled mode or
immediately. At the given time, the switchover will take place, and you
will see in the logfile an entry of switchover activity.
patronictl -c /etc/patroni/patroni.yml switchover --master your_leader_node --candidate your_replica_nodeIf you go with [now] option, switchover will take place immediately.
Simulate Patroni Cluster Failure Scenarios
To simulate failure scenarios in production environment, we will execute continuous reads and writes to the database using a simple Python script as we are interested in observing the state of the cluster upon a server failure.You should have a Linux workstation with PostgreSQL client, and PostgreSQL driver for Python installed:
sudo yum -y install postgresql python3-psycopg2
Download HAtester.py script on your Linux workstation:
cd ~

curl -LO https://raw.githubusercontent.com/jobinau/pgscripts/main/patroni/HAtester.py

chmod +x HAtester.py
Edit HAtester.py and replace database credentials with yours:
nano HAtester.pyReplace following credentials with yours:
host = "192.168.10.200"
dbname = "postgres"
user = "postgres"
password = "your_postgres_user_password"
You need to create a target table "HATEST" in your database before executing HAtester.py script:
psql -h 192.168.10.200 -p 5000 -U postgres -c "CREATE TABLE HATEST (TM TIMESTAMP);"

psql -h 192.168.10.200 -p 5000 -U postgres -c "CREATE UNIQUE INDEX idx_hatext ON hatest (tm desc);"
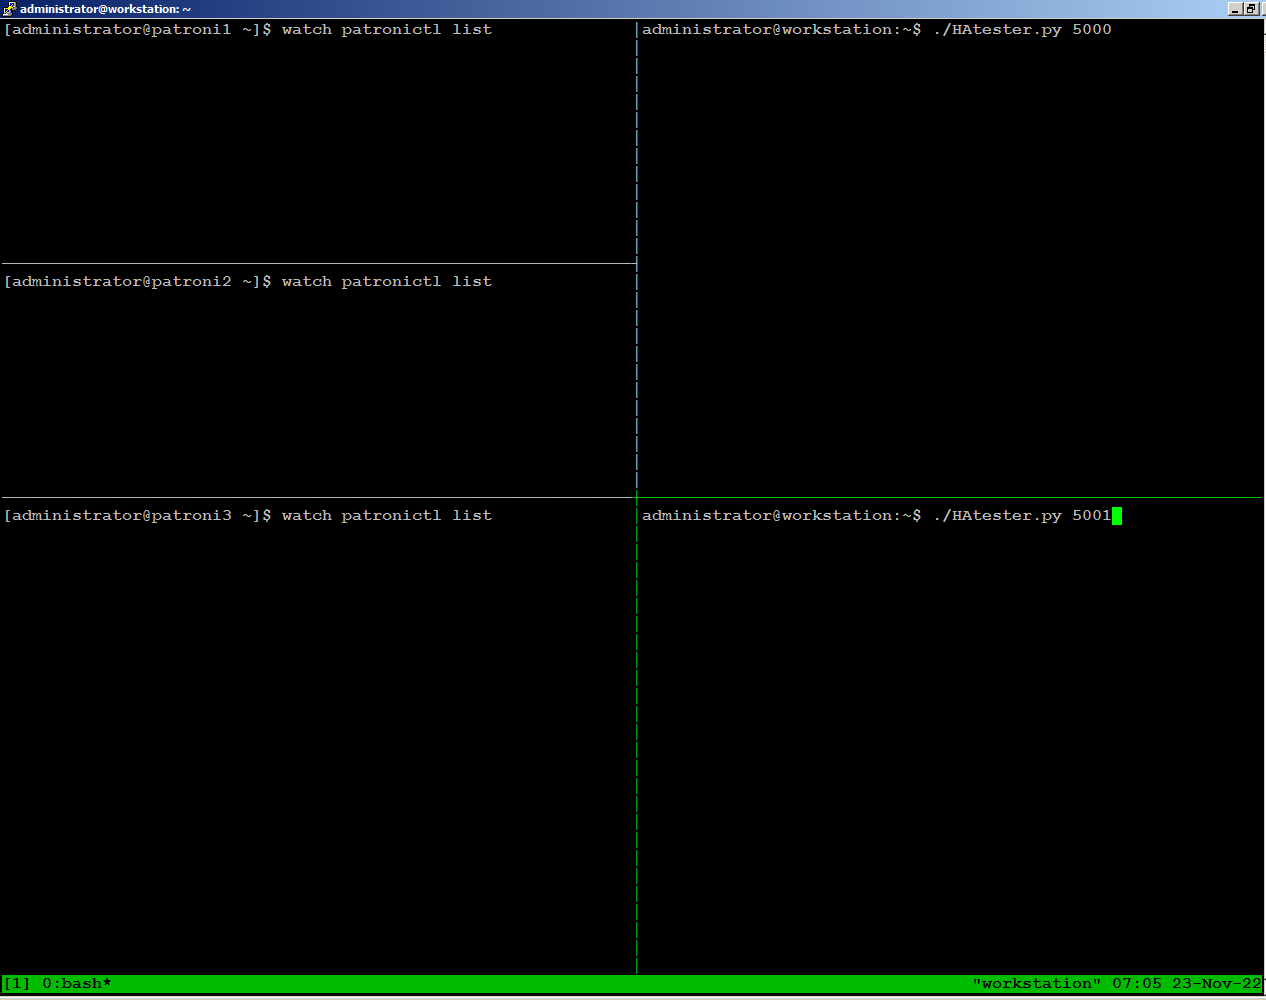
On
the left side of the screen, we have one ssh session open for each of
the 3 nodes, continuously monitoring patroni cluster state:
On the right side of the screen, we are running the HAtester.py script sending writes through port 5000, and reads through port 5001 from our workstation:
On the right side of the screen, we are running the HAtester.py script sending writes through port 5000, and reads through port 5001 from our workstation:
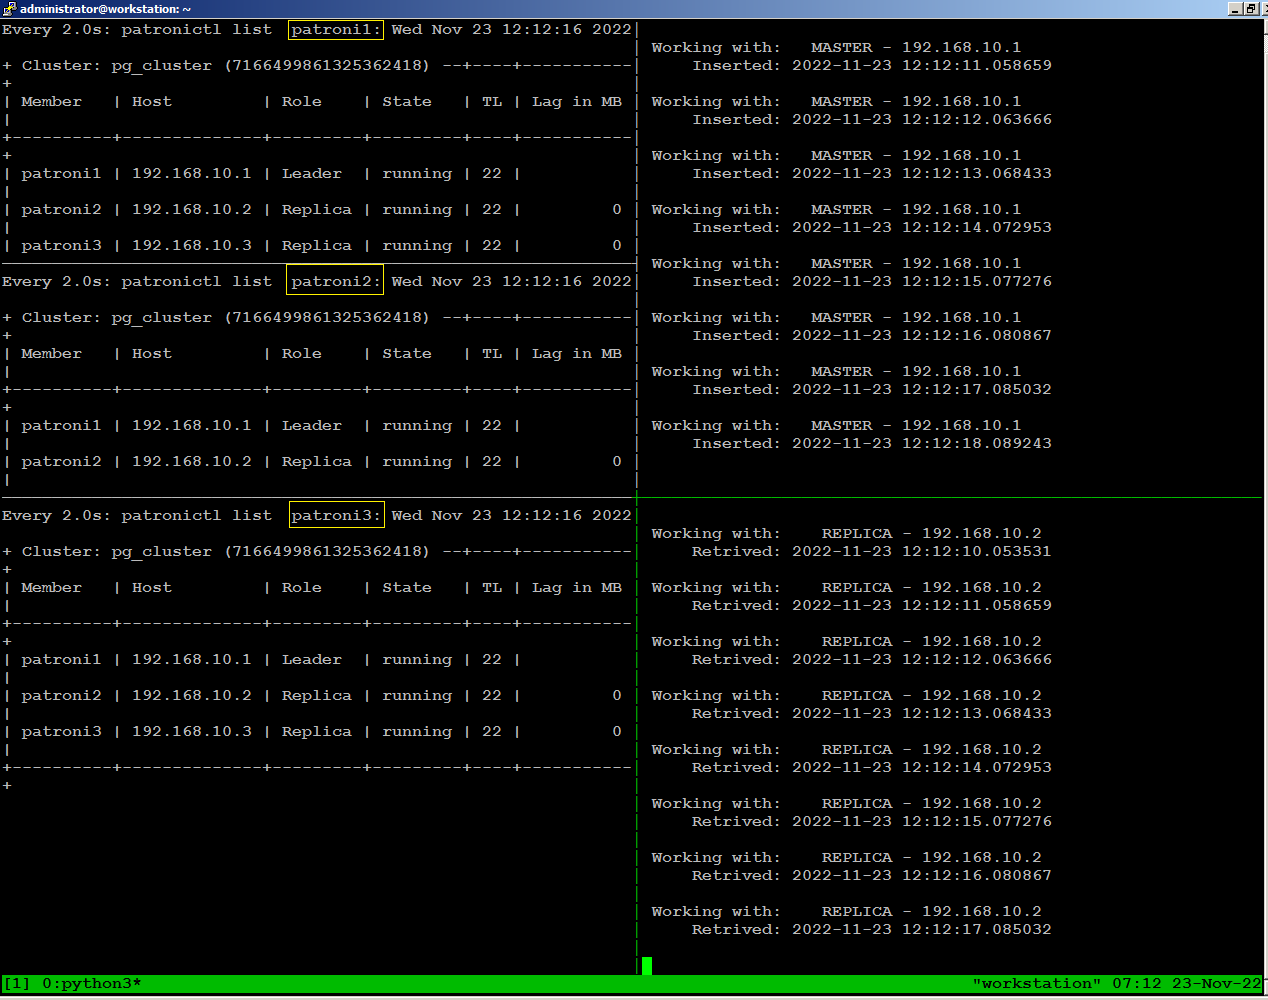
To
observe what happens with database traffic when the environment
experiences a failure, we will manually stop patroni on our leader node
using the following command:
sudo systemctl stop patroniWhen we stopped patroni on leader node, within few seconds a replica
node become leader, and continues writing to the database stopped for
few seconds, then reconnected automatically.
There is no disconnection
happens to continues reading to the database because replica node was
available throughout.
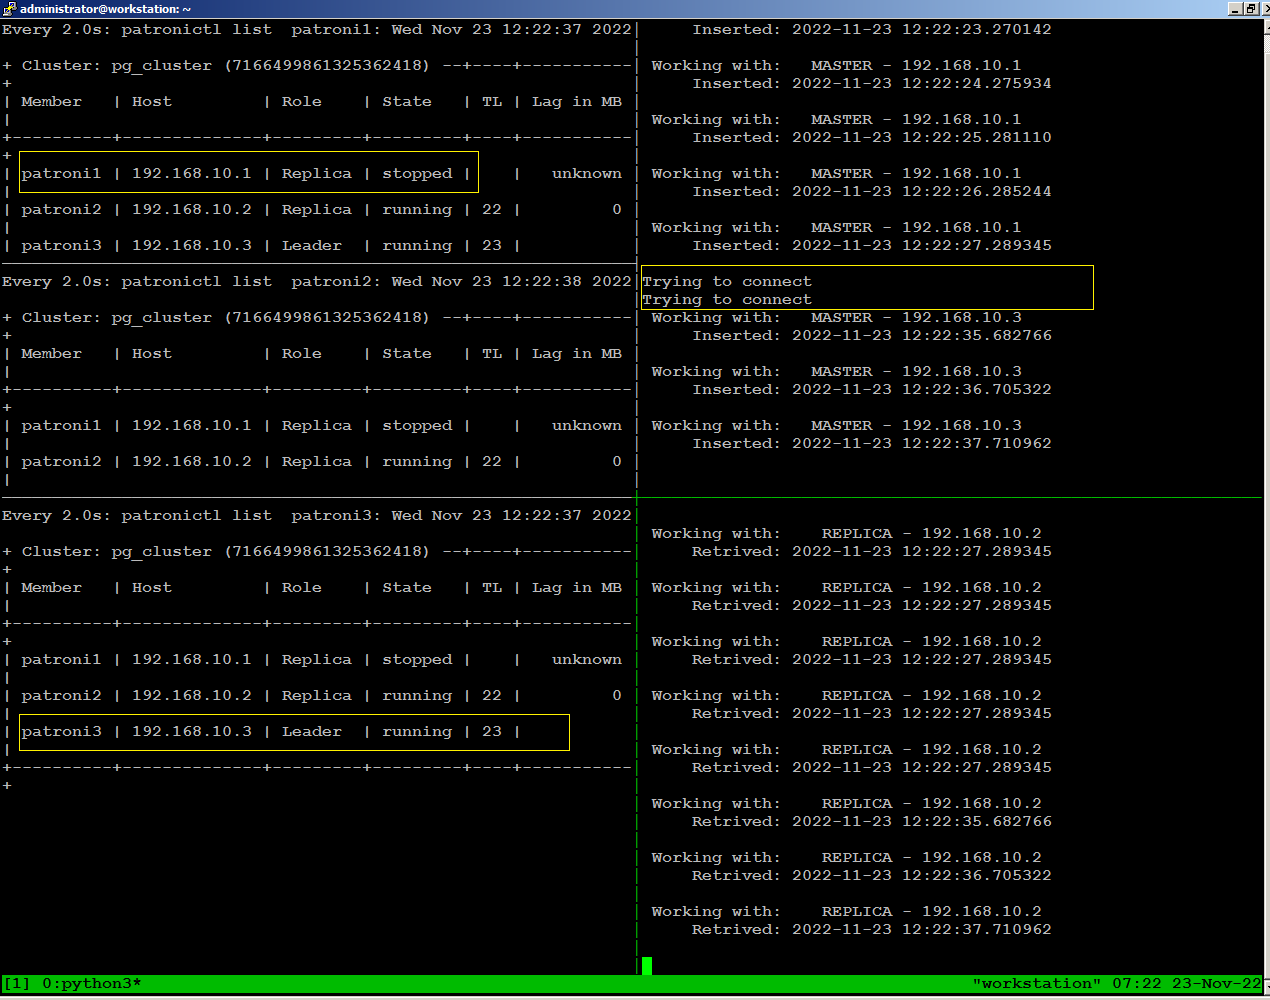
sudo systemctl start patroniThe node has automatically rejoined the cluster as replica:

Test Environment Failure Scenarios
We
leave it up to you to test and experiment with your patroni cluster to
see what happens when environment experiences a failure such as:
When simulating these tests, you should continuously monitor how the patroni cluster re-adjusts itself and how it affects read and write traffic for each failure scenario.
- Loss of network connectivity
- Power breakdown
When simulating these tests, you should continuously monitor how the patroni cluster re-adjusts itself and how it affects read and write traffic for each failure scenario.
Conclusion
I hope this guide was helpful to set up a highly available PostgreSQL release 12 cluster on CentOS 7 for your production use.
In your configuration
ReplyDeletepatronictl -c /opt/app/etc/postgres.yml show-config does not work
Error: 'Can not find suitable configuration of distributed configuration store\nAvailable implementations: exhibitor, zookeeper, etcd, kubernetes, consul'
Your path for postgres.yml file is not correct...the correct path to show the configuration is:
Deletepatronictl -c /opt/app/patroni/etc/postgresql.yml show-config
Hi, In which node I should create database and which IP should I include in my application as DB IP
ReplyDeleteIn this guide node1 and node2 will run postgresql so you can create database on any of them and it will automatically sync to remaining node....at client end, you will configure HAProxy IP and HAProxy will make the connection back to any of the database node whichever is holding master role.
DeleteThanks for your quick response. I am also little bit confused in this part " You need to copy /opt/app/patroni/etc/postgresql.yml.sample file on (node1) with below command:" Do I need to do the same on node 2?
DeleteOf course you need do the same on node2. If you have more than two nodes in your setup for example, then you will need to do the same on all of the nodes.
DeleteActually, I wasn't clearly mentioned on the document that's why I got confused. BTW thanks for the nice tutorial.
DeleteHi, facing some issues. http://158.101.228.3:7000/ servers are down shows in the haproxy. Also, postgresq service also not starting in the dbnode1 and dbnode2.
ReplyDeletehaproxy shows server down. Any guess what might cause this?
ReplyDeletepsql: error: could not connect to server: could not connect to server: No such file or directory
ReplyDeleteIs the server running locally and accepting
connections on Unix domain socket "/var/run/postgresql/.s.PGSQL.5432"?
Hi,
ReplyDeleteI have this problem, i don't have idea. :S
[root@patroni-1 ~]# systemctl status patroni -l
● patroni.service - PostgreSQL high-availability manager
Loaded: loaded (/usr/lib/systemd/system/patroni.service; disabled; vendor preset: disabled)
Active: failed (Result: exit-code) since mié 2020-09-23 08:29:51 -05; 21min ago
Process: 1258 ExecStart=/opt/app/patroni/bin/patroni ${PATRONI_CONFIG_LOCATION} (code=exited, status=1/FAILURE)
Main PID: 1258 (code=exited, status=1/FAILURE)
sep 23 08:29:51 patroni-1 patroni[1258]: File "/opt/app/patroni/lib/python3.6/site-packages/patroni/ha.py", line 1260, in _run_cycle
sep 23 08:29:51 patroni-1 patroni[1258]: return self.post_bootstrap()
sep 23 08:29:51 patroni-1 patroni[1258]: File "/opt/app/patroni/lib/python3.6/site-packages/patroni/ha.py", line 1156, in post_bootstrap
sep 23 08:29:51 patroni-1 patroni[1258]: self.cancel_initialization()
sep 23 08:29:51 patroni-1 patroni[1258]: File "/opt/app/patroni/lib/python3.6/site-packages/patroni/ha.py", line 1151, in cancel_initialization
sep 23 08:29:51 patroni-1 patroni[1258]: raise PatroniException('Failed to bootstrap cluster')
sep 23 08:29:51 patroni-1 patroni[1258]: patroni.exceptions.PatroniException: 'Failed to bootstrap cluster'
sep 23 08:29:51 patroni-1 systemd[1]: patroni.service: main process exited, code=exited, status=1/FAILURE
sep 23 08:29:51 patroni-1 systemd[1]: Unit patroni.service entered failed state.
sep 23 08:29:51 patroni-1 systemd[1]: patroni.service failed.
Please post your postgresql.yml file content here...there must be something you messed-up.
DeleteHi, I have solved that problem cluster is running now. But facing another issue using HAproxy developer from remote machine unable to connect the database. I have opened 5432 port for his IP from the firewall. What else I can do to fix it?
ReplyDeleteFrom a remote machine you have to make connection to database via haproxy ip and its listen port you defined in haproxy.cfg file. For example in this guide, listen port is 5000 so making connection to database via haproxy_ip:5000 should work.
DeleteYou can test your connection to database from haproxy machine like below:
Deletepsql -h localhost -U postgres -p 5000
OR
psql -h your_haproxy_ip -U postgres -p 5000
and the haproxy will automatically make the connection to the backend database server.
Thanks it works. But I am facing a little problem, it disconnects automatically. Did you face it?
DeleteLittle bit more detail...automatically disconnects idle session or what? Note down the time from making connection and automatically disconnection...Post here
DeleteI used haproxyip:5000 in my javaapp as db connection and after starting tomcat service getting this message: HTTP Status 404 – Not Found "The origin server did not find a current representation for the target resource or is not willing to disclose that one exists"
DeleteFrom catalina out I am getting 24-Sep-2020 13:07:07.777 SEVERE [main] org.apache.catalina.core.StandardServer.await Failed to create server shutdown socket on address [localhost] and port [8005] (base port [8005] and offset [0])
java.net.BindException: Address already in use (Bind failed)
For heaven sack man...do some little research using google on your own....pay attention to error msg.
DeleteAddress already in use (Bind failed)
Thanks Anwar. I have fixed the issue on my own. Thanks for nice documentation.
ReplyDeleteHi, I am facing this problem in one dbnode "failed to start postgres"
ReplyDeletehow to check status postgresql-12 in patroni
ReplyDeletehow to check status postgresql-12 in patroni?
DeleteHello,
ReplyDeleteafter several restarts for testing data is not being sync from server 1 to server 2 knowing that patroni is running on both servers
How many nodes do you have in your cluster setup? If your cluster has only two nodes (server1, server2), synchronization will fail. Patroni cluster must have at least 3 nodes. If you follow the tutorial, we have four nodes in our patroni cluster, (2-nodes postgresql+patroni),(1-node for Etcd), and (1-node for HAProxy).
Deletethank you for well documentation.
ReplyDeleteeverything all nodes worked fine but i have one question replication is not replicated
one thing more do i have to create replicator user and replication database name in all postgres-patroni server.
i have 3 HA server and 1 haproxy and 1 etcd
You do not need to create replicator user or database manually. If you carefully look into postgresql.yml file, there is an entry for replicator user creation, and when you start patroni first time, it will create replicator user in database automatically.
Deleteon postgres.yml
ReplyDeletewal_level=replica
but when i run below command it only show one leader and nothing more, other cluster doesnot shows up
[root@pg_node1 xsan]# sudo patronictl -c /opt/app/patroni/etc/postgresql.yml list
+ Cluster: postgres1 (6922849511148078751) -+----+-----------+
| Member | Host | Role | State | TL | Lag in MB |
+----------+-------------+--------+---------+----+-----------+
| pg_node1 | 10.X.X.X | Leader | running | 1 | |
+----------+-------------+--------+---------+----+-----------+
in 3 different cluster this Cluster: postgres1 (6922849511148078751) are different and only one that match with below is leader
[root@localhost ~]# etcdctl get /service/postgres/initialize
6922837456925557301
i even tried to remove this number by using below command
patronictl -c /opt/app/patroni/etc/postgresql.yml remove postgres
after few step it asked for master cluster and i typed postgres because on list one an only 10.X.X.X is showed but is web browser all 3 nodes are up
http://haproxy_ip:7000/#postgres/pg_node3
Make sure you have correct parameters and values in postgresql.yml file on each node you have in the cluster. Follow the guidelines carefully to set up postgresql.yml file on each node.
DeleteRun "sudo systemctl status patroni -l" on each node and share the output.
Can you tell me why this message when I try to install the package
ReplyDelete[root@localhost ~]# sudo yum -y install https://github.com/cybertec-postgresql/patroni-packaging/releases/download/1.6.5-1/patroni-1.6.5-1.rhel7.x86_64.rpm
Complementos cargados:fastestmirror
No es posible abrir: https://github.com/cybertec-postgresql/patroni-packaging/releases/download/1.6.5-1/patroni-1.6.5-1.rhel7.x86_64.rpm. Ignorando.
Error: Nada para hacer
Is like the file is missing
I have rechecked, package is there and available for download/install. Check your internet, selinux, firewall etc.
Deletei have issues with HA proxy, its not starting. can you send your /etc/haproxy/haproxy.cfg file
ReplyDeleteHi Niharika, Im not sure what is the exact issue you are facing. But can you try below command. It would help...
Deletesetsebool -P haproxy_connect_any=1
Hi Anwar,
ReplyDeleteI'm unable to start patroni service. Here is the details for reference...
# sudo systemctl status patroni -l
● patroni.service - Runners to orchestrate a high-availability PostgreSQL
Loaded: loaded (/usr/lib/systemd/system/patroni.service; enabled; vendor preset: disabled)
Active: failed (Result: exit-code) since Tue 2021-05-18 16:38:17 IST; 21min ago
Process: 12599 ExecStart=/usr/bin/patroni /opt/app/patroni/etc/postgresql.yml (code=exited, status=1/FAILURE)
Main PID: 12599 (code=exited, status=1/FAILURE)
May 18 16:38:17 labVM3174 patroni[12599]: File "/usr/lib/python3.6/site-packages/patroni/daemon.py", line 98, in abstract_main
May 18 16:38:17 labVM3174 patroni[12599]: controller = cls(config)
May 18 16:38:17 labVM3174 patroni[12599]: File "/usr/lib/python3.6/site-packages/patroni/__init__.py", line 29, in __init__
May 18 16:38:17 labVM3174 patroni[12599]: self.dcs = get_dcs(self.config)
May 18 16:38:17 labVM3174 patroni[12599]: File "/usr/lib/python3.6/site-packages/patroni/dcs/__init__.py", line 106, in get_dcs
May 18 16:38:17 labVM3174 patroni[12599]: Available implementations: """ + ', '.join(sorted(set(available_implementations))))
May 18 16:38:17 labVM3174 patroni[12599]: patroni.exceptions.PatroniFatalException: 'Can not find suitable configuration of distributed configuration store\nAvailable implementations: kubernetes'
May 18 16:38:17 labVM3174 systemd[1]: patroni.service: main process exited, code=exited, status=1/FAILURE
May 18 16:38:17 labVM3174 systemd[1]: Unit patroni.service entered failed state.
May 18 16:38:17 labVM3174 systemd[1]: patroni.service failed.
Same on other Patroni server too. Appreciate your help !!
The latest patroni version you installed comes with different configuration requirement and it requires distributed configuration store such as kubernetes if you carefully read the status last line.
DeleteHi,
ReplyDeleteIs there a possibility of connecting to both write and read instances, write instance for write operations and read instance for read operations.
Please confirm.
Thanks,
Safi Ahmed
Hi, when I i have an issue when I start :
ReplyDeletepatroni.service - PostgreSQL high-availability manager
Loaded: loaded (/usr/lib/systemd/system/patroni.service; enabled; vendor preset: disabled)
Active: active (running) since mar. 2021-09-07 09:36:19 CEST; 7h ago
Main PID: 1070 (python3.6)
Tasks: 2
CGroup: /system.slice/patroni.service
└─1070 python3.6 /opt/app/patroni/bin/patroni /opt/app/patroni/etc/postgresql.yml
sept. 07 17:31:22 localhost.localdomain patroni[1070]: 2021-09-07 17:31:22,080 ERROR: Failed to get list of machines from http://192.168.154.170:2379/v2: MaxRetryError("HTTPConnectionPool(host='192.168.154.170', port=2379): Max retries exceeded with url: /v2/machines (Caused by NewConnectionError(': Failed to establish a new connection: [Errno 113] No route to host',))",)
sept. 07 17:31:22 localhost.localdomain patroni[1070]: 2021-09-07 17:31:22,080 INFO: waiting on etcd
sept. 07 17:31:27 localhost.localdomain patroni[1070]: 2021-09-07 17:31:27,088 WARNING: Retrying (Retry(total=1, connect=None, read=None, redirect=0, status=None)) after connection broken by 'NewConnectionError(': Failed to establish a new connection: [Errno 113] No route to host',)': /v2/machines
sept. 07 17:31:27 localhost.localdomain patroni[1070]: 2021-09-07 17:31:27,089 WARNING: Retrying (Retry(total=0, connect=None, read=None, redirect=0, status=None)) after connection broken by 'NewConnectionError(': Failed to establish a new connection: [Errno 113] No route to host',)': /v2/machines
sept. 07 17:31:27 localhost.localdomain patroni[1070]: 2021-09-07 17:31:27,091 ERROR: Failed to get list of machines from http://192.168.154.170:2379/v2: MaxRetryError("HTTPConnectionPool(host='192.168.154.170', port=2379): Max retries exceeded with url: /v2/machines (Caused by NewConnectionError(': Failed to establish a new connection: [Errno 113] No route to host',))",)
sept. 07 17:31:27 localhost.localdomain patroni[1070]: 2021-09-07 17:31:27,091 INFO: waiting on etcd
sept. 07 17:31:32 localhost.localdomain patroni[1070]: 2021-09-07 17:31:32,098 WARNING: Retrying (Retry(total=1, connect=None, read=None, redirect=0, status=None)) after connection broken by 'NewConnectionError(': Failed to establish a new connection: [Errno 113] No route to host',)': /v2/machines
sept. 07 17:31:32 localhost.localdomain patroni[1070]: 2021-09-07 17:31:32,101 WARNING: Retrying (Retry(total=0, connect=None, read=None, redirect=0, status=None)) after connection broken by 'NewConnectionError(': Failed to establish a new connection: [Errno 113] No route to host',)': /v2/machines
sept. 07 17:31:32 localhost.localdomain patroni[1070]: 2021-09-07 17:31:32,103 ERROR: Failed to get list of machines from http://192.168.154.170:2379/v2: MaxRetryError("HTTPConnectionPool(host='192.168.154.170', port=2379): Max retries exceeded with url: /v2/machines (Caused by NewConnectionError(': Failed to establish a new connection: [Errno 113] No route to host',))",)
sept. 07 17:31:32 localhost.localdomain patroni[1070]: 2021-09-07 17:31:32,103 INFO: waiting on etcd
Patroni is unable to reach to your etcd node, make sure your etcd node is accessible.
DeleteTry following:
Initiate ping
Stop firewall
Disable SELinux
Hi Mohammed and thanks fou your support,
Deleteso when I execute this commande "psql -h your_haproxy_ip -U postgres -p 5000", I obtain this error psql: erreur : a reçu une réponse invalide à la négociation SSL : H
SSL = off from postgresql.conf file and restart Postgres service
Deletethe postgresql.conf file is created automatically with patroni and this file didn't contain ssl:
Delete[root@localhost karem]# cat /var/lib/pgsql/12/data/postgresql.conf
# Do not edit this file manually!
# It will be overwritten by Patroni!
include 'postgresql.base.conf'
cluster_name = 'cluster_PG'
hot_standby = 'on'
listen_addresses = '192.168.154.217'
max_connections = '100'
max_locks_per_transaction = '64'
max_prepared_transactions = '0'
max_replication_slots = '10'
max_wal_senders = '10'
max_worker_processes = '8'
port = '5432'
track_commit_timestamp = 'off'
wal_keep_segments = '8'
wal_level = 'replica'
wal_log_hints = 'on'
hba_file = '/var/lib/pgsql/12/data/pg_hba.conf'
ident_file = '/var/lib/pgsql/12/data/pg_ident.conf'
# recovery.conf
primary_conninfo = 'user=replicator passfile=/tmp/pgpass host=192.168.154.216 port=5432 sslmode=prefer application_name=N_PG1'
primary_slot_name = 'n_pg1'
recovery_target = ''
recovery_target_lsn = ''
recovery_target_name = ''
recovery_target_time = ''
recovery_target_timeline = 'latest'
recovery_target_xid = ''
Try connection like:
Deletepsql “sslmod=disable -h 192.168.154.160 -U postgres -p 5000”
psql: erreur : option de connexion « sslmod » invalide
DeleteI obtain this error:
Deletepsql: erreur : option de connexion « “sslmod » invalide
This will help https://laracasts.com/discuss/channels/eloquent/received-invalid-response-to-ssl-negotiation
DeleteI see this doument But I don't find the file how disable sslmod
Deletehi, I can't resolve this problem. and I have another question :
Deleteafter finishing the installation of patroni and patoni status is active, when I see the status of postgres is disabled. does that correct?
hi Mohammed, the ssl problem is resolved.
DeleteI have two questions:
first after installaion of patroni, status postgresql is still stopped and disable, is this correct?
second I want use this solution in prod environment; is it necessary to use (2-nodes postgres+patroni), (2-nodes etcd), and (2-nodes HAProxy),and how can do that(2-nodes etcd), and (2-nodes HAProxy),
finally thanks for your support
It would be great if you post how did you manage to resolve ssl issue to help community around. Secondly always use odd number of nodes for database like 3 nodes (patroni+postgres) and 2 nodes (etcd) and 2 nodes (haproxy). I will post step by step guide for your production setup in next 2-3 days.
DeleteIt is absolutely fine for postgres service showing stopped and disabled because patroni taking care of everything.
Deletehi, I resolve the problem SSL when I change mode to tcp in /etc/haproxy/haproxy.cfg because I made the mode configuration http early:
Deletedefaults
mode tcp
log global
how can Patroni or ETCD know a node is stopping ? using ttl or Rest api or each method for discover the leader is stopped
DeleteHi,
ReplyDeleteI have this error "psql: erreur : a reçu une réponse invalide à la négociation SSL : H" when I excute this commande psql -h 192.168.154.160 -U postgres -p 5000
Please help me
You need to disable SSL authentication from Postgres first.
DeleteHi,
ReplyDeletehow can Patroni or ETCD know a node is stopping ? using ttl or Rest api or each method for discover the leader is stopped
hi Mohamed,
ReplyDeletedo you post the tuto about HA postgresql (3 nodes(patroni + postgres)+ 2 nodes (haproxy+2 nodes (ETCD))
Hi, sorry couldn't get time but if you do google, you will find plenty of tutorials and its very easy to create ETCD cluster.
Deletethanks Mohamed,
DeleteI want to use this solution in containers, how can I do that?
Hi Mohamed,
ReplyDeleteI want to use docker containers as a solution for create propre image
You have to research, test and apply your docker solution, cant help you in this.
DeleteI have done docker deployment, if you still need tutorial for the same, let me know.
Deletehi;
ReplyDeleteMy problem occurs when I insert data("insert table t1" for exemple) in the master server and it's down in the same time, the failover and the replication of the postgresql db are doing but the request of insertion is losted => t1 not created :( Someone can help me??
Someone can help me??
DeleteHi Mohamed,
ReplyDeleteMy problem occurs when I insert data("insert table t1" for exemple) in the master server and it's down in the same time, the failover and the replication of the postgresql db are doing but the request of insertion is losted => t1 not created :( Someone can help me??
Please ask your question at github under patroni section so that community can see and answer your query.
Deletehi Mohamed;
ReplyDeleteMy problem occurs when I insert data("insert table t1" for exemple) in the master server and it's down in the same time, the failover and the replication of the postgresql db are doing but the request of insertion is losted => t1 not created :( Someone can help me??
Can I make both servers active at the same time?
ReplyDeleteNot possible with patroni, and master/master replication is not recommended due to:
Deletemulti-master replication complexity.
Conflict resolution is very difficult because simultaneous writes on multiple nodes are possible.
Sometimes manual intervention is required in case of conflict.
Chance of data inconsistency.
However, if you still insist on master/master replication, then you can achieve it with BDR, search google, you will find plenty of write-ups related to it.
Hello. to client applications to be connected to a DB it turns out to the haproxy address through port 5000? so that you do not have to change the address and port in their configs
ReplyDelete