osTicket is a widely-used open source support desk system. It seamlessly integrates inquiries created via email, phone and web-based forms into a simple easy-to-use multi-user web interface. Manage, organize and archive all your support requests and responses in one place while providing your customers with accountability and responsiveness they deserve.
This tutorial will take you through the steps to set up a help desk system using osTicket on CentOS/RHEL 7.
This tutorial will take you through the steps to set up a help desk system using osTicket on CentOS/RHEL 7.
Prerequisites
You will need one CentOS/RHEL 7 (physical or virtual) machine with root privileges.
Disabling Selinux
You should disable selinux for smooth installation and configuration using the following command:
sudo vi /etc/selinux/config
Change following parameter from enforcing to disabled
SELINUX=disabled
Save and close.
Disabling Firewalld & IPTables
To make installation more smooth and errors free, you should disable firewalld and iptables or customize it according to your environment need.
Clean iptables rules and disable firewalld if you don't need it:
iptables -F
systemctl stop firewalld
systemctl disable firewalld
You must reboot now.
reboot
Once reboot completed, proceed with the following steps.
Installing Epel Repository
You need to install epel repository to get extra and updated packages for our linux server.
yum install -y epel-release
Installing PHP
You need to install following php perquisites needed for osTicket.
yum -y install php php-mysql php-gd php-ldap php-odbc php-pear php-xml php-xmlrpc php-mbstring php-snmp php-mcrypt php-imap php-apcu php-intl php-opcache zip unzip
Installing Apache
To serve osticket web services to users and customers, you need to install either Nginx or Apache as your web server. For this guide, we are going with apache.
yum install -y httpd openssl mod_ssl php
Installing MariaDB
To fulfill osTicket database requirement, we will install mariadb as our database server.
yum install -y mariadb-server
Securing MariaDB
By default mariadb has no root password and it is accessible to anyone from anywhere. It is important to secure your database before bringing it into production.
systemctl start mariadb
systemctl enable mariadb
mysql_secure_installation
NOTE: RUNNING ALL PARTS OF THIS SCRIPT IS RECOMMENDED FOR ALL MariaDB
SERVERS IN PRODUCTION USE! PLEASE READ EACH STEP CAREFULLY!
In order to log into MariaDB to secure it, we'll need the current
password for the root user. If you've just installed MariaDB, and
you haven't set the root password yet, the password will be blank,
so you should just press enter here.
Enter current password for root (enter for none):
OK, successfully used password, moving on...
Setting the root password ensures that nobody can log into the MariaDB
root user without the proper authorisation.
Set root password? [Y/n] y
New password:
Re-enter new password:
Password updated successfully!
Reloading privilege tables..
... Success!
By default, a MariaDB installation has an anonymous user, allowing anyone
to log into MariaDB without having to have a user account created for
them. This is intended only for testing, and to make the installation
go a bit smoother. You should remove them before moving into a
production environment.
Remove anonymous users? [Y/n] y
... Success!
Normally, root should only be allowed to connect from 'localhost'. This
ensures that someone cannot guess at the root password from the network.
Disallow root login remotely? [Y/n] y
... Success!
By default, MariaDB comes with a database named 'test' that anyone can
access. This is also intended only for testing, and should be removed
before moving into a production environment.
Remove test database and access to it? [Y/n] y
- Dropping test database...
... Success!
- Removing privileges on test database...
... Success!
Reloading the privilege tables will ensure that all changes made so far
will take effect immediately.
Reload privilege tables now? [Y/n] y
... Success!
Cleaning up...
All done! If you've completed all of the above steps, your MariaDB
installation should now be secure.
Thanks for using MariaDB!
Downloading osTicket
You can download latest version of osTicket from the official website https://osticket.com/download/. When you are done with download extract it into the following directory.
mkdir /var/www/osTicket
cd /var/www/osTicket
unzip osTicket-v1.12.zip
cp upload/include/ost-sampleconfig.php upload/include/ost-config.php
chown -R apache:apache /var/www/osTicket
chmod 0666 upload/include/ost-config.php
Creating osTicket Database
At this point, you need to create a database and a user for osticket. Replace following highlighted parameter to reflect yours.
mysql -u root -p
create database osticketdb;
create user 'osticket'@'localhost' identified by 'P@ssw0rd';
grant all privileges on osticketdb.* to 'osticket'@'localhost';
flush privileges;
exit
Configuring Apache
Now, you need to make osticket web directory available to Apache. Replace highlighted parameters to reflect yours.
vi /etc/httpd/conf.d/osticket.conf
<VirtualHost *:80>
ServerAdmin webmaster@techsupportpk.com
DocumentRoot "/var/www/osTicket/upload"
ServerName labserver.techsupportpk.com
ErrorLog "/var/log/httpd/error_log"
CustomLog "/var/log/httpd/access_log" combined
<Directory "/var/www/osTicket/upload">
DirectoryIndex index.html index.php
Options FollowSymLinks
AllowOverride All
Require all granted
</Directory>
</VirtualHost>
Save and close.
mv /etc/httpd/conf.d/welcome.conf /etc/httpd/conf.d/bkpwelcome
systemctl start httpd
systemctl enable httpd
Open up your favorite web browser and access osTicket web installer http://your_server.domain or http://your_server_ip and proceed following the instruction on screen like below:
Make sure all prerequisites are green, click Continue

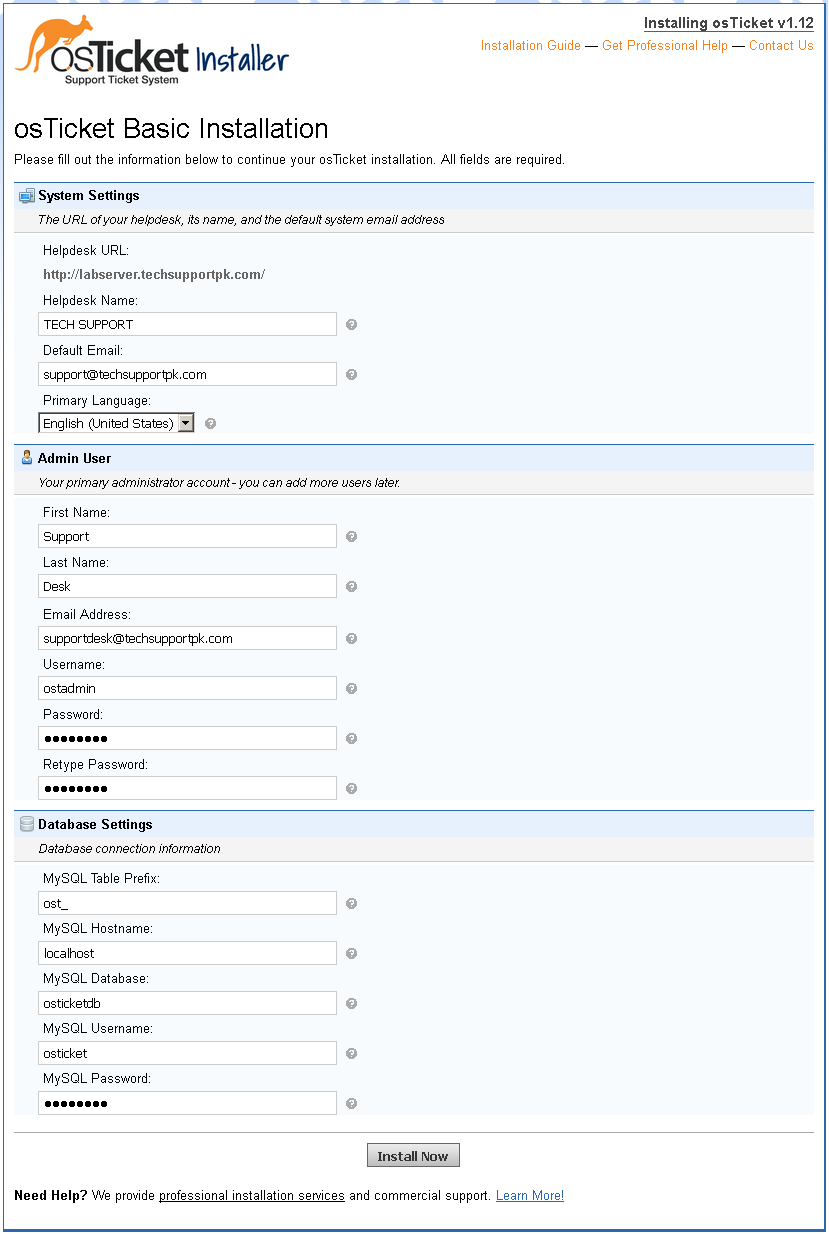
Fill out following information to reflect yours then click Install Now button.

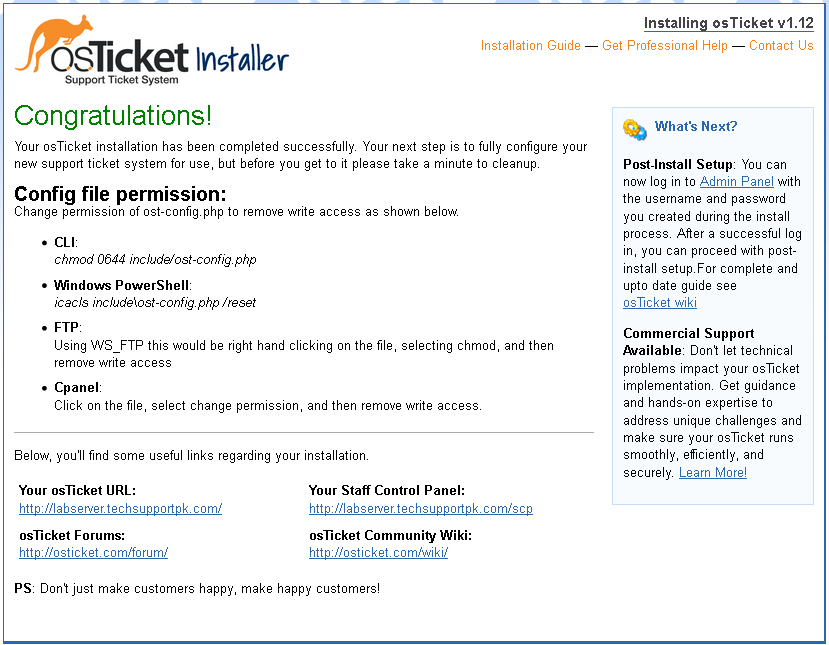
You will be presented following screen contains information of links to access osTicket url and admin panel.

You are done here, go back to CentOS 7 machine's terminal and revert back the writable permission to read like below:
chmod 0644 /var/www/osTicket/upload/include/ost-config.php
Wrapping
You support desk system with osTicket installation completed successfully. Now you can navigate to osTicket admin panel to customize it as per your environment need.

No comments: