Open computers and software inventory is an assets management solution. OCS Inventory queries its agents to know the soft and hard composition of each machine, each server. OCS Inventory also queries the network to discover the active elements that cannot receive an agent. Since version 2.0, OCS Inventory integrates the functionality of SNMP scans.
This comprehensive tutorial will walk you through the steps to set up asset management using OCS Inventory on an Ubuntu 18.04.
Prerequisites
You will need one Ubuntu 18.04 (physical or virtual) machine having non-root user with sudo privileges.
Installing Dependencies
First, you need to correct your Ubuntu machine time and date using the following command. Replace highlighted parameter to reflect yours.
sudo timedatectl set-timezone Asia/Karachi
Now install required dependencies by copying the following command into Ubuntu terminal:
sudo apt update
sudo apt install -y php php-mysql php-zip php-pclzip php-gd php-soap php-curl php-json make cmake gcc make zip
Installing Apache
We will use Apache as web server to host ocs inventory web console.
sudo apt install -y perl libapache2-mod-perl2-dev libapache2-mod-perl2 libapache-dbi-perl libapache-db-perl libapache2-mod-php
sudo apt install -y libxml-simple-perl libcompress-zlib-perl libdbi-perl libdbd-mysql-perl libnet-ip-perl libsoap-lite-perl libio-compress-perl libarchive-zip-perl
Installing MySQL
For database requirement, you can install MySQL server like below:
sudo apt install -y mysql-server
sudo systemctl start mysql
sudo systemctl enable mysql
Securing MySQL
By default MySQL has no root password and it is accessible to anyone from anywhere. Make sure it is safe and secure before bringing your database into production:
sudo mysql_secure_installation
Securing the MySQL server deployment.
Connecting to MySQL using a blank password.
VALIDATE PASSWORD PLUGIN can be used to test passwords
and improve security. It checks the strength of password
and allows the users to set only those passwords which are
secure enough. Would you like to setup VALIDATE PASSWORD plugin?
Press y|Y for Yes, any other key for No: y
There are three levels of password validation policy:
LOW Length >= 8
MEDIUM Length >= 8, numeric, mixed case, and special characters
STRONG Length >= 8, numeric, mixed case, special characters and dictionary file
Please enter 0 = LOW, 1 = MEDIUM and 2 = STRONG: 1
Please set the password for root here.
New password:
Re-enter new password:
Estimated strength of the password: 100
Do you wish to continue with the password provided?(Press y|Y for Yes, any other key for No) : y
By default, a MySQL installation has an anonymous user,
allowing anyone to log into MySQL without having to have
a user account created for them. This is intended only for
testing, and to make the installation go a bit smoother.
You should remove them before moving into a production
environment.
Remove anonymous users? (Press y|Y for Yes, any other key for No) : y
Success.
Normally, root should only be allowed to connect from
'localhost'. This ensures that someone cannot guess at
the root password from the network.
Disallow root login remotely? (Press y|Y for Yes, any other key for No) : y
Success.
By default, MySQL comes with a database named 'test' that
anyone can access. This is also intended only for testing,
and should be removed before moving into a production
environment.
Remove test database and access to it? (Press y|Y for Yes, any other key for No) : y
- Dropping test database...
Success.
- Removing privileges on test database...
Success.
Reloading the privilege tables will ensure that all changes
made so far will take effect immediately.
Reload privilege tables now? (Press y|Y for Yes, any other key for No) : y
Success.
All done!
Creating Database
At this point, we need to create a database to fulfill OCS Inventory requirement:
sudo mysql -u root -p
create database ocsdb;
create user 'ocs'@'localhost identified by 'P@ssw0rd';
grant all privileges on ocsdb.* to 'ocs'@'localhost';
flush privileges;
exit
Configuring PHP
You need to make edit following php configuration file to increase filesize limit:
sudo nano /etc/php/7.2/apache2/php.ini
Change following parameters to like below:
post_max_size = 200M
upload_max_filesize = 200M
Save and close.
Restart Apache service to take changes into effect.
sudo systemctl restart apache2
sudo systemctl enable apache2
Installing Required Modules
You can install ocs inventory setup required modules by issuing the following commands:
sudo perl -MCPAN -e shell
cpan[1]> install Apache2::SOAP
cpan[1]> install XML:Entities
cpan[1]> install Mojolicious::Lite
cpan[1]> install Switch
cpan[1]> install Plack::Handler
cpan[1]> install Archive::Zip
cpan[1]> exit
Cloning OCS Inventory Server
git clone https://github.com/OCSInventory-NG/OCSInventory-Server.git ~/ocsinventory-server
git clone https://github.com/OCSInventory-NG/OCSInventory-ocsreports.git ~/ocsinventory-server/ocsreports
Installing OCS Inventory Server
You can install ocs inventory server by executing setup.sh file from the ocsinventory-server directory. The process will ask you several questions but you will only need to press Enter to keep the default settings:
cd ocsinventory-server
Edit setup.sh script to change MySQL credentials must reflect yours.
sudo nano setup.sh
DB_SERVER_HOST="localhost"
DB_SERVER_PORT="3306"
DB_SERVER_USER="ocs"
DB_SERVER_PWD="P@ssw0rd"
Save and close.
sudo ./setup.sh
+----------------------------------------------------------+
| |
| Welcome to OCS Inventory NG Management server setup ! |
| |
+----------------------------------------------------------+
Trying to determine which OS or Linux distribution you use
+----------------------------------------------------------+
| Checking for Apache web server binaries ! |
+----------------------------------------------------------+
CAUTION: If upgrading Communication server from OCS Inventory NG 1.0 RC2 and
previous, please remove any Apache configuration for Communication Server!
Do you wish to continue ([y]/n)?
Assuming Communication server 1.0 RC2 or previous is not installed
on this computer.
Starting OCS Inventory NG Management server setup from folder /var/www/ocsinventory-server
Storing log in file /var/www/ocsinventory-server/ocs_server_setup.log
+----------------------------------------------------------+
| Checking for database server properties... |
+----------------------------------------------------------+
Your MySQL client seems to be part of MySQL version 5.7.
Your computer seems to be running MySQL 4.1 or higher, good ;-)
Which host is running database server [localhost] ?
OK, database server is running on host localhost ;-)
On which port is running database server [3306] ?
OK, database server is running on port 3306 ;-)
+----------------------------------------------------------+
| Checking for Apache web server daemon... |
+----------------------------------------------------------+
Where is Apache daemon binary [/usr/sbin/apache2ctl] ?
OK, using Apache daemon /usr/sbin/apache2ctl ;-)
+----------------------------------------------------------+
| Checking for Apache main configuration file... |
+----------------------------------------------------------+
Where is Apache main configuration file [/etc/apache2/apache2.conf] ?
OK, using Apache main configuration file /etc/apache2/apache2.conf ;-)
+----------------------------------------------------------+
| Checking for Apache user account... |
+----------------------------------------------------------+
Which user account is running Apache web server [www-data] ?
OK, Apache is running under user account www-data ;-)
+----------------------------------------------------------+
| Checking for Apache group... |
+----------------------------------------------------------+
Which user group is running Apache web server [www-data] ?
OK, Apache is running under users group www-data ;-)
+----------------------------------------------------------+
| Checking for Apache Include configuration directory... |
+----------------------------------------------------------+
Setup found Apache Include configuration directory in
/etc/apache2/conf-available.
Setup will put OCS Inventory NG Apache configuration in this directory.
Where is Apache Include configuration directory [/etc/apache2/conf-available] ?
OK, Apache Include configuration directory /etc/apache2/conf-available found ;-)
+----------------------------------------------------------+
| Checking for PERL Interpreter... |
+----------------------------------------------------------+
Found PERL interpreter at </usr/bin/perl> ;-)
Where is PERL interpreter binary [/usr/bin/perl] ?
OK, using PERL interpreter /usr/bin/perl ;-)
Do you wish to setup Communication server on this computer ([y]/n)?
+----------------------------------------------------------+
| Checking for Make utility... |
+----------------------------------------------------------+
OK, Make utility found at </usr/bin/make> ;-)
+----------------------------------------------------------+
| Checking for Apache mod_perl version... |
+----------------------------------------------------------+
Checking for Apache mod_perl version 1.99_22 or higher
Found that mod_perl version 1.99_22 or higher is available.
OK, Apache is using mod_perl version 1.99_22 or higher ;-)
+----------------------------------------------------------+
| Checking for Communication server log directory... |
+----------------------------------------------------------+
Communication server can create detailed logs. This logs can be enabled
by setting integer value of LOGLEVEL to 1 in Administration console
menu Configuration.
Where to put Communication server log directory [/var/log/ocsinventory-server] ?
OK, Communication server will put logs into directory /var/log/ocsinventory-server ;-)
+----------------------------------------------------------------------------+
| Checking for Communication server plugins configuration directory... |
+----------------------------------------------------------------------------+
Communication server need a directory for plugins configuration files.
Where to put Communication server plugins configuration files [/etc/ocsinventory-server/plugins] ?
OK, Communication server will put plugins configuration files into directory /etc/ocsinventory-server/plugins ;-)
+-------------------------------------------------------------------+
| Checking for Communication server plugins perl directory... |
+-------------------------------------------------------------------+
Communication server need a directory for plugins Perl modules files.
Where to put Communication server plugins Perl modules files [/etc/ocsinventory-server/perl] ?
OK, Communication server will put plugins Perl modules files into directory /etc/ocsinventory-server/perl ;-)
+----------------------------------------------------------+
| Checking for required Perl Modules... |
+----------------------------------------------------------+
Checking for DBI PERL module...
Found that PERL module DBI is available.
Checking for Apache::DBI PERL module...
Found that PERL module Apache::DBI is available.
Checking for DBD::mysql PERL module...
Found that PERL module DBD::mysql is available.
Checking for Compress::Zlib PERL module...
Found that PERL module Compress::Zlib is available.
Checking for XML::Simple PERL module...
Found that PERL module XML::Simple is available.
Checking for Net::IP PERL module...
Found that PERL module Net::IP is available.
Checking for SOAP::Lite Perl module...
Found that PERL module SOAP::Lite is available.
Checking for Archive::Zip Perl module...
Found that PERL module Archive::Zip is available.
+----------------------------------------------------------+
| Checking for optional Perl Modules... |
+----------------------------------------------------------+
Checking for Apache2::SOAP PERL module...
Found that PERL module SOAP::Apache2 is available.
Checking for XML::Entities PERL module...
Found that PERL module XML::Entities is available.
Do you wish to setup Rest API server on this computer ([y]/n)?
+----------------------------------------------------------+
| Checking for REST API Dependencies ... |
+----------------------------------------------------------+
Found that PERL module Mojolicious::Lite is available.
Found that PERL module Switch is available.
Found that PERL module Plack::Handler is available.
+----------------------------------------------------------+
| Configuring REST API Server files ... |
+----------------------------------------------------------+
Where do you want the API code to be store [/usr/local/share/perl/5.26.1] ?
Copying files to /usr/local/share/perl/5.26.1
+----------------------------------------------------------+
| Configuring REST API Server configuration files ... |
+----------------------------------------------------------+
+----------------------------------------------------------+
| OK, looks good ;-) |
| |
| Configuring Communication server Perl modules... |
+----------------------------------------------------------+
Generating a Unix-style Makefile
Writing Makefile for Apache::Ocsinventory
Writing MYMETA.yml and MYMETA.json
+----------------------------------------------------------+
| OK, looks good ;-) |
| |
| Preparing Communication server Perl modules... |
+----------------------------------------------------------+
+----------------------------------------------------------+
| OK, prepare finshed ;-) |
| |
| Installing Communication server Perl modules... |
+----------------------------------------------------------+
+----------------------------------------------------------+
| OK, Communication server Perl modules install finished;-)|
| |
| Creating Communication server log directory... |
+----------------------------------------------------------+
Creating Communication server log directory /var/log/ocsinventory-server.
Fixing Communication server log directory files permissions.
Configuring logrotate for Communication server.
Removing old communication server logrotate file /etc/logrotate.d/ocsinventory-NG
Writing communication server logrotate to file /etc/logrotate.d/ocsinventory-server
+----------------------------------------------------------------------+
| OK, Communication server log directory created ;-) |
| |
| Creating Communication server plugins configuration directory... |
+----------------------------------------------------------------------+
Creating Communication server plugins configuration directory /etc/ocsinventory-server/plugins.
+----------------------------------------------------------------------+
| OK, Communication server plugins configuration directory created ;-) |
| |
| Creating Communication server plugins Perl directory... |
+----------------------------------------------------------------------+
Creating Communication server plugins Perl directory /etc/ocsinventory-server/perl.
+----------------------------------------------------------------------+
| OK, Communication server plugins Perl directory created ;-) |
| |
| Now configuring Apache web server... |
+----------------------------------------------------------------------+
To ensure Apache loads mod_perl before OCS Inventory NG Communication Server,
Setup can name Communication Server Apache configuration file
'z-ocsinventory-server.conf' instead of 'ocsinventory-server.conf'.
Do you allow Setup renaming Communication Server Apache configuration file
to 'z-ocsinventory-server.conf' ([y]/n) ?
OK, using 'z-ocsinventory-server.conf' as Communication Server Apache configuration file
Removing old communication server configuration to file /etc/apache2/conf-available/ocsinventory.conf
Writing communication server configuration to file /etc/apache2/conf-available/z-ocsinventory-server.conf
+----------------------------------------------------------------------+
| OK, Communication server setup successfully finished ;-) |
| |
| Please, review /etc/apache2/conf-available/z-ocsinventory-server.conf |
| to ensure all is good. Then restart Apache daemon. |
+----------------------------------------------------------------------+
Do you wish to setup Administration Server (Web Administration Console)
on this computer ([y]/n)?
+----------------------------------------------------------+
| Checking for Administration Server directories... |
+----------------------------------------------------------+
CAUTION: Setup now install files in accordance with Filesystem Hierarchy
Standard. So, no file is installed under Apache root document directory
(Refer to Apache configuration files to locate it).
If you're upgrading from OCS Inventory NG Server 1.01 and previous, YOU
MUST REMOVE (or move) directories 'ocsreports' and 'download' from Apache
root document directory.
If you choose to move directory, YOU MUST MOVE 'download' directory to
Administration Server writable/cache directory (by default
/var/lib/ocsinventory-reports), especially if you use deployment feature.
Do you wish to continue ([y]/n)?
Assuming directories 'ocsreports' and 'download' removed from
Apache root document directory.
Where to copy Administration Server static files for PHP Web Console
[/usr/share/ocsinventory-reports] ?
OK, using directory /usr/share/ocsinventory-reports to install static files ;-)
Where to create writable/cache directories for deployment packages,
administration console logs, IPDiscover and SNMP [/var/lib/ocsinventory-reports] ?
OK, writable/cache directory is /var/lib/ocsinventory-reports ;-)
+----------------------------------------------------------+
| Checking for required Perl Modules... |
+----------------------------------------------------------+
Checking for DBI PERL module...
Found that PERL module DBI is available.
Checking for DBD::mysql PERL module...
Found that PERL module DBD::mysql is available.
Checking for XML::Simple PERL module...
Found that PERL module XML::Simple is available.
Checking for Net::IP PERL module...
Found that PERL module Net::IP is available.
+----------------------------------------------------------+
| Installing files for Administration server... |
+----------------------------------------------------------+
Creating PHP directory /usr/share/ocsinventory-reports/ocsreports.
Copying PHP files to /usr/share/ocsinventory-reports/ocsreports.
Fixing permissions on directory /usr/share/ocsinventory-reports/ocsreports.
Creating database configuration file /usr/share/ocsinventory-reports/ocsreports/dbconfig.inc.php.
Creating IPDiscover directory /var/lib/ocsinventory-reports/ipd.
Fixing permissions on directory /var/lib/ocsinventory-reports/ipd.
Creating packages directory /var/lib/ocsinventory-reports/download.
Fixing permissions on directory /var/lib/ocsinventory-reports/download.
Creating snmp mibs directory /var/lib/ocsinventory-reports/snmp.
Fixing permissions on directory /var/lib/ocsinventory-reports/snmp.
Creating Administration server log files directory /var/lib/ocsinventory-reports/logs.
Fixing permissions on directory /var/lib/ocsinventory-reports/logs.
Creating Administration server scripts log files directory /var/lib/ocsinventory-reports/scripts.
Fixing permissions on directory /var/lib/ocsinventory-reports/scripts.
Configuring IPDISCOVER-UTIL Perl script.
Installing IPDISCOVER-UTIL Perl script.
Fixing permissions on IPDISCOVER-UTIL Perl script.
Writing Administration server configuration to file /etc/apache2/conf-available/ocsinventory-reports.conf
+----------------------------------------------------------------------+
| OK, Administration server installation finished ;-) |
| |
| Please, review /etc/apache2/conf-available/ocsinventory-reports.conf
| to ensure all is good and restart Apache daemon. |
| |
| Then, point your browser to http://server//ocsreports
| to configure database server and create/update schema. |
+----------------------------------------------------------------------+
Setup has created a log file /var/www/ocsinventory-server/ocs_server_setup.log. Please, save this file.
If you encounter error while running OCS Inventory NG Management server,
we can ask you to show us its content !
DON'T FORGET TO RESTART APACHE DAEMON !
Enjoy OCS Inventory NG ;-)
Configuring OCS Inventory Server
If you are successfully done with setup.sh installation process then the following configuration steps.
sudo chown -R www-data:www-data /usr/share/ocsinventory-reports/ocsreports
sudo chown -R www-data:www-data /var/lib/ocsinventory-reports
sudo ln -s /etc/apache2/conf-available/ocsinventory-reports.conf /etc/apache2/conf-enabled/ocsinventory-reports.conf
sudo ln -s /etc/apache2/conf-available/z-ocsinventory-server.conf /etc/apache2/conf-enabled/z-ocsinventory-server.conf
sudo ln -s /etc/apache2/conf-available/zz-ocsinventory-restapi.conf /etc/apache2/conf-enabled/zz-ocsinventory-restapi.conf
Running Web Installer
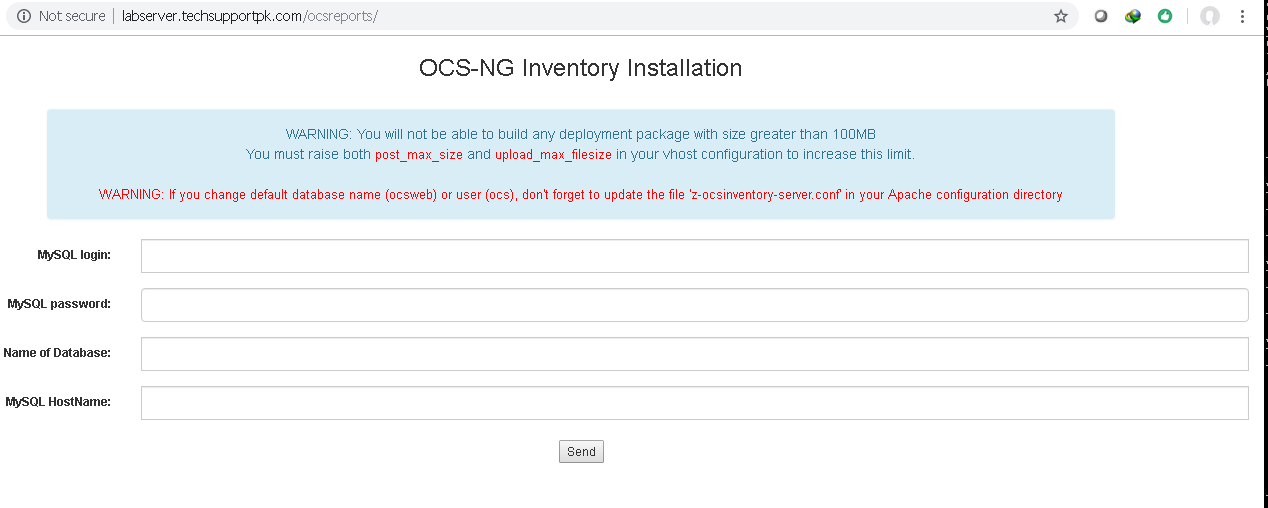
Open up your favorite web browser and access http://your_servername.domain/ocsreports or http://your_server_ip/ocsreportsYou will see the following database settings page.

You can safely ignore the warning if both post_max_size and upload_max_filesize parameters are good to go with your defined size limit.
Fill out database information to reflect yours and press Send.


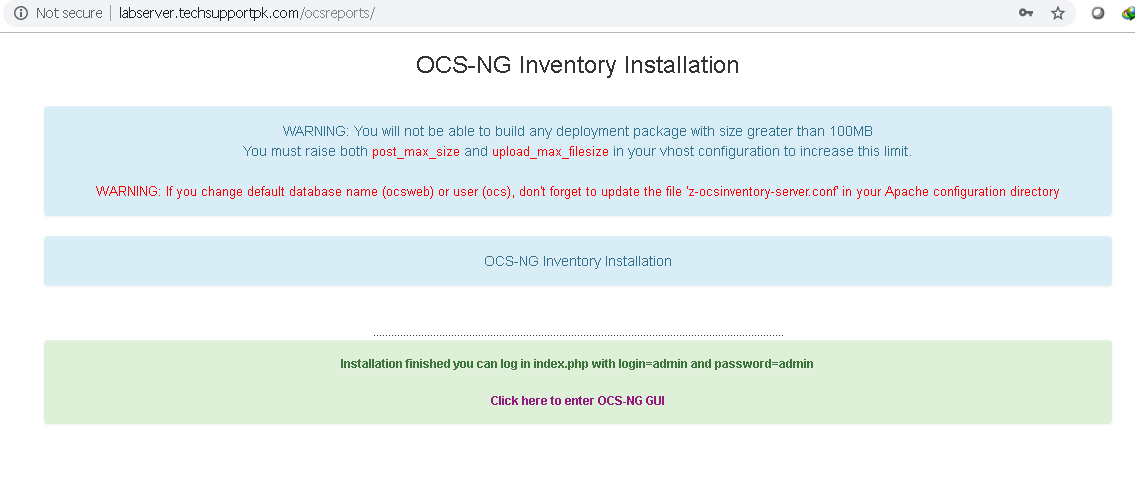
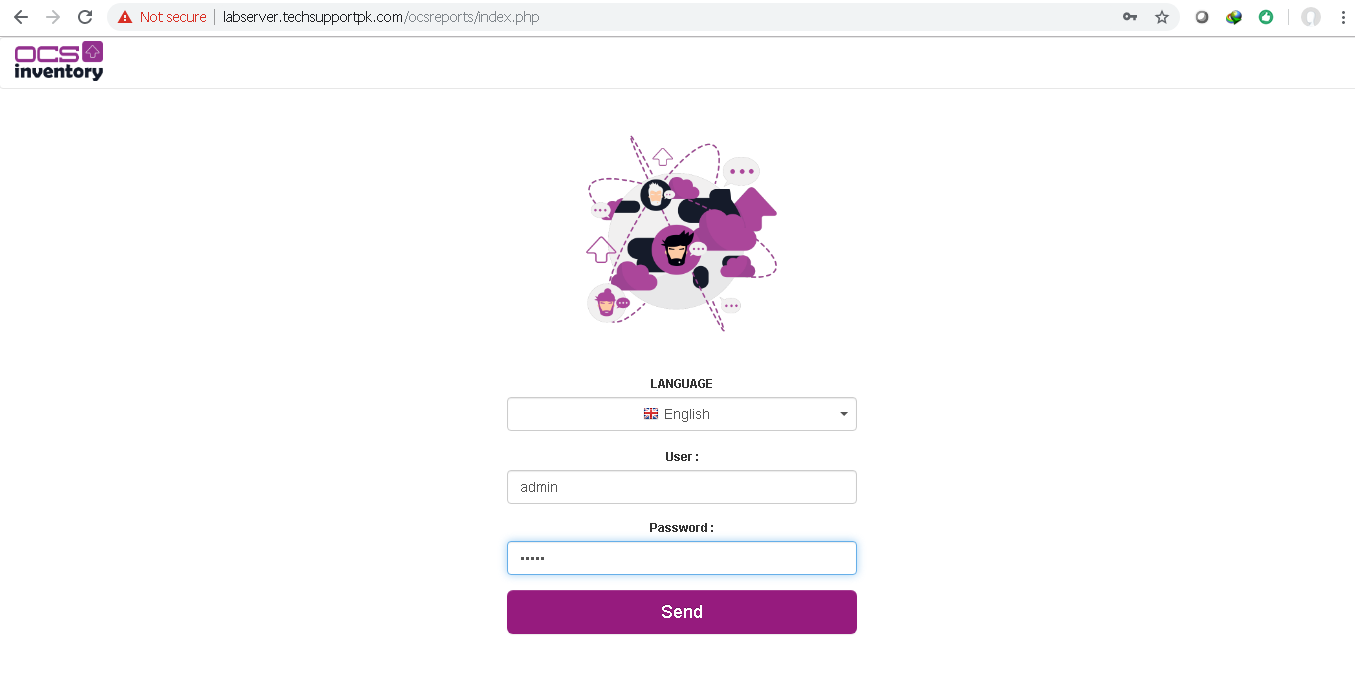
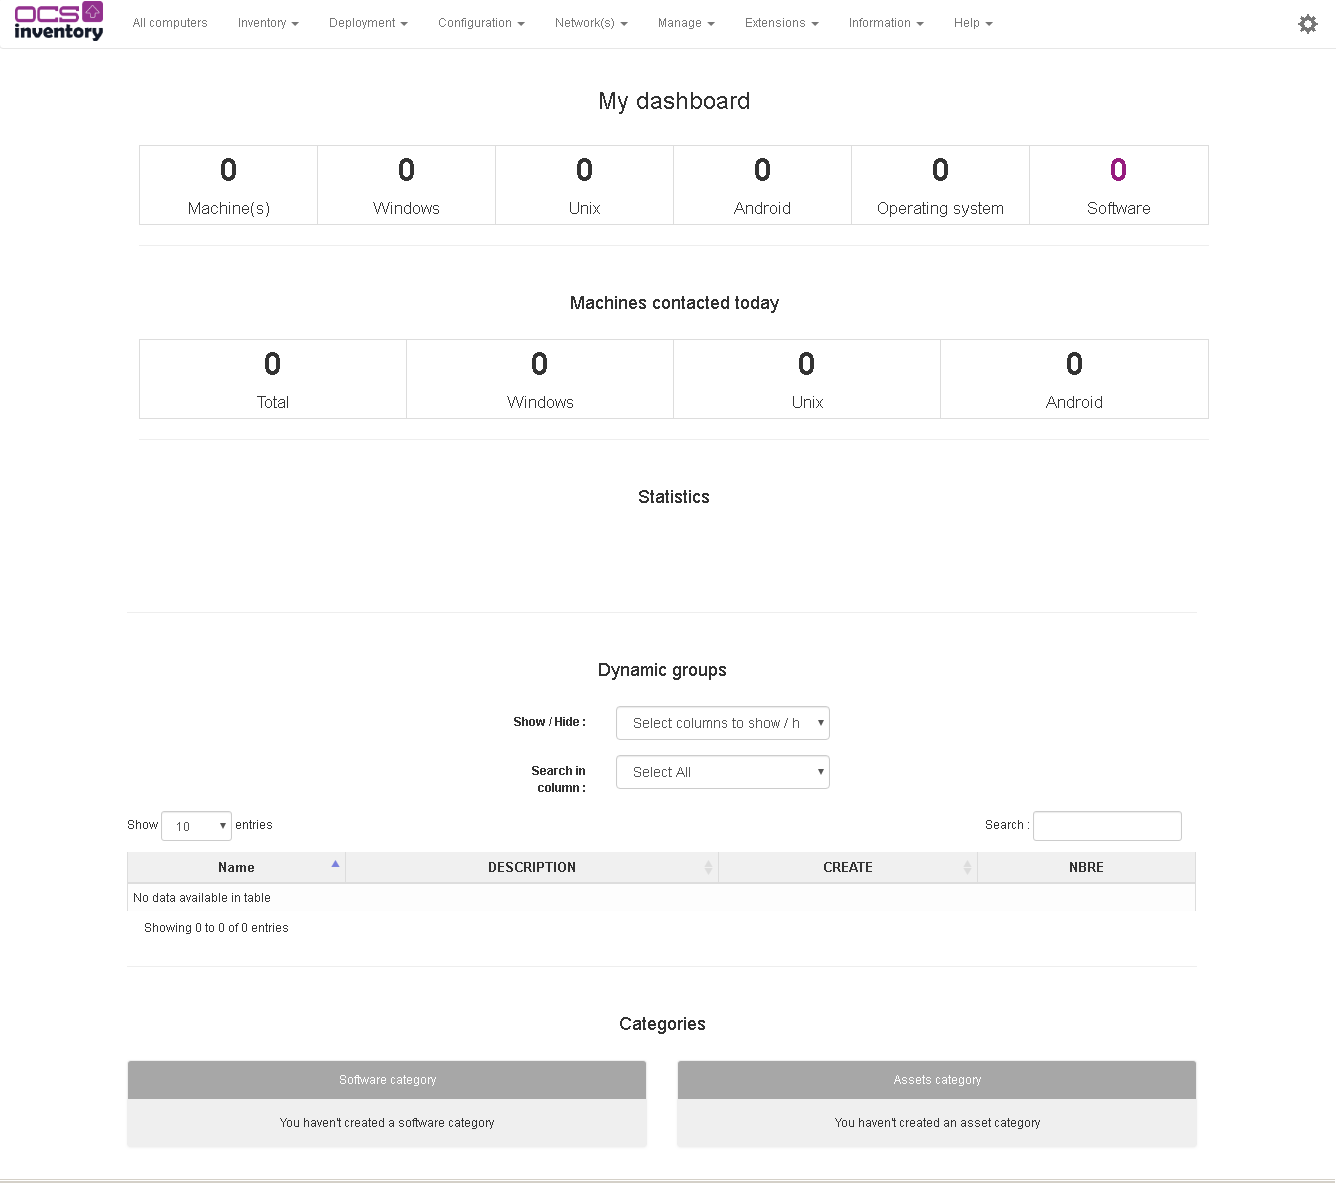
Again click here to enter OCS-NG GUI


You should now remove install.php file with the following command.
sudo rm -rf /usr/share/ocsinventory-reports/ocsreports/install.php
Wrapping up
The OCS Inventory Server on an Ubuntu 18.04 machine is now successfully installed. Next, start configuring the server from the web console with the machine options, install the agents on the network computers pointing the ocs server ip on them and enable snmp protocols on all of the devices where agent can not be installed.

No comments: