Set Up a LEMP Stack (Nginx, MariaDB, PHP) on Debian 10

The LEMP Stack is a group of software that can be used to serve dynamic web pages and web applications. This tutorial will walk you through the steps to install Nginx, MariaDB and PHP on a Debian 10 machine.

Prerequisites

You will need one Debian 10 (physical or virtual) machine configured with a non-root user having sudo privileges.

Installing Nginx

If this is the first time you'll be using apt on Debian 10, you should start off by updating your local package index and then install the nginx server:

sudo apt update
sudo apt install nginx

On Debian 10, Nginx is configured to start running upon installation. If you have the ufw firewall running, you will need to allow connections to Nginx. Since you haven't configured SSL for your server yet, for now you only need to allow HTTP traffic on port 80.

sudo ufw allow 'Nginx HTTP'
sudo ufw status

Output
Status: active

To                         Action      From
--                         ------      ----
OpenSSH                    ALLOW       Anywhere
Nginx HTTP                ALLOW       Anywhere
OpenSSH (v6)            ALLOW       Anywhere (v6)
Nginx HTTP (v6)        ALLOW       Anywhere (v6)

Installing MariaDB

You need to install the database system to be able to store and manage data for your site.

sudo apt install mariadb-server

We recommend that you should run a security script comes pre-installed with MariaDB. This script will remove some insecure default settings and lock down anonymous access to your database system.

sudo mysql_secure_installation

The first prompt will ask you to enter the current database root password. Because you just installed MariaDB and haven’t made any configuration changes yet, this password will be blank, so just press ENTER at the prompt.

The next prompt asks you whether you'd like to set up a database root password. Because MariaDB uses a special authentication method for the root user that is typically safer than using a password, you don't need to set this now. Type N and then press ENTER.

Rest, you can press Y and then ENTER to accept the defaults for all the subsequent questions. This will remove anonymous users and the test database, disable remote root login, and load these new rules so that MariaDB immediately respects the changes you have made.

NOTE: RUNNING ALL PARTS OF THIS SCRIPT IS RECOMMENDED FOR ALL MariaDB
      SERVERS IN PRODUCTION USE!  PLEASE READ EACH STEP CAREFULLY!
In order to log into MariaDB to secure it, we'll need the current
password for the root user.  If you've just installed MariaDB, and
you haven't set the root password yet, the password will be blank,
so you should just press enter here.
Enter current password for root (enter for none):
OK, successfully used password, moving on...
Setting the root password ensures that nobody can log into the MariaDB
root user without the proper authorisation.
Set root password? [Y/n] n
By default, a MariaDB installation has an anonymous user, allowing anyone
to log into MariaDB without having to have a user account created for
them.  This is intended only for testing, and to make the installation
go a bit smoother.  You should remove them before moving into a
production environment.
Remove anonymous users? [Y/n] y
 ... Success!
Normally, root should only be allowed to connect from 'localhost'.  This
ensures that someone cannot guess at the root password from the network.
Disallow root login remotely? [Y/n] y
 ... Success!
By default, MariaDB comes with a database named 'test' that anyone can
access.  This is also intended only for testing, and should be removed
before moving into a production environment.
Remove test database and access to it? [Y/n] y
 - Dropping test database...
 ... Success!
 - Removing privileges on test database...
 ... Success!
Reloading the privilege tables will ensure that all changes made so far
will take effect immediately.
Reload privilege tables now? [Y/n] y
 ... Success!
Cleaning up...
All done!  If you've completed all of the above steps, your MariaDB
installation should now be secure.
Thanks for using MariaDB!

Now log in to the MariaDB console by typing:

sudo mariadb

create database testdb;
grant all on testdb.* to 'testuser'@'localhost' identified by 'TypePasswordHere' with grant option;
flush privileges;
exit

You can test if the new user has the proper permissions by logging in to the MariaDB console again, this time using the custom user credentials:

sudo mariadb -u testuser -p
show databases;

This will give you the following output:

+--------------------+
| Database           |
+--------------------+
| information_schema |
| testdb             |
+--------------------+
2 rows in set (0.000 sec)

mysql> exit

Installing PHP

We need to install php-fpm, which stands for "PHP fastCGI process manager", and tell Nginx to pass PHP requests to this software for processing. Additionally, you'll need php-mysql, a PHP module that allows PHP to communicate with MySQL-based databases. Core PHP packages will automatically be installed as dependencies.

sudo apt install php-fpm php-mysql

Configuring Nginx

Nginx has one server block enabled by default and is configured to serve documents out of a directory at /var/www/html. While this works well for a single site, it can become difficult to manage if you are hosting multiple sites. Instead of modifying /var/www/html, let's create a directory structure within /var/www for the website, leaving /var/www/html in place as the default directory to be served if a client request doesn't match any other sites.

Create the root web directory as follows:

sudo mkdir /var/www/techsupportpk
sudo chown -R $USER:$USER /var/www/techsupportpk
sudo nano /etc/nginx/sites-available/techsupportpk.conf
 server {
    listen 80;
    listen [::]:80;
    root /var/www/techsupportpk;
    index index.php index.html index.htm;
    server_name techsupportpk.com;
    location / {
        try_files $uri $uri/ =404;
    }
    location ~ \.php$ {
        include snippets/fastcgi-php.conf;
        fastcgi_pass unix:/var/run/php/php7.3-fpm.sock;
    }
}

Save and close.

Activate your configuration by linking to the config file from Nginx's sites-enabled directory:

sudo ln -s /etc/nginx/sites-available/techsupportpk.conf /etc/nginx/sites-enabled/
sudo nginx -t
sudo systemctl reload nginx

Test PHP Configuration

You can test Nginx and PHP functionality by creating a test PHP file in your document root. Open a new file called info.php within your document root in your favorite text editor:

nano /var/www/techsupportpk/info.php
<?php
phpinfo();
?>

Save and close the file by typing CTRL+X and then y and ENTER to confirm.

You can now access this info.php in your web browser by visiting the domain name or IP address you've set up in your Nginx configuration file like below:

http://techsupportpk.com/info.php or http://172.20.10.8/info.php
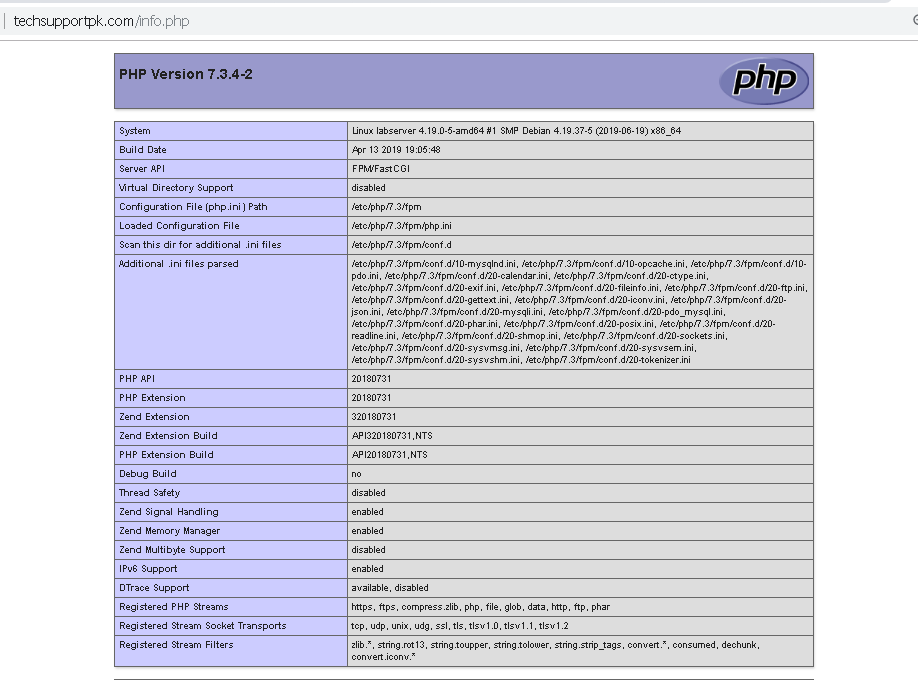

You will see a web page containing detailed information about your Debian 10 server:

Once tested your PHP and Nginx functionality through info.php file, it's best to remove the file as it contains sensitive information about your PHP environment and your Debian server.

sudo rm /var/www/techsupportpk/info.php

Testing Database

Now we will test if PHP is able to connect to MariaDB and execute database queries, you can create a test table with dummy data and query for its contents from a PHP script.

mariadb -u testuser -p
create table testdb.php_list (
 item_id INT AUTO_INCREMENT,
 content VARCHAR(255),
 PRIMARY KEY(item_id)
);

insert into testdb.php_list (content) VALUES ("Testing item 1");
insert into testdb.php_list (content) VALUES ("Testing item 2");
insert into testdb.php_list (content) VALUES ("Testing item 3");
insert into testdb.php_list (content) VALUES ("Testing item 4");
select * from testdb.php_list;

You will see the following output:

+---------+----------------+
| item_id | content        |
+---------+----------------+
|       1 | Testing item 1 |
|       2 | Testing item 2 |
|       3 | Testing item 3 |
|       4 | Testing item 4 |
+---------+----------------+
4 rows in set (0.000 sec)

After confirming that you have valid data in your test table, you can exit the MariaDB console:

exit

Now you can create the PHP script that will connect to MariaDB and query for your content. Create a new PHP file in your custom web root directory using your preferred editor.

nano /var/www/techsupportpk/list.php

Add the following content to your PHP script:

<?php
$user = "testuser";
$password = "Password";
$database = "testdb";
$table = "php_list";
try {
  $db = new PDO("mysql:host=localhost;dbname=$database", $user, $password);
  echo "<h2>TESTING Nginx, PHP and MariaDB Functionality</h2><ol>";
  foreach($db->query("SELECT content FROM $table") as $row) {
    echo "<li>" . $row['content'] . "</li>";
  }
  echo "</ol>";
} catch (PDOException $e) {
    print "Error!: " . $e->getMessage() . "<br/>";
    die();
}

Save and close the file when you're done editing.

You can now access this page in your web browser by visiting the domain name or IP address followed by /list.php like below:

http://techsupportpk.com/list.php or http://172.20.10.8/list.php

You should see a page like this, showing the content you've inserted in your test table:
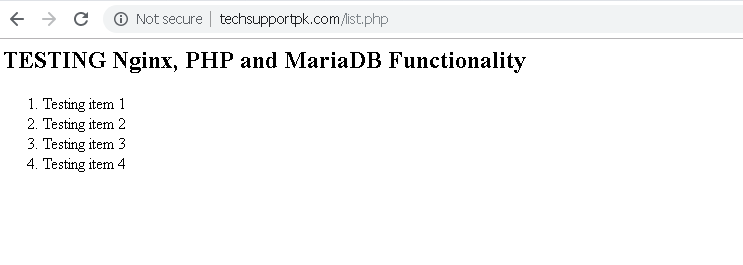

That means your PHP environment is ready to connect and interact with your MariaDB server.

Securing Nginx with SSL

For this guide, we will generate a self signed certificate using openssl.

sudo nano /etc/ssl/openssl.cnf

add or update the following parameters and replace highlighted text to reflect yours:

copy_extensions = copy

[ v3_ca ]
subjectAltName      = @alternate_names
keyUsage = digitalSignature, keyEncipherment

[alternate_names]
DNS.1   =       techsupportpk.com

Save and close.

Now run the following command to generate a self signed certificate:

sudo openssl genrsa -out /etc/ssl/techsupportpk.key 2048
sudo openssl req -new -x509 -key /etc/ssl/techsupportpk.key -sha256 -out /etc/ssl/techsupportpk.crt -days 365

sudo nano /etc/nginx/sites-available/techsupportpk.conf

add the following ssl parameters in your configuration file. Replace highlighted text to reflect yours.

server {
listen 80;
listen [::]:80;
listen 443;

ssl on;
ssl_certificate /etc/ssl/techsupportpk.crt;
ssl_certificate_key /etc/ssl/techsupportpk.key;

root /var/www/techsupportpk;
index index.php index.html index.htm;
server_name techsupportpk.com;

    location / {
        try_files $uri $uri/ =404;
    }
    location ~ \.php$ {
        include snippets/fastcgi-php.conf;
        fastcgi_pass unix:/var/run/php/php7.3-fpm.sock;
    }
}

Save and close.

Update firewall settings to allow SSL traffic then verify nginx configuration and restart nginx service to take changes into effect.

sudo ufw allow 'Nginx HTTPS'
sudo nginx -t
sudo systemctl reload nginx

You can now access this page with https in your web browser by visiting the domain name or IP address followed by /list.php like below:

https://techsupportpk.com/list.php or https://172.20.10.8/list.php

Wrapping up

We have successfully installed and configured Nginx web server to handle PHP requests through php-fpm and configured a MariaDB database to store website's data.

No comments:

Powered by Blogger.