

Consider a situation, you have broken the FSM in your IBM Flex or IBM PureFlex System, either it won't power on any more, its just failing to start or its inaccessible. In my case after a software update it wouldn't boot up correctly and some how the root user had been corrupted, so this meant that I couldn't get access to the system. Below I'll go through the steps I took to get the software re-installed from the 'recovery' section of the internal disk on the FSM node.
FMS Recovery From Internal Disk
First you need to log into the CMM (Chassis Management Module) in order to reset the FSM node

Once you've done that You need to look at booting FSM and opening a
console, so select the FSM then from the drop down box select 'Launch
Compute Node Console'

This should present a pop-up window which will enable you to launch the remote console to the node

This will present you with IMM window for the node

So put in you access credentials such as USERID and the password you have set for this and you should see this screen

Then from the window above select the 'REMOTE CONTROL' button to control the server

From here you can select the 'Start remote control in multi-user mode'
to bring up the console, which will open you up a window to the server

From this window you want to interrupt the boot phase to change the boot
disk, so if you get your 'Ctrl-Alt-F1' ready from the menus you should
see the window below

You can see that the message ' key
pressed' is displayed if you are successful, then your be presented with
the 'System Configuration and Boot Management' menu, so select 'Start
Options' to get the screen below

Select Hard Disk 1 to boot of the recovery disk and select 'Full system recovery' as below

Once you have kicked it off you should see a boot phase similar to this, so you know the boot-up is going well

After the boot has completed you should be presented with the system
Flex recovery menus, of which the license agreement is first

Select Agree on the menu and move to the next part, the Welcome page and set-up wizard

So go though and set your, date/time and password, your also need to set-up your networking again, though most of the hard work has been done, in my case I don't need the advanced routing set

So carry on through the menus, setting up the LAN adapter, Gateway, DNS, and such and once you finish you should see the start-up console. This can take sometime to get through, so go get a tea, or action some other work

And hopefully once you have completed it all OK you should be presented with a lovely login screen

After this point you will need to go in and do the rediscovery of the IBM Flex chassis, the various nodes, switches and storage if you have it. Due you different various features of the IBM Flex depending on what you have, I won't be covering that part here.
Connecting to the management node locally by using the console breakout cable
Use this information to connect to the IBM® Flex
System Manager management
node locally by using the console breakout cable and configure the IBM Flex
System Enterprise Chassis.
Procedure
To connect to the IBM Flex
System Manager management
node locally by using the console breakout cable and configure the IBM Flex
System Enterprise Chassis,
complete the following steps:
- Locate the KVM connector on the management node. See the IBM Flex System Manager management node documentation for the location of this connector.
- Connect the console breakout cable to the KVM connector; then, tighten the captive screws to secure the cable to the KVM connector.
- Connect a monitor, keyboard, and mouse to the console breakout
cable connectors.
- Power on the management node.
- Log in and accept the license agreement. The configuration wizard starts.
Reinstalling the management software from the recovery partition
Use this recovery method if the management software is inoperable because of misconfiguration or corruption, but the
management node hardware is operational and the hard drives have not
failed.
About this task
This procedure returns the management node and management software to factory defaults, and destroys data on the system (but not backups
stored on the hard disk drive). After the recovery process is complete,
you must configure the system with the Management Server Setup wizard
or restore the system from a backup image.
Procedure
- Restart the management node.
- When the firmware splash screen is displayed, press F12. The setup menu is displayed. The screen displays confirmation that F12 has been pressed.
- Select Recovery partition.
- When the boot options screen is displayed, select Full system recovery. After approximately 30 minutes, the recovery process ends and the Management Server Setup wizard opens.
- Either complete the Management Server Setup wizard or restore a previous configuration from a backup.
What to do next
Important: If your recovery partition is an earlier
version of the management software than the version before the recovery
procedure, update the management software to the same version as before
the recovery operation after you complete the Management Server Setup
wizard. If you do not update the management software in this situation,
the management software is older than other components in your environment,
which might cause compatibility problems.
Restoring the CMM manufacturing default configuration
Use this information to restore the CMM to
its manufacturing default configuration.
Attention: When you restore the CMM to
its manufacturing default configuration, all configuration settings
that you made are erased. Be sure to save your current configuration
before you restore the CMM to
its default configuration, if you intend use your previous settings.
You can restore the CMM to
its manufacturing default configuration in three ways:
- In the CMM web interface, select Reset to Defaults from the Mgt Module Management menu. All fields and options are fully described in the CMM web interface online help.
- In the CMM CLI, use the clear command (see clear command for information about command use).
- If you have physical access to the CMM, push the reset button and hold it for approximately 10 seconds (see CMM controls and indicators for the reset button location).
CMM controls and indicators
The IBM® Flex System Chassis Management Module (CMM)
has LEDs and controls that you can use to obtain status information
and restart the CMM.
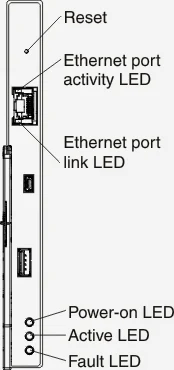
The CMM has the following LEDs and controls:
- Reset button
- Use this button to restart the Chassis Management Module. Insert a straightened paper clip into the reset button pinhole; then, press and hold the button in for at least one second to restart the CMM. The restart process initiates upon release of the reset button but might not be immediately apparent in some cases.
- Attention: If you press the reset button, hold it for at least 10 seconds, then release it, the CMM will restart and reset back to the factory default configuration. Be sure to save your current configuration before you reset the CMM back to factory defaults. The combined reset and restart process initiates upon release of the reset button but might not be immediately apparent in some cases.Note: Both the CMM restart and reset to factory default processes require a short period of time to complete.
- Power-on LED
- When this LED is lit (green), it indicates that the CMM has power.
- Active LED
- When this LED is lit (green), it indicates that the CMM is
actively controlling the chassis.
Only one CMM actively controls the chassis. If two CMMs are installed in the chassis, this LED is lit on only one CMM. - Fault LED
- When this LED is lit (yellow), an error has been detected in the CMM. When the error LED is lit, the chassis fault LED is also lit.
- Ethernet port link (RJ-45) LED
- When this LED is lit (green), it indicates that there is an active connection through the remote management and console (Ethernet) port to the management network.
- Ethernet port activity (RJ-45) LED
- When this LED is flashing (green), it indicates that there is activity through the remote management and console (Ethernet) port over the management network.
No comments: