
This guide will walk you through the steps to install PostgreSQL release 13 on a CentOS 7 or 8. These instructions can also be applied if you are running a Fedora or Oracle Linux in your environment.
Prerequisite
You will need one (physical or virtual) machine with CentOS 7 or 8 minimal installed having sudo non-root user privileges. You must set correct timezone on your server before proceeding with the installation:
Install EPEL Repository
For CentOS 7, type below command to install epel repository:
For CentOS 8, type below command to install epel repository:Install PostgreSQL
For CentOS 7, type below command to install PostgreSQL release 13:
For CentOS 8, type below command to install PostgreSQL release 13:Initialize PostgreSQL Cluster
A PostgreSQL database cluster is a collection of databases that are managed by a single server instance. Creating a database cluster consists of creating the directories in which the database data will be placed, generating the shared catalog tables, and creating the template and postgres databases.
Type below command to initialize PostgreSQL database cluster:
Type below command to start PostgreSQL server:Now that your database is up and running, let's learn how PostgreSQL works and how it is different from similar database management systems you may have used in the past.
Creating PostgreSQL Roles and Databases
By default, Postgres uses a concept called roles to handle in authentication and authorization. These are, in some ways, similar to regular Unix-style accounts, but Postgres does not distinguish between users and groups and instead prefers the more flexible term role.
Upon installation, Postgres is set up to use ident authentication, meaning that it associates Postgres roles with a matching Unix/Linux system account. If a role exists within Postgres, a Unix/Linux username with the same name is able to sign in as that role.
The installation procedure created a default user account called postgres that is associated with the default postgres role. In order to use postgres, you can log in to that account. There are several ways to use this account to access Postgres.
Let's begin with the switching over to the postgres account:
Type below to access a postgres prompt: This will log you into the PostgreSQL prompt, and from here you can interact with the database management system right away. Type below to list default databases: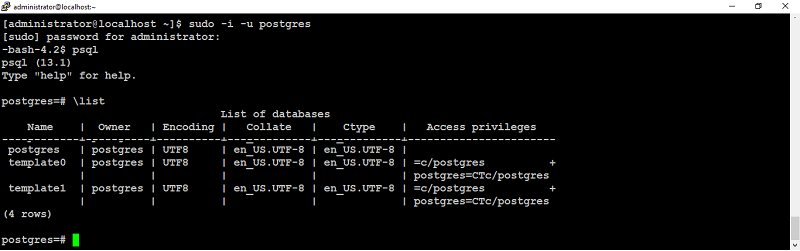
Type below to logout from the postgres prompt:
Type below to exit from the postgres user shellAccess PostgreSQL without Switching the Account
In the above example, you were asked to access PostgreSQL by first switching to the postgres user and then running psql to open the postgres prompt.
You could do this in one step by running the single command as the postgres user with sudo, like below:
This will log you directly into the postgres prompt.

Type below to logout from postgres prompt:
Creating or Removing a Role
With fresh installation, you just have the default postgres role configured within the database. You can create new roles using the createrole command. The --interactive flag will prompt you for the name of the new role and also ask whether it should have superuser permissions.
You can also interactively remove a role from the default database:Creating a New Database
You can create a new database and its associated user like below:
Access PostgreSQL with the New Role
To log in with ident based authentication, you’ll need a Linux user with the same name as your postgres role and database. If you don’t have a matching Linux user available, you can create one with the adduser command.
You will have to do this from your non-root account with sudo privileges (meaning, not logged in as the postgres user):
Once this new account is available, you can switch over and connect to the database by typing: If you want your user to connect to its own database, you can do so by specifying the user like below:Allow Remote Access
By default PostgreSQL access is bound to localhost only. To make the PostgreSQL accept outside connection, you will need to make following changes in the configuration files:
Locate, uncomment and change listen_addresses = 'localhost' to
Save and close the editor when you are finished.
Next, edit pg_hba.conf file to make the changes:
Add the following line at the end of the file to allow PostgreSQL to accept connection from anywhere: You can also limit PostgreSQL to accept connection only from specified IPs:Save and close the editor when you are finished.
Update Firewall Rules
Wrapping up
We hope this guide was helpful to set up PostgreSQL release 13 on your CentOS 7 or 8.
No comments: