Database clustering is particularly useful for highly active website and application. With replication, at least two or more MySQL servers act as a cluster. MySQL multi-node circular replication adds speed and redundancy.
This tutorial is written for Ubuntu 18.04.4, 19.04, 19.10, 20.04 and Debian 9, 10 using a non-root user, which means commands that require elevated privileges are prefixed with sudo.
If you wish you can watch below video tutorial to set up your replication cluster quickly.
You must set correct timezone on each of the nodes with below command:
on dbserver1:
Add, update the following values and replace the bind-address with dbserver2 ip:
on dbserver3:
Add, update the following values and replace bind-address with your dbserver3 ip
Save and close file when you are done.
Once completed, restart the MySQL service on each node to take changes into effect:
on dbserver1:
on dbserver2:
on dbserver3:
You can verify replication user authentication like below:
From dbserver1:
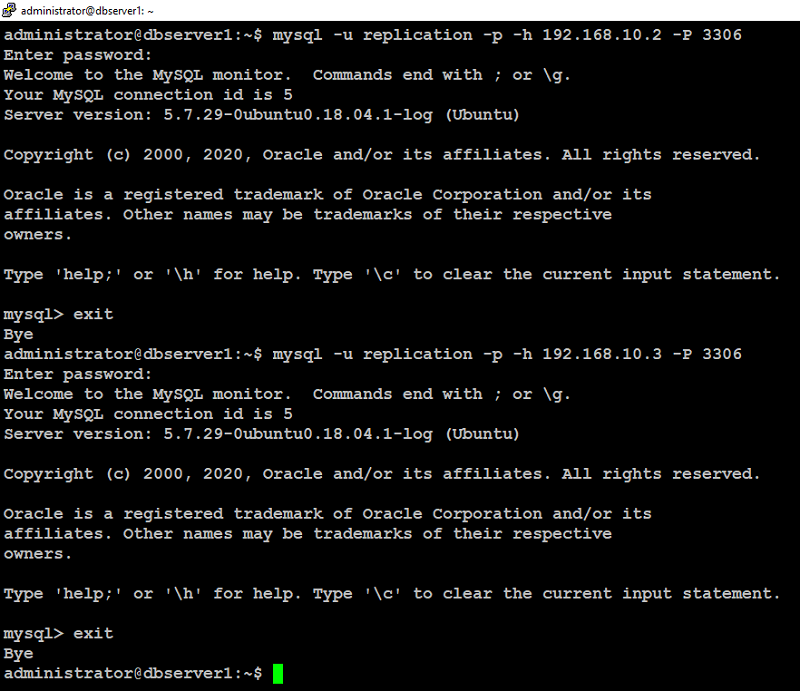
From dbserver2:

From dbserver3:
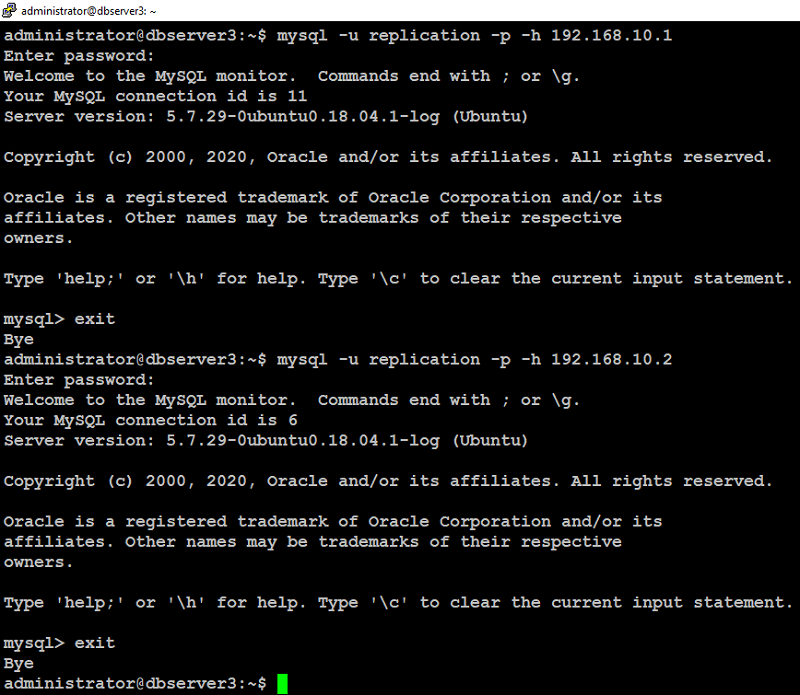
We are able to connect to the remote server’s MySQL instance as you can see in above screenshots.
To configure replication on each node, first login into MySQL prompt on (dbserver3 in our case) and query the master status with below command:
Note the file and position values that are displayed in above command's output.
Now login to first node (dbserver1 in our case) at the MySQL prompt and set up the replication functionality for the database like below.
Next, login to second node (dbserver2 in our case) at the MySQL prompt, set up the replication functionality for the database like below:
Lastly, login to third node (dbserver3 in our case) at mysql prompt, set up the replication functionality for the database like below:
Next, go to first node (dbserver1 in our case) at MySQL prompt and type the below command to start replication process:
Wait 5 seconds, then type below command at MySQL prompt on dbserver1 to verify replication status:
If the above command's output shows Slave_IO_Running=Yes and Slave_SQL_Running=Yes, replication is working.
Next, type the below command at MySQL prompt on dbserver2 to start replication process:
Wait 5 seconds, then type below command at MySQL prompt on dbserver2 to verify the replication status:
If the above command's output shows Slave_IO_Running=Yes and Slave_SQL_Running=Yes, replication is working.
Next, type the below command at MySQL prompt on dbserver3 to start the replication process:
Wait 5 seconds, then type below command at MySQL prompt on dbserver3 to verify replication status:
If the above command's output shows Slave_IO_Running=Yes and Slave_SQL_Running=Yes, replication is working.
Type the below command on mysql prompt to create dummy database reptest:
Type the below command at mysql prompt on dbserver2 to see if dummy databases reptest replicated:
When queried, you should see the reptest and its tables from dbserver1 replicated on dbserver2
Next, type the below command at mysql prompt on dbserver3 to see if dummy database reptest replicated:
When queried, you should see the reptest and its tables from dbserver1 replicated on dbserver3.
add below configuration parameters at the end of the file and make sure you replace highlighted text with yours:
Save and close file when you are finished.
Repeat these steps on dbserver2, dbserver3 as well.
Next, we need to create an additional user on MySQL servers. This user will be used by HAProxy for checking health status of MySQL on each node.
Note that haproxy_check user must be created without any password because haproxy can not handle password authentication for health status check.
Login to any of the nodes at MySQL prompt with below command:
Type below command at MySQL prompt to create a user (haproxy_check):
Create one more additional user with password having database root privileges on MySQL servers to test load balancing functionality later via haproxy
Type below command at MySQL prompt to create root privileges user:
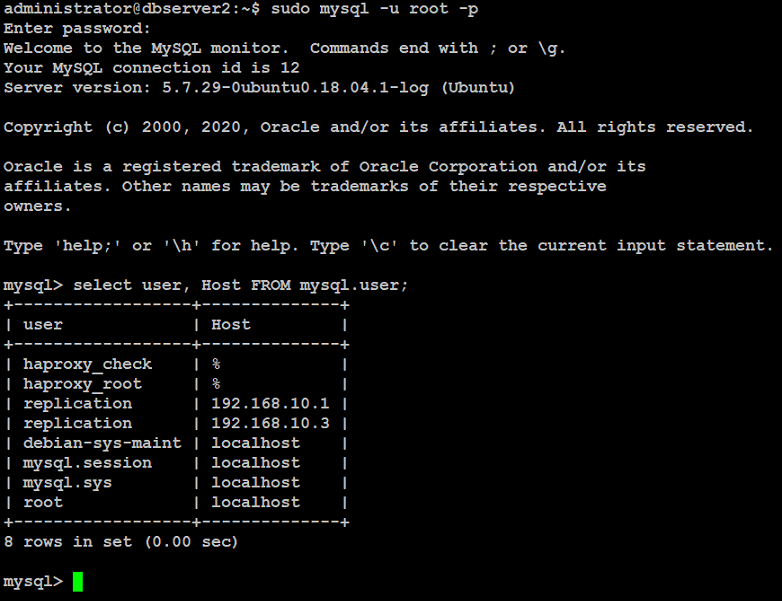
You can verify on remaining nodes at MySQL prompt if haproxy_check and haproxy_root user replicated like below:
If the above command's output shows haproxy_check and haproxy_root users are replicated, you are good to go.
To make virtual IP floating across the database servers (dbserver1, dbserver2, dbserver3) in our case, we need to add net.ipv4.ip_nonlocal_bind=1 directive in sysctl option on each node
Edit /etc/sysctl.conf on dbserver1:
Add below directive:
Save and close file.
Next, type below command:
Repeat the same on dbserver2, dbserver3 as well.
When you are finished, restart HAProxy on all of the nodes with below command:
You can verify haproxy listening stat with below command on each node:

Type below command to install hearbeat on each node (dbserver1, dbserver2, dbserver3) in our case:
Create a /etc/ha.d/authkeys file with same content on each node:
add below configuration parameters and make sure you change the P@ssw0rd with your strong password:
Save and close file.
Apply appropriate permission with below command:
Repeat the same on dbserver2, dbserver3 as well.
This /etc/ha.d/authkeys file will be used by heartbeat to store data to authenticate each other node.
Next, we will create a main configuration file /etc/ha.d/ha.cf for Heartbeat on each node.
Type below command on dbserver1:
Add below configuration parameters but make sure you replace highlighted text with yours:
Save and close file.
Type below command on dbserver2:
Add below configuration parameters but make sure you replace highlighted text with yours:
Save and close file.
Type below command on dbserver3:
Add below configuration parameters but make sure you replace highlighted text with yours:
Save and close file.
Lastly, we need to create the /etc/ha.d/haresources file with same content on dbserver1, dbserver2 and dbserver3.
Type below command on dbserver1:
Add your shared ip address (192.168.10.10) and master node (dbserver1) in our case by default:
Save and close file.
Repeat the same on dbserver2, dbserver3:
When you are finished with the above, restart Heartbeat service on each node with below command:
Repeat same on dbserver2, dbserver3 as well.
Type below command on dbserver1 to verify if heartbeat activated virtual ip:
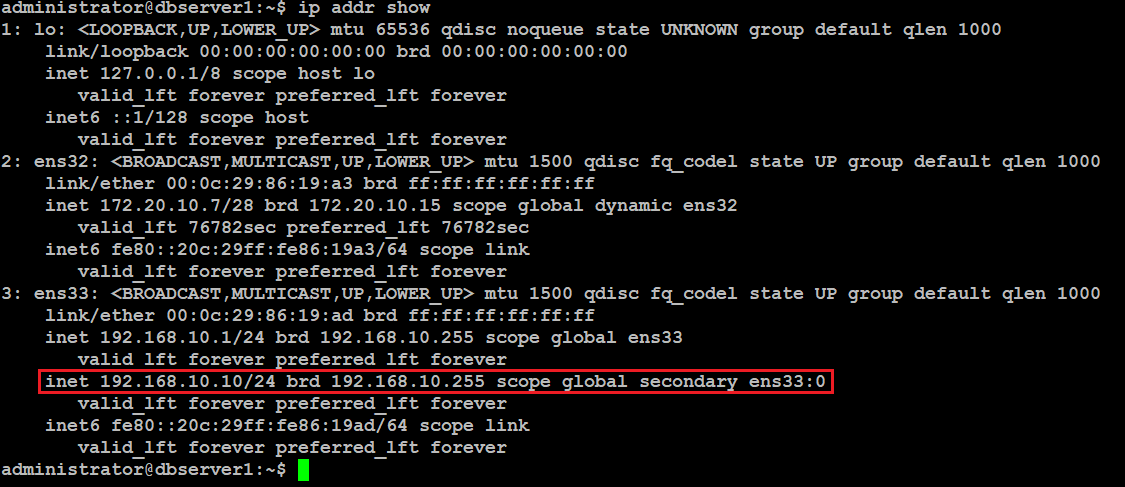
You will see that on dbserver1 you have the virtual ip up and running.
As you can see virtual IP is assigned to first node dbserver1 and HAProxy listening on it, so we can check how it works.
You can simply make a test requests from any of your client machines with mysql-client package installed using below command:
This will ask you for haproxy_root user's password, enter password your created earlier.
You will see the output similar to like below, shows that "round-robin" load balancing working on all of the nodes.
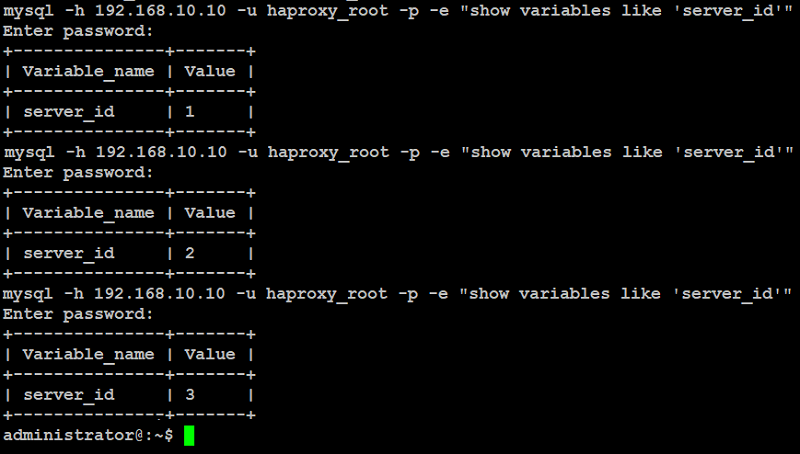
Now we need to check the failover when the dbserver1 will go offline. For example, restart or shutdown the dbserver1 manually, and check that virtual IP was moved to second available node (dbserver2) in our case and requests to the MySQL servers are still okay.
Type below command from client machine again.
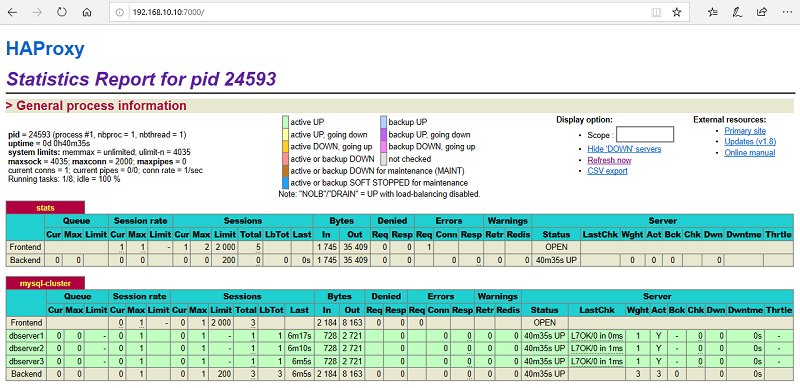
Also check the HAProxy status with any of your preferred browser navigating to http://192.168.10.10:7000 using user admin and password.
You will see the haproxy dashboard with your database server's information like below:
For this guide, we will use these three machines to set up MySQL multi-node circular replication cluster.
| HOSTNAME | IP ADDRESS | PURPOSE |
| dbserver1 | 192.168.10.1 | MySQL, HAProxy, Heartbeat |
| dbserver2 | 192.168.10.2 | MySQL, HAProxy, Heartbeat |
| dbserver3 | 192.168.10.3 | MySQL, HAProxy, Heartbeat |
If you wish you can watch below video tutorial to set up your replication cluster quickly.
Prerequisites
To follow this tutorial, you will need three (physical or virtual) machines with Ubuntu 18.04.4 server installed on each machine having sudo non-root user privileges.
Installing MySQL
Use the following commands to install MySQL on each node (dbserver1, dbserver2, dbserver3) in our case:
Run the script on each node (dbserver1, dbserver2, dbserver3) in our case to secure your mysql installation from unauthorized access.
You will be asked to create a root password. It is recommended, you should select yes to all of the questions on the following prompts:
Configuring MySQL
Edit the /etc/mysql/my.cnf file on each node (dbserver1, dbserver2, dbserver3) in our case.on dbserver1:
Add, update the following values under [mysqld] section and don't forget to replace bind-address with your dbserver1 ip address:
on dbserver2: Add, update the following values and replace the bind-address with dbserver2 ip:
on dbserver3:
Add, update the following values and replace bind-address with your dbserver3 ip
Save and close file when you are done.
Once completed, restart the MySQL service on each node to take changes into effect:
Creating Replication Users
Login to MySQL on each node (dbserver1, dbserver2, dbserver3) and create a replication user like below:on dbserver1:
on dbserver2:
on dbserver3:
You can verify replication user authentication like below:
From dbserver1:

From dbserver2:

From dbserver3:

We are able to connect to the remote server’s MySQL instance as you can see in above screenshots.
Configuring Database Replication
We will configure MySQL master-master circular replication topology which means in our three node replication cluster:- dberver1's master will be dbserver3
- dberver2's master will be dbserver1
- dbserver3's master will be dbserver2
To configure replication on each node, first login into MySQL prompt on (dbserver3 in our case) and query the master status with below command:
Note the file and position values that are displayed in above command's output.
Now login to first node (dbserver1 in our case) at the MySQL prompt and set up the replication functionality for the database like below.
Next, login to second node (dbserver2 in our case) at the MySQL prompt, set up the replication functionality for the database like below:
Lastly, login to third node (dbserver3 in our case) at mysql prompt, set up the replication functionality for the database like below:
Next, go to first node (dbserver1 in our case) at MySQL prompt and type the below command to start replication process:
Wait 5 seconds, then type below command at MySQL prompt on dbserver1 to verify replication status:
If the above command's output shows Slave_IO_Running=Yes and Slave_SQL_Running=Yes, replication is working.
Next, type the below command at MySQL prompt on dbserver2 to start replication process:
Wait 5 seconds, then type below command at MySQL prompt on dbserver2 to verify the replication status:
If the above command's output shows Slave_IO_Running=Yes and Slave_SQL_Running=Yes, replication is working.
Next, type the below command at MySQL prompt on dbserver3 to start the replication process:
Wait 5 seconds, then type below command at MySQL prompt on dbserver3 to verify replication status:
If the above command's output shows Slave_IO_Running=Yes and Slave_SQL_Running=Yes, replication is working.
Testing MySQL Replication
You can simply test replication between the servers by creating a dummy database and inserting a dummy row on dbserver1 like below:Type the below command on mysql prompt to create dummy database reptest:
Type the below command at mysql prompt on dbserver2 to see if dummy databases reptest replicated:
When queried, you should see the reptest and its tables from dbserver1 replicated on dbserver2
Next, type the below command at mysql prompt on dbserver3 to see if dummy database reptest replicated:
When queried, you should see the reptest and its tables from dbserver1 replicated on dbserver3.
Installing HAProxy
You will need to install haproxy on each node (dbserver1, dbserver2, dbserver3) in our case with below command:Configuring HAProxy
To configure haproxy, you need to edit /etc/haproxy/haproxy.cfg and add few configuration parameters like below.
Login to your first node (dbserver1) in our case, take backup of haproxy.cfg file with below command:
Next edit /etc/haproxy/haproxy.cfg file: add below configuration parameters at the end of the file and make sure you replace highlighted text with yours:
Save and close file when you are finished.
Repeat these steps on dbserver2, dbserver3 as well.
Next, we need to create an additional user on MySQL servers. This user will be used by HAProxy for checking health status of MySQL on each node.
Note that haproxy_check user must be created without any password because haproxy can not handle password authentication for health status check.
Login to any of the nodes at MySQL prompt with below command:
Type below command at MySQL prompt to create a user (haproxy_check):
Create one more additional user with password having database root privileges on MySQL servers to test load balancing functionality later via haproxy
Type below command at MySQL prompt to create root privileges user:
You can verify on remaining nodes at MySQL prompt if haproxy_check and haproxy_root user replicated like below:
If the above command's output shows haproxy_check and haproxy_root users are replicated, you are good to go.

To make virtual IP floating across the database servers (dbserver1, dbserver2, dbserver3) in our case, we need to add net.ipv4.ip_nonlocal_bind=1 directive in sysctl option on each node
Edit /etc/sysctl.conf on dbserver1:
Add below directive:
Save and close file.
Next, type below command:
Repeat the same on dbserver2, dbserver3 as well.
When you are finished, restart HAProxy on all of the nodes with below command:
You can verify haproxy listening stat with below command on each node:

Installing and Configuring Heartbeat
In this step, we will install and configure Heartbeat on each node to make the virtual IP functional. This virtual IP will automatically float to second available node if primary node goes down.Type below command to install hearbeat on each node (dbserver1, dbserver2, dbserver3) in our case:
Create a /etc/ha.d/authkeys file with same content on each node:
add below configuration parameters and make sure you change the P@ssw0rd with your strong password:
Save and close file.
Apply appropriate permission with below command:
Repeat the same on dbserver2, dbserver3 as well.
This /etc/ha.d/authkeys file will be used by heartbeat to store data to authenticate each other node.
Next, we will create a main configuration file /etc/ha.d/ha.cf for Heartbeat on each node.
Type below command on dbserver1:
Add below configuration parameters but make sure you replace highlighted text with yours:
Save and close file.
Type below command on dbserver2:
Add below configuration parameters but make sure you replace highlighted text with yours:
Save and close file.
Type below command on dbserver3:
Add below configuration parameters but make sure you replace highlighted text with yours:
Save and close file.
Lastly, we need to create the /etc/ha.d/haresources file with same content on dbserver1, dbserver2 and dbserver3.
Type below command on dbserver1:
Add your shared ip address (192.168.10.10) and master node (dbserver1) in our case by default:
Save and close file.
Repeat the same on dbserver2, dbserver3:
When you are finished with the above, restart Heartbeat service on each node with below command:
Repeat same on dbserver2, dbserver3 as well.
Type below command on dbserver1 to verify if heartbeat activated virtual ip:

You will see that on dbserver1 you have the virtual ip up and running.
As you can see virtual IP is assigned to first node dbserver1 and HAProxy listening on it, so we can check how it works.
You can simply make a test requests from any of your client machines with mysql-client package installed using below command:
This will ask you for haproxy_root user's password, enter password your created earlier.
You will see the output similar to like below, shows that "round-robin" load balancing working on all of the nodes.

Now we need to check the failover when the dbserver1 will go offline. For example, restart or shutdown the dbserver1 manually, and check that virtual IP was moved to second available node (dbserver2) in our case and requests to the MySQL servers are still okay.
Type below command from client machine again.
Also check the HAProxy status with any of your preferred browser navigating to http://192.168.10.10:7000 using user admin and password.
You will see the haproxy dashboard with your database server's information like below:


Hello,
ReplyDeleteAfter run "$ sudo apt -y install heartbeat" command getting error which is mentioned below:
info: See also: http://linux-ha.org/wiki/Ha.cf#node_directive
WARN: Deprecated 'legacy' auto_failback option selected.
WARN: Please convert to 'auto_failback on'.
WARN: See documentation for conversion details.
WARN: Logging daemon is disabled --enabling logging daemon is recommended
ERROR: Configuration error, heartbeat not started.
heartbeat.service: Control process exited, code=exited status=6
Failed to start LSB: High-availability services..
heartbeat.service: Unit entered failed state.
heartbeat.service: Failed with result 'exit-code'.
heartbeat.service: Control process exited, code=exited status=6
Failed to start LSB: High-availability services..
heartbeat.service: Unit entered failed state.
heartbeat.service: Failed with result 'exit-code'.
Please help out me.
Pay attention to suggested option in the output you shared. Fix them first
DeleteWARN: Please convert to 'auto_failback on'.
WARN: Logging daemon is disabled --enabling logging daemon is recommended
Hello Sir,
ReplyDeleteI have fixed 'auto_failback on'. can you give some direction how to enabling logging daemon.
Here is latest output:
heartbeat: baudrate setting must precede media statementsheartbeat[5275]: info: Pacemaker support
ERROR: Current node [mysql2-virtualbox] not in configuration!
info: By default, cluster nodes are named by `uname -n` and must be declared wit
info: See also: http://linux-ha.org/wiki/Ha.cf#node_directive
WARN: Logging daemon is disabled --enabling logging daemon is recommended
heartbeat[5275]: 2020/08/01_13:29:44 ERROR: Configuration error, heartbeat not started.
heartbeat.service: Control process exited, code=exited status=6
Failed to start LSB: High-availability services..
heartbeat.service: Unit entered failed state.
heartbeat.service: Failed with result 'exit-code'.
ha_check user cannot be created due password policy restrictions enforced earlier during mysql_secure_installation. How to fix this?
ReplyDeleteLog in to mysql prompt with root privileges and set the password policy to low using the following:
Deletemysql -h localhost -u root -p
SET GLOBAL validate_password_length = 6;
SET GLOBAL validate_password_number_count = 0;
SET GLOBAL validate_password_policy=LOW;
Hello
ReplyDeletecreate user 'haproxy_check'@'%';
can't create. ERROR 1819 (HY000): Your password does not satisfy the current policy requirements
How to create ?
Set strong password like P@ssw0rd123
DeleteBut 'haproxy_check' user should create without any password.
DeleteYes but for that, first you have to change password complexity in your database
DeleteHow to do it? Can you tell me? I haven't been able to create this account for 3 days already.
DeleteHow to change this? Could you help ?
DeleteRun “sudo mysql_secure_installation” script and select 0 at password policy prompt.
DeleteHello
ReplyDeleteCannot creare 'haproxy_check' user
Error - Your password does not satisfy the current policy requirements
What can be a problem ?