This guide will walk you through the steps to install and configure phpMyAdmin with Nginx web server on CentOS, RHEL 8.
phpMyAdmin is a free software tool written in PHP, intended to handle the administration of MySQL/MariaDB over the Web interface. phpMyAdmin supports a wide range of database operations including (managing databases, tables, columns, relations, indexes, users, permissions, etc) can be performed via the user interface, while you still have the ability to directly execute any SQL statement.
Note: With CentOS, RHEL 8 release, yum command has been replaced with dnf and in near future yum package manager will be discontinued. It is now recommended to use dnf for installing packages but if you still wish to use yum you can use it.
Prerequisites
You will need one (physical or virtual) machine installed with CentOS, or RHEL 8 Linux having sudo non-root user privileges
Set Timezone
You can correct your server timezone by typing the following command but make sure you replace Asia/Karachi with yours
sudo timedatectl set-timezone Asia/Karachi
Adding EPEL Repository
It is always recommended to add extra packages for enterprise Linux on your fresh CentOS/RHEL server:
sudo dnf -y install https://dl.fedoraproject.org/pub/epel/epel-release-latest-8.noarch.rpm
sudo dnf config-manager --set-enabled PowerTools
sudo dnf -y update
If you are on RHEL 8, execute the following command as well:
sudo ARCH=$( /bin/arch )
sudo subscription-manager repos --enable "codeready-builder-for-rhel-8-${ARCH}-rpms"
sudo dnf config-manager --set-enabled PowerTools
Installing PHP
You can install latest PHP and its commonly used extensions with the below command:
sudo dnf -y install https://rpms.remirepo.net/enterprise/remi-release-8.rpm
sudo dnf -y install php php-common php-process php-xmlrpc php-xml php-soap php-snmp php-recode php-bcmath php-cli php-dba php-dbg php-mbstring php-odbc php-pecl-apcu-devel php-pecl-zip php-pgsql php-pecl-apcu php-pear php-pdo php-opcache php-devel php-embedded php-enchant php-gd php-fpm php-gmp php-intl php-ldap php-json php-mysqlnd php-pdo php-gd php-mbstring zip unzip tar wget
Installing Nginx
Type the following command to install Nginx web server:
sudo dnf -y install nginx nginx-all-modules
Now starting Nginx service and making it persistent even when system reboots:
sudo systemctl start nginx
sudo systemctl enable nginx
Installing MariaDB
If you would like to user MariaDB as your database, type the below command to install:
sudo dnf -y install mariadb-server
Starting MariaDB service and making it persistent even when system reboots:
sudo systemctl start mariadb
sudo systemctl enable mariadb
Or if you still wish to use MySQL as your database, type the below command to install:
sudo dnf -y install mysql-server mysql
Securing MariaDB/MySQL
By default MariaDB/MySQL has no root password and anyone can intrude into your database, so run the below script and follow on screen instruction to secure it:
sudo mysql_secure_installation
Response to the following prompts on your server like below:
NOTE: RUNNING ALL PARTS OF THIS SCRIPT IS RECOMMENDED FOR ALL MariaDB
      SERVERS IN PRODUCTION USE!  PLEASE READ EACH STEP CAREFULLY!

In order to log into MariaDB to secure it, we'll need the current
password for the root user.  If you've just installed MariaDB, and
you haven't set the root password yet, the password will be blank,
so you should just press enter here.

Enter current password for root (enter for none):
OK, successfully used password, moving on...

Setting the root password ensures that nobody can log into the MariaDB
root user without the proper authorisation.

Set root password? [Y/n] y
New password:
Re-enter new password:
Password updated successfully!
Reloading privilege tables..
 ... Success!

By default, a MariaDB installation has an anonymous user, allowing anyone
to log into MariaDB without having to have a user account created for
them.  This is intended only for testing, and to make the installation
go a bit smoother.  You should remove them before moving into a
production environment.

Remove anonymous users? [Y/n] y
 ... Success!

Normally, root should only be allowed to connect from 'localhost'.  This
ensures that someone cannot guess at the root password from the network.

Disallow root login remotely? [Y/n] y
 ... Success!

By default, MariaDB comes with a database named 'test' that anyone can
access.  This is also intended only for testing, and should be removed
before moving into a production environment.

Remove test database and access to it? [Y/n] y
 - Dropping test database...
 ... Success!
 - Removing privileges on test database...
 ... Success!

Reloading the privilege tables will ensure that all changes made so far
will take effect immediately.

Reload privilege tables now? [Y/n] y
 ... Success!

Cleaning up...

All done!  If you've completed all of the above steps, your MariaDB
installation should now be secure.

Thanks for using MariaDB!
Enabling SSL
We need to generate an SSL certificate for our Nginx server to enable HTTPS secure protocol:
sudo openssl req -x509 -nodes -days 3650 -newkey rsa:2048 -keyout /etc/pki/tls/private/nginx.key -out /etc/pki/tls/certs/nginx.crt
Response to the following prompts with yours:
Country Name (2 letter code) [XX]:PK
State or Province Name (full name) []:Sind
Locality Name (eg, city) [Default City]:Karachi
Organization Name (eg, company) [Default Company Ltd]:TECH SUPPORT
Organizational Unit Name (eg, section) []:IT
Common Name (eg, your name or your server's hostname) []:localhost
Email Address []:support@techsupportpk.com
Now edit default configuration file from Nginx like below:
sudo vi /etc/nginx/nginx.conf
Uncomment the below parameters to enable HTTPS secure protocol and make sure you update ssl_certificate and ssl_certificate_key parameters with your newly generated certificate file:
# Settings for a TLS enabled server.
    server {
        listen       443 ssl http2 default_server;
        listen       [::]:443 ssl http2 default_server;
#        server_name  _;
#        root         /usr/share/nginx/html;
       ssl_certificate "/etc/pki/tls/certs/nginx.crt";
       ssl_certificate_key "/etc/pki/tls/private/nginx.key";
       ssl_session_cache shared:SSL:1m;
       ssl_session_timeout  10m;
       ssl_ciphers PROFILE=SYSTEM;
       ssl_prefer_server_ciphers on;
       include /etc/nginx/default.d/*.conf;
        location / {
        }
        error_page 404 /404.html;
            location = /40x.html {
        }
        error_page 500 502 503 504 /50x.html;
            location = /50x.html {
        }
    }
Testing Nginx, PHP
Now create info.php page under /usr/share/nginx/html to test your Apache and PHP functionality:
sudo vi /usr/share/nginx/html/info.php
Add following code into it:
<?php
phpinfo();
?>
Save and close file.
Restart Nginx to take changes into effect:
sudo systemctl restart nginx
Add firewall rules to allow HTTPS traffic:
sudo firewall-cmd --zone=public --permanent --add-service=https
sudo firewall-cmd --reload
Open up you preferred web browser and navigate to nginx default page https://your_server_name_or_ip and if you see the below page, then your nginx is working as expected
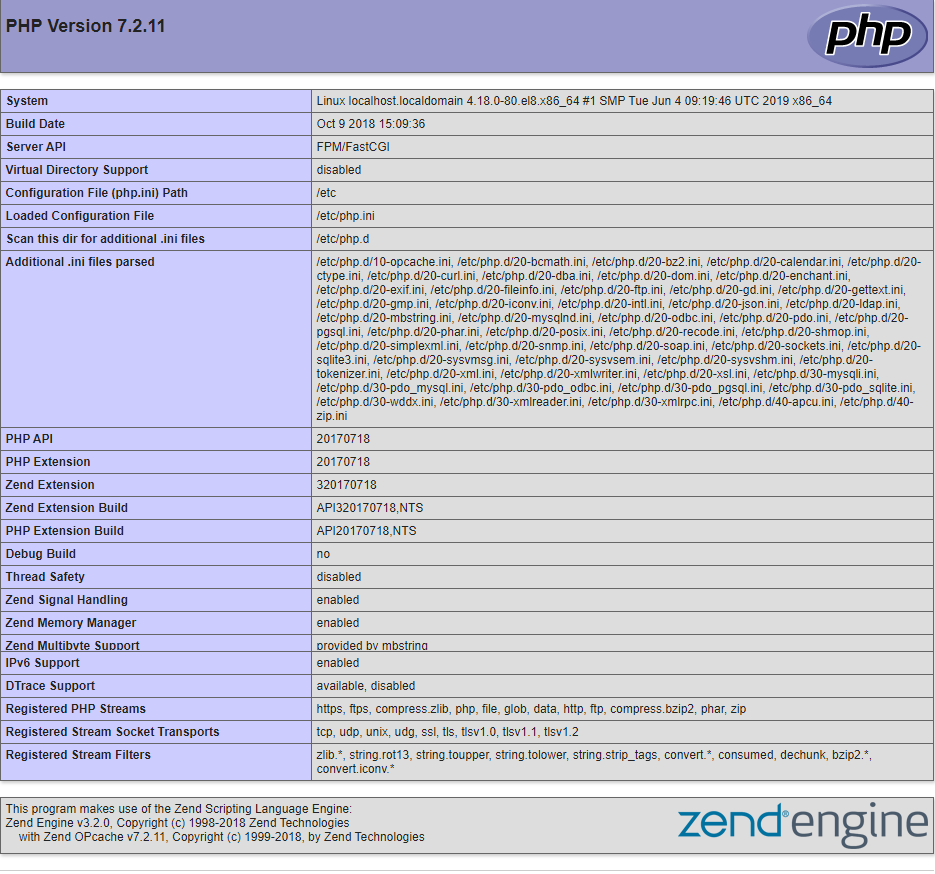
Now navigate to https://your_server_name_or_ip/info.php and if you see below page, then your Nginx and PHP working as expected.
Downloading phpMyAdmin
You can check the current release on phpMyAdmin website, then copy the downloadable link:
Set phpMyAdmin version to your CentOS/RHEL server environment variable:
export VER="5.0.0"
Now download the latest release of phpMyAdmin and extract it like below:
curl -o phpMyAdmin-5.0.0-all-languages.zip https://files.phpmyadmin.net/phpMyAdmin/5.0.0/phpMyAdmin-5.0.0-all-languages.zip
sudo unzip -q phpMyAdmin*.zip
sudo mv phpMyAdmin-5.0.0-all-languages /usr/share/nginx/html/phpmyadmin
Copy sample configuration file like below:
sudo cp /usr/share/nginx/html/phpmyadmin/config.sample.inc.php /usr/share/nginx/html/phpmyadmin/config.inc.php
Now edit config.inc.php file:
sudo vi /usr/share/nginx/html/phpmyadmin/config.inc.php
Set a secret passphrase should be 32 chars long as well as set tmp directory like below:
$cfg['blowfish_secret'] = '$2a$07$H6V9J74bK5S5qez6CRXt7OviIqRlFwJiniEFAaBsGXoz8MCukudia';
$cfg['TempDir'] = '/var/lib/phpmyadmin/tmp';
Save and close file when you are finished.
Now create tmp directory and set appropriate permission like below:
sudo mkdir /var/lib/phpmyadmin
sudo mkdir /var/lib/phpmyadmin/tmp
sudo chown -R nginx:nginx /var/lib/phpmyadmin/tmp
Restart Nginx service to take changes into effect:
sudo systemctl restart nginx
Configuring SELinux
If SELinux is in Enforcing mode on your CentOS/RHEL server, you’ll get permission denied error when you try to access phpMyAdmin page.
Type the below command to allow it pass-throw selinux:
sudo semanage fcontext -a -t httpd_sys_content_t "/usr/share/nginx/html/phpmyadmin(/.*)?"
sudo restorecon -Rv /usr/share/nginx/html/phpmyadmin
Or type just below command to disable selinux enforcing:
sudo setenforce 0
Access phpMyAdmin Web interface
Open up web browser on the host you allowed to access phpMyAdmin web interface in above Apache configuration file, then navigate to https://your_server_name_or_ip/phpmyadmin and you will see the below phpMyAdmin login page.
For the first time you can log in with database user root and password whatever you set up during mysql_secure_installation script.
Once you log in, you will see the below man page
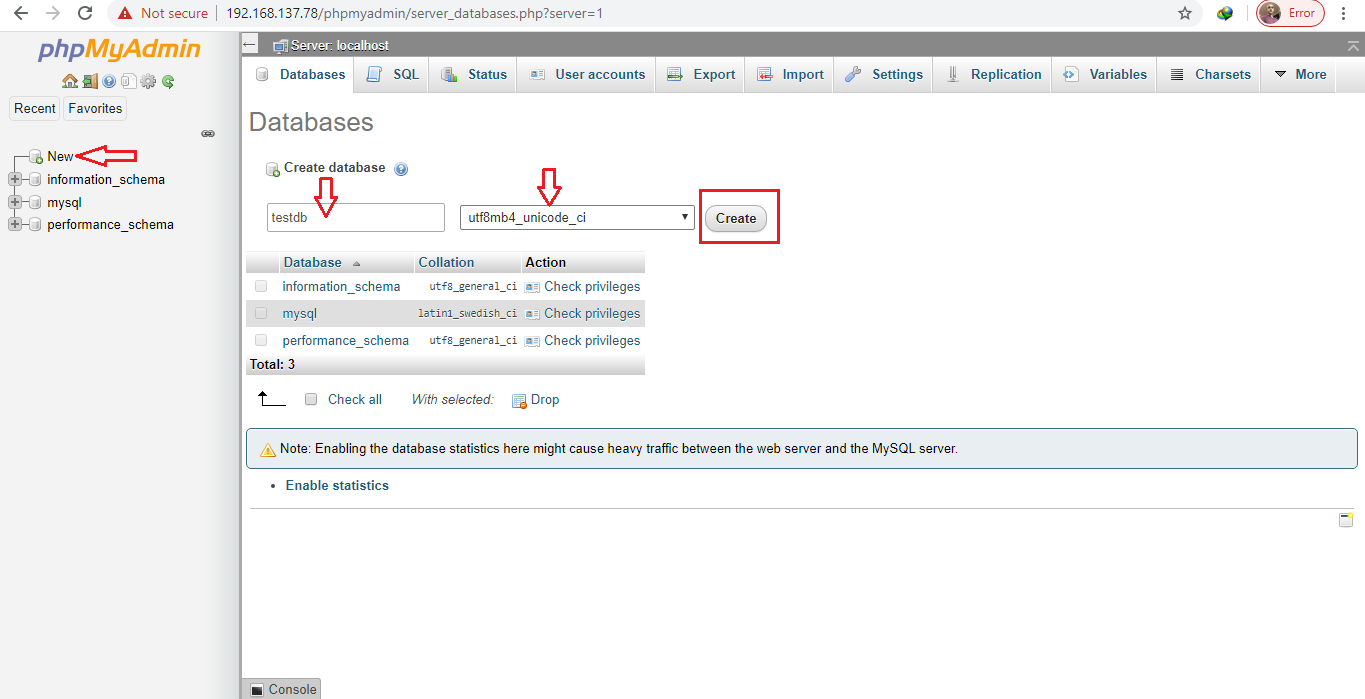
We will create a test database, user and privileges to give you an example:
Creating user for testdb
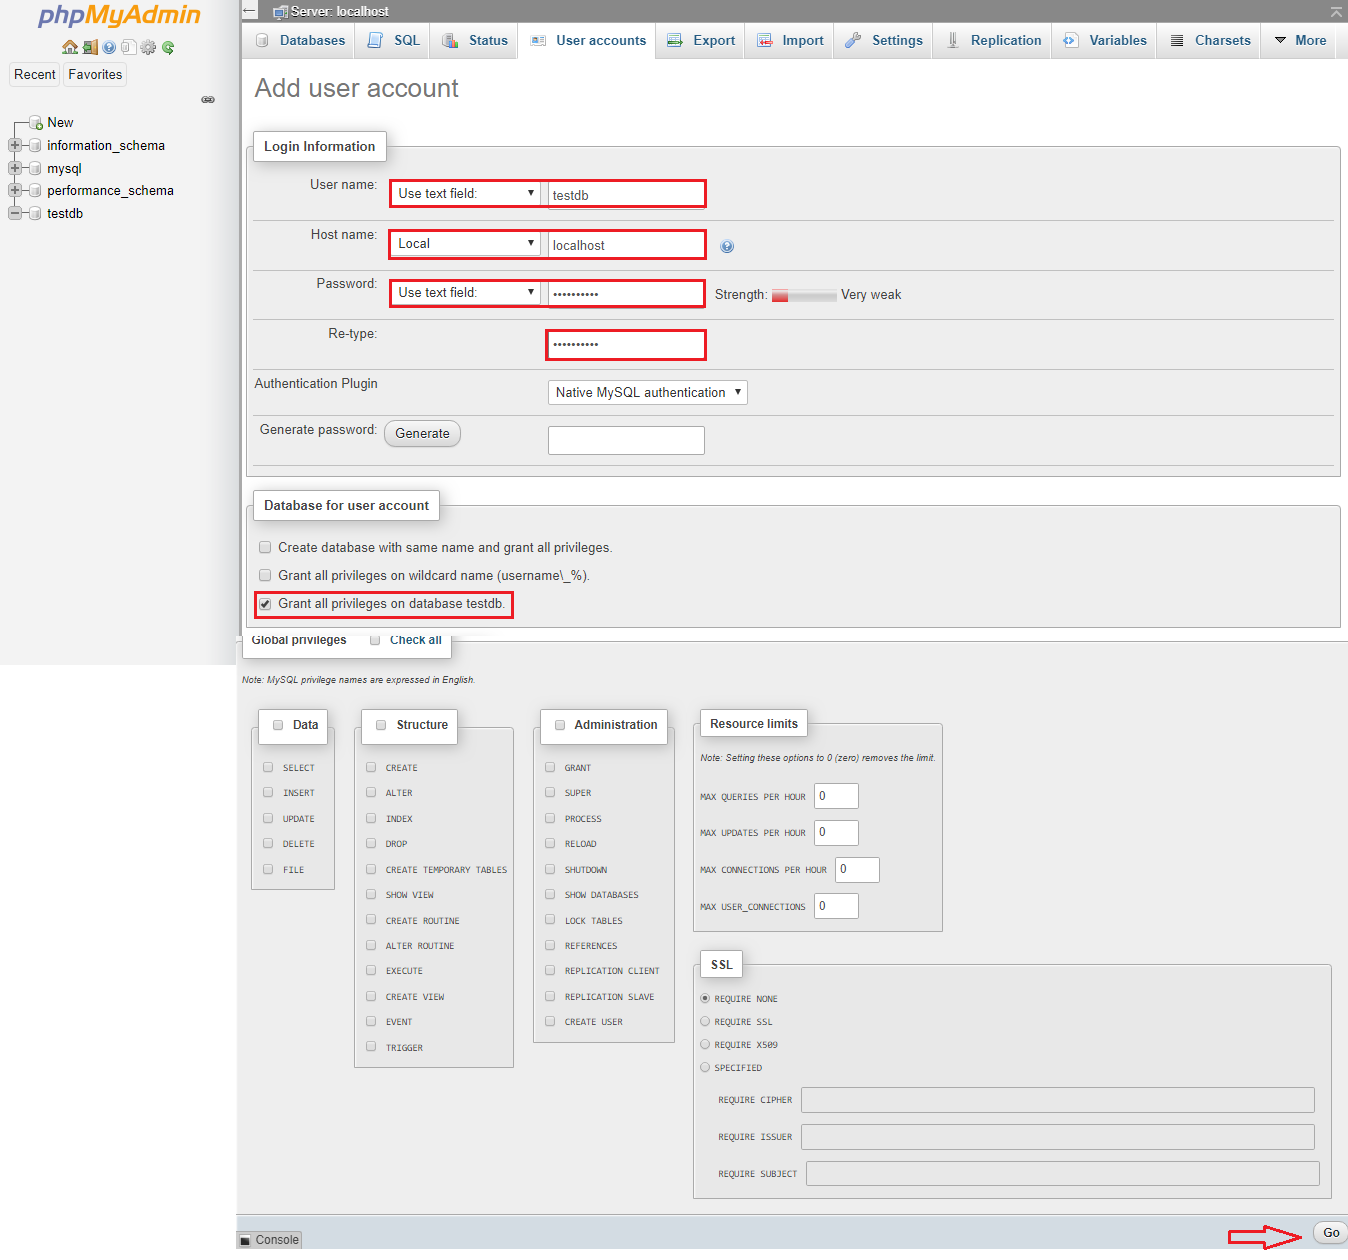
Set the user's credentials
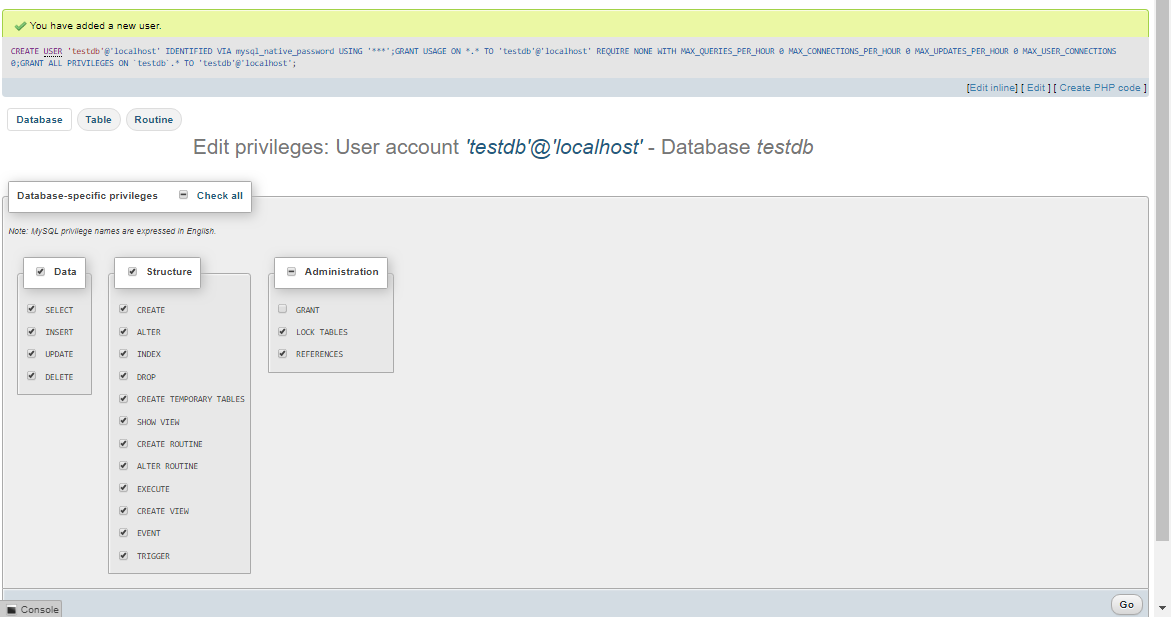
User created with database specific privileges
Now logout from the root user
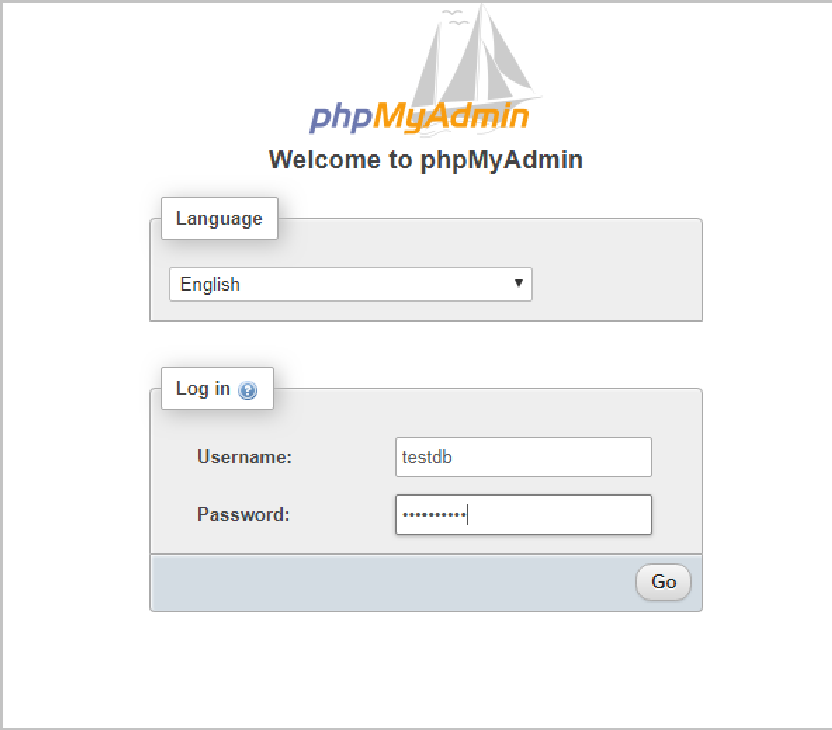
Login with newly created database user testdb
You are log in to testdb database.
Wrapping up
You have successfully set up phpMyAdmin with Nginx web server on your CentOS/RHEL 8. Now you can create, administer and manage your MariaDB/MySQL database using phpMyAdmin web interface.






Hi,
ReplyDeleteplease change this line "sudo openssl req -x509 -nodes -days 3650 -newkey rsa:2048 -keyout /etc/pki/tls/certs/nginx.crt -out /etc/pki/tls/private/nginx.pki"
with
sudo openssl req -x509 -nodes -days 3650 -newkey rsa:2048 -keyout /etc/pki/tls/private/nginx.key -out /etc/pki/tls/certs/nginx.crt
thank