osTicket is a widely-used open source help desk system. It seamlessly integrates inquiries created via email, phone and web-based forms into a simple easy-to-use multi-user web interface. The program is written in PHP, supports a variety of databases including (MySQL, PostgreSQL), and can integrate with LDAP/Active directory for central authentication.
sudo apt update
sudo apt install -y nginx
sudo apt install -y mysql-server
Securing the MySQL server deployment.
Connecting to MySQL using a blank password.
VALIDATE PASSWORD PLUGIN can be used to test passwords
and improve security. It checks the strength of password
and allows the users to set only those passwords which are
secure enough. Would you like to setup VALIDATE PASSWORD plugin?
Press y|Y for Yes, any other key for No: y
There are three levels of password validation policy:
LOW Length >= 8
MEDIUM Length >= 8, numeric, mixed case, and special characters
STRONG Length >= 8, numeric, mixed case, special characters and dictionary file
Please enter 0 = LOW, 1 = MEDIUM and 2 = STRONG: 1
Please set the password for root here.
New password:
Re-enter new password:
Estimated strength of the password: 100
Do you wish to continue with the password provided?(Press y|Y for Yes, any other key for No) : y
By default, a MySQL installation has an anonymous user,
allowing anyone to log into MySQL without having to have
a user account created for them. This is intended only for
testing, and to make the installation go a bit smoother.
You should remove them before moving into a production
environment.
Remove anonymous users? (Press y|Y for Yes, any other key for No) : y
Success.
Normally, root should only be allowed to connect from
'localhost'. This ensures that someone cannot guess at
the root password from the network.
Disallow root login remotely? (Press y|Y for Yes, any other key for No) : y
Success.
By default, MySQL comes with a database named 'test' that
anyone can access. This is also intended only for testing,
and should be removed before moving into a production
environment.
Remove test database and access to it? (Press y|Y for Yes, any other key for No) : y
- Dropping test database...
Success.
- Removing privileges on test database...
Success.
Reloading the privilege tables will ensure that all changes
made so far will take effect immediately.
Reload privilege tables now? (Press y|Y for Yes, any other key for No) : y
Success.
All done!
sudo timedatectl set-timezone Asia/Karachi
sudo nano /etc/php/7.2/fpm/php.ini
Uncomment cgi.fix_pathinfo variable and change its value to 0
cgi.fix_pathinfo=0
Save and close.
sudo systemctl restart php7.2-fpm
sudo systemctl enable php7.2-fpm
sudo systemctl enable nginx
sudo systemctl enable mysql
Add and uncomment the following highlighted configuration lines:
server {
listen 80 default_server;
listen [::]:80 default_server;
root /var/www/html;
index index.php index.html index.htm index.nginx-debian.html;
server_name _;
location / {
try_files $uri $uri/ =404;
}
location ~ \.php$ {
include snippets/fastcgi-php.conf;
fastcgi_pass unix:/run/php/php7.2-fpm.sock;
}
location ~ /\.ht {
deny all;
}
}
Save and close.
Now, create a configuration file osticket.conf which will enable osticket web services:
sudo nano /etc/nginx/sites-available/osticket.conf
Paste the following into it and replace the highlighted parameters to reflect yours.
server {
listen 80;
server_name labserver.example.com;
root /var/www/osTicket/upload;
access_log /var/log/nginx/access.log;
error_log /var/log/nginx/error.log;
index index.php index.html index.htm;
gzip on;
gzip_min_length 1000;
gzip_types text/plain application/x-javascript text/xml text/css application/xml;
set $path_info "";
location ~ /include {
deny all;
return 403;
}
if ($request_uri ~ "^/api(/[^\?]+)") {
set $path_info $1;
}
location ~ ^/api/(?:tickets|tasks).*$ {
try_files $uri $uri/ /api/http.php?$query_string;
}
if ($request_uri ~ "^/scp/.*\.php(/[^\?]+)") {
set $path_info $1;
}
location ~ ^/scp/ajax.php/.*$ {
try_files $uri $uri/ /scp/ajax.php?$query_string;
}
location / {
try_files $uri $uri/ index.php;
fastcgi_buffer_size 128k;
fastcgi_buffers 256 256k;
}
location ~ \.php$ {
fastcgi_param SCRIPT_FILENAME $document_root$fastcgi_script_name;
include fastcgi_params;
include snippets/fastcgi-php.conf;
fastcgi_pass unix:/run/php/php7.2-fpm.sock;
}
}
Save and close.
You need to create a symbolic link to enable osticket.conf in nginx web server like below:
sudo ln -s /etc/nginx/sites-available/osticket.conf /etc/nginx/sites-enabled/
Verify nginx configuration with following command:
sudo nginx -t
You will see the output similar to below.
Output
nginx: the configuration file /etc/nginx/nginx.conf syntax is ok
nginx: configuration file /etc/nginx/nginx.conf test is successful
Restart nginx service to take changes into effect.
sudo systemctl restart nginx
wget https://s3.amazonaws.com/downloads.osticket.com/core/osTicket-v1.12.zip
sudo unzip osTicket-v1.12.zip
sudo mkdir /var/www/osTicket
sudo mv scripts upload /var/www/osTicket
sudo chown -R www-data:www-data /var/www/osTicket
cd /var/www/osTicket
sudo cp upload/include/ost-sampleconfig.php upload/include/ost-config.php
sudo chmod 0666 upload/include/ost-config.php
sudo mysql -u root -p
create database osticket;
create user 'osticket'@'localhost' identified by 'Your-Password';
grant all privileges on osticket.* to 'osticket'@'localhost';
flush privileges;
exit
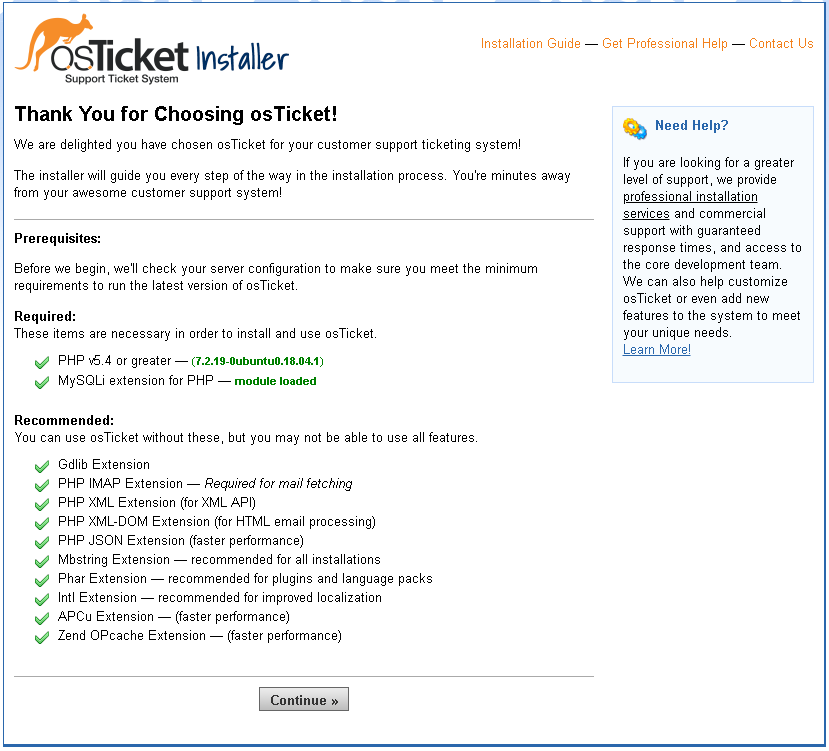
Make sure all prerequisites are green and click Continue.
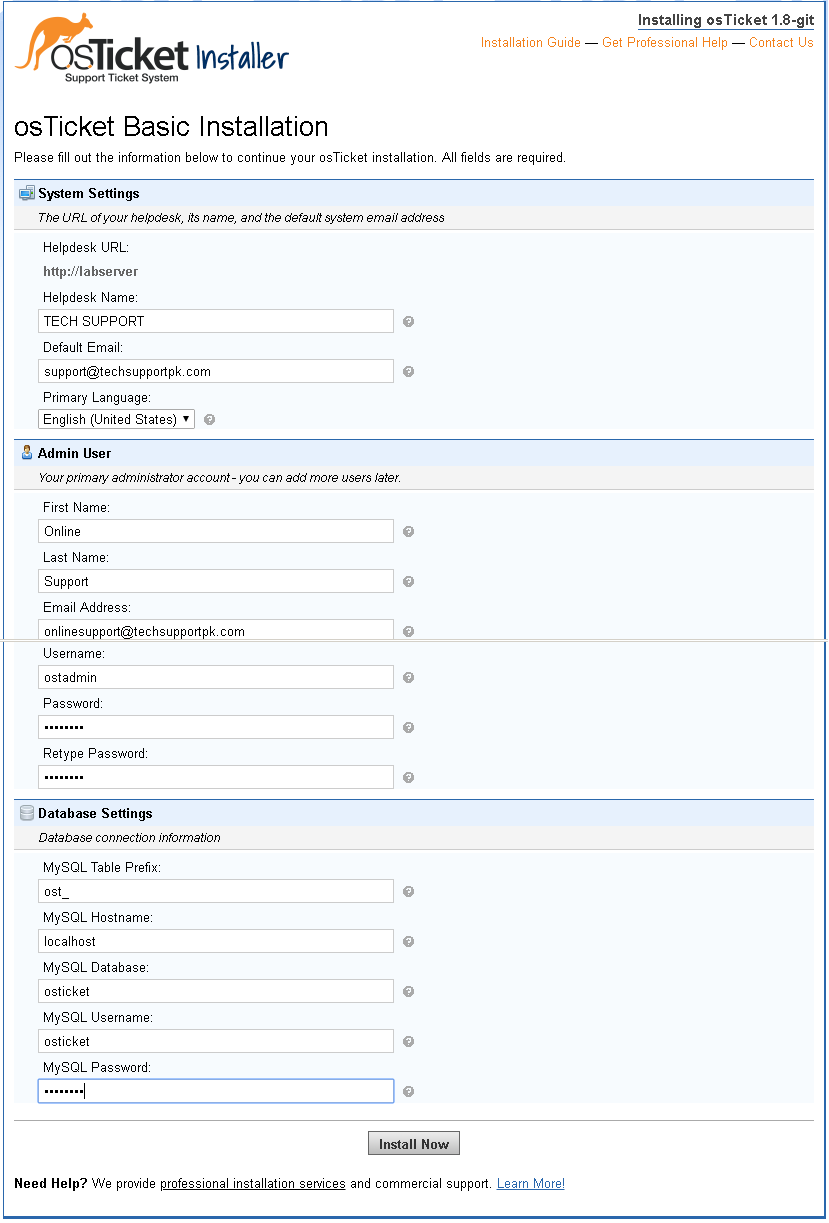
Provide all the information and click Install Now
It will take few minutes to complete.
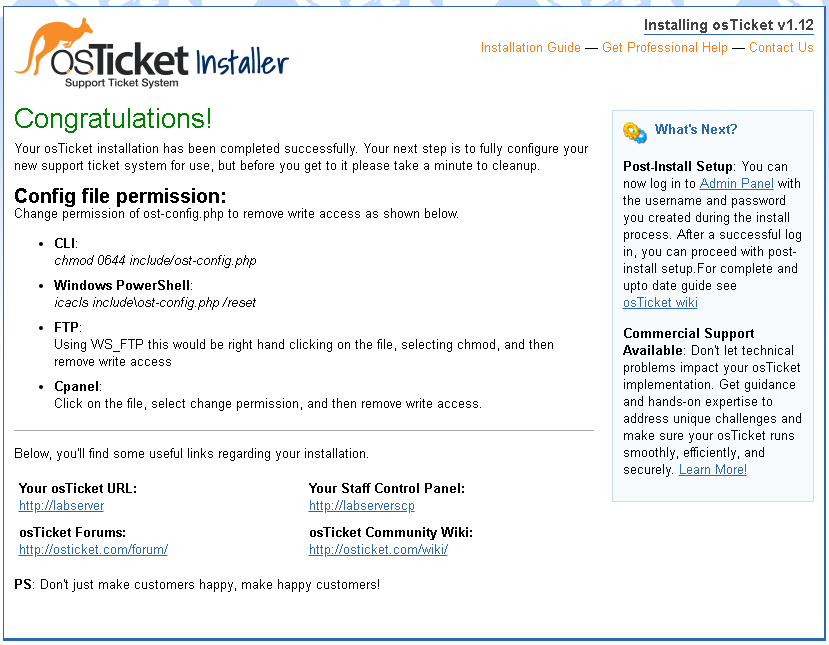
Once completed, you will see the following screen contains information including permission and links to access osticket system and admin panel.
Now go back to Ubuntu server terminal and type the following command:
sudo chmod 0644 /var/www/osTicket/upload/include/ost-config.php
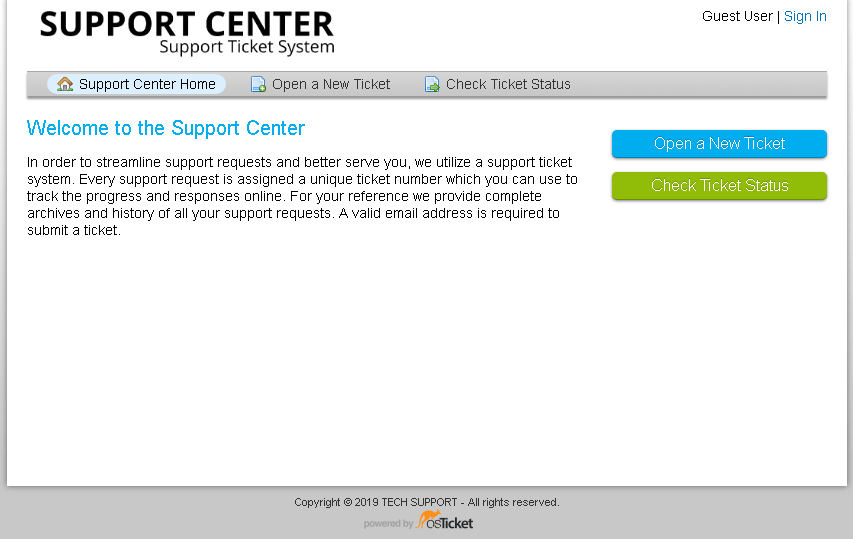
Access http://your_server.domain or http://your_server_ip and you will see the following screen. From here you or your customer can create a support ticket or check status of already created tickets.
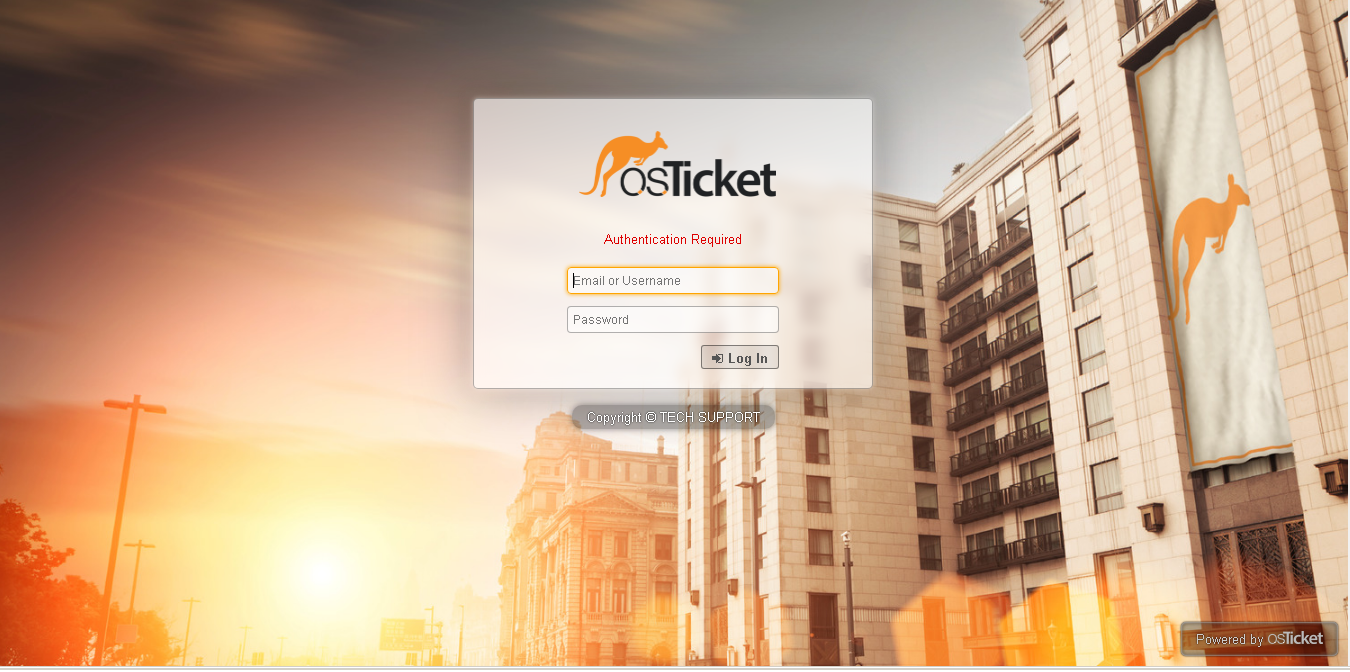
Access http://your_server.domain/scp or http://your_server_ip/scp and you will see the following screen. Login with username and password you created in earlier web installer step.
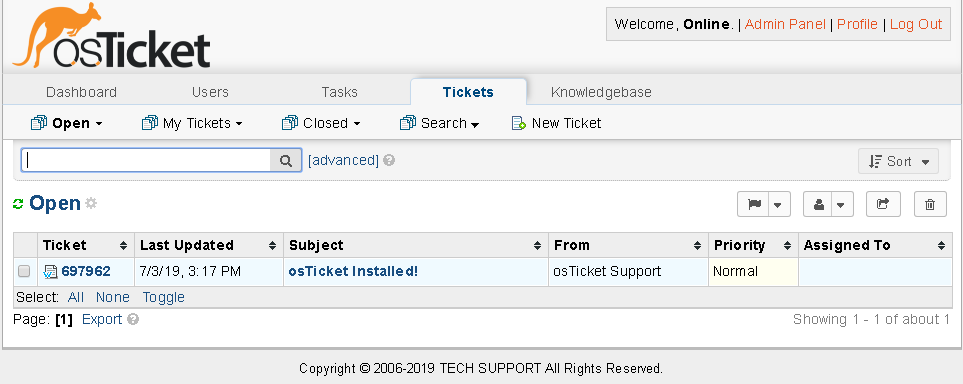
Once logged in, you will see the following dashboard of admin panel. From here you can control, customize and manage your osTicket support desk
This tutorial will help you to implement a support desk for your users and customers using open source osTicket on an Ubuntu 19.04 server.
Prerequisites
To follow this tutorial, you will need one Ubuntu 19.04 (physical or virtual) machine should have a non-root user with sudo privileges.
Installing Nginx
You can install nginx web server using the following command:sudo apt update
sudo apt install -y nginx
Installing MySQL
For database, we will install MySQL server to fulfill osticket database requirement:sudo apt install -y mysql-server
Securing MySQL
sudo mysql_secure_installationSecuring the MySQL server deployment.
Connecting to MySQL using a blank password.
VALIDATE PASSWORD PLUGIN can be used to test passwords
and improve security. It checks the strength of password
and allows the users to set only those passwords which are
secure enough. Would you like to setup VALIDATE PASSWORD plugin?
Press y|Y for Yes, any other key for No: y
There are three levels of password validation policy:
LOW Length >= 8
MEDIUM Length >= 8, numeric, mixed case, and special characters
STRONG Length >= 8, numeric, mixed case, special characters and dictionary file
Please enter 0 = LOW, 1 = MEDIUM and 2 = STRONG: 1
Please set the password for root here.
New password:
Re-enter new password:
Estimated strength of the password: 100
Do you wish to continue with the password provided?(Press y|Y for Yes, any other key for No) : y
By default, a MySQL installation has an anonymous user,
allowing anyone to log into MySQL without having to have
a user account created for them. This is intended only for
testing, and to make the installation go a bit smoother.
You should remove them before moving into a production
environment.
Remove anonymous users? (Press y|Y for Yes, any other key for No) : y
Success.
Normally, root should only be allowed to connect from
'localhost'. This ensures that someone cannot guess at
the root password from the network.
Disallow root login remotely? (Press y|Y for Yes, any other key for No) : y
Success.
By default, MySQL comes with a database named 'test' that
anyone can access. This is also intended only for testing,
and should be removed before moving into a production
environment.
Remove test database and access to it? (Press y|Y for Yes, any other key for No) : y
- Dropping test database...
Success.
- Removing privileges on test database...
Success.
Reloading the privilege tables will ensure that all changes
made so far will take effect immediately.
Reload privilege tables now? (Press y|Y for Yes, any other key for No) : y
Success.
All done!
Installing PHP
sudo apt install -y php7.2-cli php7.2-mysql php7.2-cgi php7.2-fpm php7.2-gd php7.2-imap php7.2-xml php7.2-mbstring php7.2-intl php-apcu zipsudo timedatectl set-timezone Asia/Karachi
sudo nano /etc/php/7.2/fpm/php.ini
Uncomment cgi.fix_pathinfo variable and change its value to 0
cgi.fix_pathinfo=0
Save and close.
sudo systemctl restart php7.2-fpm
sudo systemctl enable php7.2-fpm
sudo systemctl enable nginx
sudo systemctl enable mysql
Configuring Nginx
sudo nano /etc/nginx/sites-available/defaultAdd and uncomment the following highlighted configuration lines:
server {
listen 80 default_server;
listen [::]:80 default_server;
root /var/www/html;
index index.php index.html index.htm index.nginx-debian.html;
server_name _;
location / {
try_files $uri $uri/ =404;
}
location ~ \.php$ {
include snippets/fastcgi-php.conf;
fastcgi_pass unix:/run/php/php7.2-fpm.sock;
}
location ~ /\.ht {
deny all;
}
}
Save and close.
Now, create a configuration file osticket.conf which will enable osticket web services:
sudo nano /etc/nginx/sites-available/osticket.conf
Paste the following into it and replace the highlighted parameters to reflect yours.
server {
listen 80;
server_name labserver.example.com;
root /var/www/osTicket/upload;
access_log /var/log/nginx/access.log;
error_log /var/log/nginx/error.log;
index index.php index.html index.htm;
gzip on;
gzip_min_length 1000;
gzip_types text/plain application/x-javascript text/xml text/css application/xml;
set $path_info "";
location ~ /include {
deny all;
return 403;
}
if ($request_uri ~ "^/api(/[^\?]+)") {
set $path_info $1;
}
location ~ ^/api/(?:tickets|tasks).*$ {
try_files $uri $uri/ /api/http.php?$query_string;
}
if ($request_uri ~ "^/scp/.*\.php(/[^\?]+)") {
set $path_info $1;
}
location ~ ^/scp/ajax.php/.*$ {
try_files $uri $uri/ /scp/ajax.php?$query_string;
}
location / {
try_files $uri $uri/ index.php;
fastcgi_buffer_size 128k;
fastcgi_buffers 256 256k;
}
location ~ \.php$ {
fastcgi_param SCRIPT_FILENAME $document_root$fastcgi_script_name;
include fastcgi_params;
include snippets/fastcgi-php.conf;
fastcgi_pass unix:/run/php/php7.2-fpm.sock;
}
}
Save and close.
You need to create a symbolic link to enable osticket.conf in nginx web server like below:
sudo ln -s /etc/nginx/sites-available/osticket.conf /etc/nginx/sites-enabled/
Verify nginx configuration with following command:
sudo nginx -t
You will see the output similar to below.
Output
nginx: the configuration file /etc/nginx/nginx.conf syntax is ok
nginx: configuration file /etc/nginx/nginx.conf test is successful
Restart nginx service to take changes into effect.
sudo systemctl restart nginx
Downloading osTicket
You can find the latest version of osticket from the official website https://osticket.com/download/wget https://s3.amazonaws.com/downloads.osticket.com/core/osTicket-v1.12.zip
sudo unzip osTicket-v1.12.zip
sudo mkdir /var/www/osTicket
sudo mv scripts upload /var/www/osTicket
sudo chown -R www-data:www-data /var/www/osTicket
cd /var/www/osTicket
sudo cp upload/include/ost-sampleconfig.php upload/include/ost-config.php
sudo chmod 0666 upload/include/ost-config.php
Creating Database
You can create a database for osticket using the below commands under mysql prompt and you should replace following highlighted parameter to reflect yours:sudo mysql -u root -p
create database osticket;
create user 'osticket'@'localhost' identified by 'Your-Password';
grant all privileges on osticket.* to 'osticket'@'localhost';
flush privileges;
exit
Run osTicket Web Installer
To run osticket web installer, open up your favorite web browser and type http://your_servername.domain or http://your_server_ip and you will see the following screen.Make sure all prerequisites are green and click Continue.

Provide all the information and click Install Now

It will take few minutes to complete.
Once completed, you will see the following screen contains information including permission and links to access osticket system and admin panel.

Now go back to Ubuntu server terminal and type the following command:
sudo chmod 0644 /var/www/osTicket/upload/include/ost-config.php
Access http://your_server.domain or http://your_server_ip and you will see the following screen. From here you or your customer can create a support ticket or check status of already created tickets.

Access http://your_server.domain/scp or http://your_server_ip/scp and you will see the following screen. Login with username and password you created in earlier web installer step.

Once logged in, you will see the following dashboard of admin panel. From here you can control, customize and manage your osTicket support desk

Wrapping up
You have successfully installed and configured support desk system using osTicket. Now you can accept and process support requests from your users and customers using both the web interface and email.

No comments: