This tutorial will take you through the steps to set up a basic authentication for Apache web server to secure your web contents from unauthorized access on Ubuntu 19.04.
Prerequisite
To follow this tutorial, you will need one Ubuntu 19.04 (physical or virtual) machine with sudo non-root user privileges.
Installing Apache Web Server
You can install apache web server package using the following command:
sudo apt update
sudo apt -y install apache2
When installation completed, apache service automatically starts, you can verify whether apache service is started:
sudo systemctl status apache2
Installing Basic Authentication
In this step, you need to install basic authentication package to protect apache web server contents.
sudo apt -y install apache2-utils pwauth libapache2-mod-authnz-external
Now we need to create a configuration file under /etc/apache2/sites-available directory similar to below:
sudo tee /etc/apache2/sites-available/protected.conf<<EOF
<Directory /var/www/html/protected>
AuthType Basic
AuthName "Basic Authentication"
AuthUserFile /etc/apache2/.htpasswd
require valid-user
</Directory>
EOF
Next, add users to the Basic Authentication file.
sudo htpasswd -c /etc/apache2/.htpasswd testuser1
Output
New password:
Re-type new password:
Adding password for user testuser1
The “-c” switch in above command is used to create a file storing users credentials during initial setup. Now you can add more users like below:
sudo htpasswd /etc/apache2/.htpasswd testuser2
Output
New password:
Re-type new password:
Adding password for user testuser2
You can see .htpasswd file information storing users credentials using the following command:
sudo cat /etc/apache2/.htpasswd
Output
testuser1:$apr1$nIxlKLgc$xGTv.J1x5wtbJqAfFPt6o1
testuser2:$apr1$F4OnyIyv$WImqRIR5BBopTMjqGXs/c1
Activate Protected Web Site
In the earlier step, we created protected.conf file to host our test website and now we need to activate it by executing the following command:
sudo a2ensite protected.conf
Output
Enabling site protected.
To activate the new configuration, you need to run:
systemctl reload apache2
Next, create protected directory under /var/www/html path like below:
sudo mkdir -p /var/www/html/protected
At this point, we need to create index.html page with following contents into /var/www/html/protected directory for testing:
sudo tee /var/www/html/protected/index.html<<EOF
<html>
<body>
<div style="width: 100%; font-size: 50px; font-weight: bold; text-align: center;">
This is my protected web page using Basic Authentication in Apache
</div>
</body>
</html>
EOF
Restart Apache service to take changes into effect.
sudo systemctl restart apache2
Testing Protected Web Page
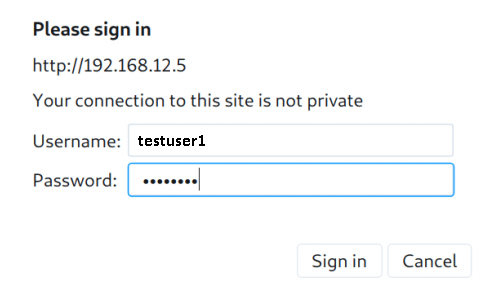
Open up your favorite web browser and access http://your_server_hostname/protected or http://your_server_ip/protected and you will be presented the following login page.

Once authenticated, you will see the following index.html page contents confirming that our basic authentication is successful.

Wrapping up
Prerequisite
To follow this tutorial, you will need one Ubuntu 19.04 (physical or virtual) machine with sudo non-root user privileges.
Installing Apache Web Server
You can install apache web server package using the following command:
sudo apt update
sudo apt -y install apache2
When installation completed, apache service automatically starts, you can verify whether apache service is started:
sudo systemctl status apache2
Installing Basic Authentication
In this step, you need to install basic authentication package to protect apache web server contents.
sudo apt -y install apache2-utils pwauth libapache2-mod-authnz-external
Now we need to create a configuration file under /etc/apache2/sites-available directory similar to below:
sudo tee /etc/apache2/sites-available/protected.conf<<EOF
<Directory /var/www/html/protected>
AuthType Basic
AuthName "Basic Authentication"
AuthUserFile /etc/apache2/.htpasswd
require valid-user
</Directory>
EOF
Next, add users to the Basic Authentication file.
sudo htpasswd -c /etc/apache2/.htpasswd testuser1
Output
New password:
Re-type new password:
Adding password for user testuser1
The “-c” switch in above command is used to create a file storing users credentials during initial setup. Now you can add more users like below:
sudo htpasswd /etc/apache2/.htpasswd testuser2
Output
New password:
Re-type new password:
Adding password for user testuser2
You can see .htpasswd file information storing users credentials using the following command:
sudo cat /etc/apache2/.htpasswd
Output
testuser1:$apr1$nIxlKLgc$xGTv.J1x5wtbJqAfFPt6o1
testuser2:$apr1$F4OnyIyv$WImqRIR5BBopTMjqGXs/c1
Activate Protected Web Site
In the earlier step, we created protected.conf file to host our test website and now we need to activate it by executing the following command:
sudo a2ensite protected.conf
Output
Enabling site protected.
To activate the new configuration, you need to run:
systemctl reload apache2
Next, create protected directory under /var/www/html path like below:
sudo mkdir -p /var/www/html/protected
At this point, we need to create index.html page with following contents into /var/www/html/protected directory for testing:
sudo tee /var/www/html/protected/index.html<<EOF
<html>
<body>
<div style="width: 100%; font-size: 50px; font-weight: bold; text-align: center;">
This is my protected web page using Basic Authentication in Apache
</div>
</body>
</html>
EOF
Restart Apache service to take changes into effect.
sudo systemctl restart apache2
Testing Protected Web Page
Open up your favorite web browser and access http://your_server_hostname/protected or http://your_server_ip/protected and you will be presented the following login page.

Once authenticated, you will see the following index.html page contents confirming that our basic authentication is successful.

Wrapping up
You have successfully implemented basic authentication to protect your web contents hosted on Ubuntu 19.04 with Apache web server.

No comments: