
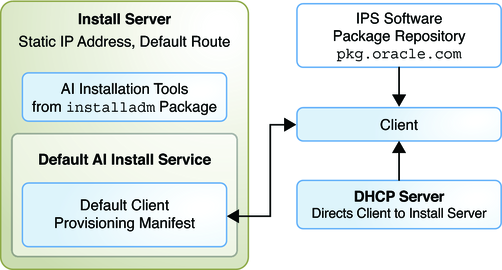
This article will guide you through the steps to set up automated installation server (AIS) which allows you to remotely load Solaris 11 operating system over the network on multiple machines at once similar to Solaris 10 Jumpstart.
Pre-requisites:
Download
Solaris 11 Text Base Installation Image for x86 or SPARC, whatever platform you
prefer.
Download
Solaris repository image
The
repository image is provided in two parts that must be concatenated together.
Concatenate
files in Windows
copy /b sol-11-1111-repo-full.iso-a+sol-11-1111-repo-full.iso-b
sol-11-1111-repo-full.iso
Concatenate
files in Unix/Linux/Mac OS X
cat sol-11-1111-repo-full.iso-a sol-11-1111-repo-full.iso-b >
sol-11-1111-repo-full.iso
I
assume that you have completed pre-requisites section. I am not including
download or operating system installation procedure here. In our lab
environment I will use VMware virtual machine for AI Server.
AI Server Info:
Hostname: aiserver
IP
Address: 172.22.16.1
Netmask: 255.255.255.0
Gateway: none: (define if you have)
AI Server
Configuration Steps:
1.
Create
Solaris repository
root@aiserver:~# lofiadm -a /download/sol-11-1111-repo-full.iso
/dev/lofi/1
root@aiserver:~# mount -F hsfs -o ro /dev/lofi/1 /media
root@aiserver:~#
zfs create rpool/export/s11repo
root@aiserver:~#
scp -r /media/SOL11REPO_FULL/* /export/s11repo
root@aiserver:~#
pkg unset-publisher solaris
root@aiserver:~#
pkg set-publisher -g file:///export/s11repo solaris
root@aiserver:~#
svccfg -s application/pkg/server setprop pkg/inst_root=/export/s11repo/repo
root@aiserver:~#
svccfg -s application/pkg/server setprop pkg/readonly=true
root@aiserver:~#
svcadm refresh application/pkg/server
root@aiserver:~#
svcadm enable application/pkg/server
root@aiserver:~#
pkg set-publisher -O http://172.22.16.1 solaris
2.
Create
Service for Solaris 11 x86 and Solaris 11 SPARC
root@aiserver:~#
installadm create-service -n s11x86 -i 172.22.16.10 -c 100
Warning:
Service svc:/network/dns/multicast:default is not online.
Installation services will not be advertised
via multicast DNS.
Creating
service from: pkg:/install-image/solaris-auto-install
OK
to use default image path: /export/auto_install/s11x86? [y/N]: y
Download:
install-image/solaris-auto-install ...
Done
Install
Phase ... Done
Package
State Update Phase ... Done
Image
State Update Phase ... Done
Reading
Existing Index ... Done
Indexing
Packages ... Done
Creating
service: s11x86
Image
path: /export/auto_install/s11x86
Starting
DHCP server...
Unable
to determine DNS domain for DHCP configuration.
Unable
to determine DNS servers for DHCP configuration.
Name
services are not configured for local DHCP server. Manual
configuration
will be required, please see dhcpd(8) for further
information.
Adding
IP range to local DHCP configuration
Unable
to determine a route for network 172.22.16.0. Setting the route
temporarily
to 0.0.0.0; this should be changed to an appropriate value
in
the DHCP configuration file. Please see dhcpd(8) for further
information.
Refreshing
install services
Warning:
mDNS registry of service s11x86 could not be verified.
Creating
default-i386 alias.
Setting
the default PXE bootfile in the local DHCP configuration to
'default-i386/boot/grub/pxegrub'
Refreshing
install services
Warning:
mDNS registry of service default-i386 could not be verified.
root@aiserver:~#
installadm create-service -a sparc -n s11sparc
Warning:
Service svc:/network/dns/multicast:default is not online.
Installation services will not be advertised
via multicast DNS.
Creating
service from: pkg:/install-image/solaris-auto-install
OK
to use default image path: /export/auto_install/s11sparc? [y/N]: y
Download:
install-image/solaris-auto-install ...
Done
Install
Phase ... Done
Package
State Update Phase ... Done
Image
State Update Phase ... Done
Reading
Existing Index ... Done
Indexing
Packages ... Done
Creating
service: s11sparc
Image
path: /export/auto_install/s11sparc
Service
discovery fallback mechanism set up
Creating
SPARC configuration file
Refreshing
install services
Warning:
mDNS registry of service s11sparc could not be verified.
Creating
default-sparc alias.
Setting
the default SPARC bootfile in the local DHCP configuration to
'http://172.22.16.1:5555/cgi-bin/wanboot-cgi'
Service
discovery fallback mechanism set up
Creating
SPARC configuration file
Refreshing
install services
Warning:
mDNS registry of service default-sparc could not be verified.
3.
Verify
service and manifest
root@aiserver:~#
installadm list
Service
Name Alias Of Status Arch Image Path
------------
-------- ------ ---- ----------
default-i386
s11x86 on x86
/export/auto_install/s11x86
s11x86 -
on x86 /export/auto_install/s11x86
root@aiserver:~#
installadm list -m
Service
Name Manifest Status
------------ --------
------
default-i386 orig_default
Default
s11x86 orig_default Default
4.
Create
manifest directory and files
root@aiserver:~#
zfs create rpool/export/config
root@aiserver:~#
installadm export -n s11x86 -m orig_default >
/export/config/orig_default.xml
root@aiserver:~#
vi /export/config/orig_default.xml
find <origin name="http://pkg.oracle.com/solaris/release"/>
and replace <origin_name="http://pkg.oracle.com/solaris/release"/>
to <origin_name="http://172.22.16.1/solaris"/>
root@aiserver:~#
installadm update-manifest -n default-i386 -m orig_default -f
/export/config/orig_default.xml
root@aiserver:~#
installadm export -n s11sparc -m orig_default >
/export/config/orig_defaultsparc.xml
root@aiserver:~#
vi /export/config/orig_defaultsparc.xml
root@aiserver:~#
installadm update-manifest -n default-sparc -m orig_default -f
/export/config/orig_defaultsparc.xml
find <origin name="http://pkg.oracle.com/solaris/release"/>
and replace <origin_name="http://pkg.oracle.com/solaris/release"/>
to <origin_name="http://172.22.16.1/solaris"/>
5.
Create
client profile
root@aiserver:~#
sysconfig create-profile -o /export/config/profile.xml
root@aiserver:~#
installadm validate -n default-i386 -P /export/config/profile.xml
Validating
static profile profile.xml...
Passed
root@aiserver:~#
installadm create-profile -n default-i386 -f /export/config/profile.xml -p
default-profile
Profile default-profile
added to database.
root@aiserver:~#
installadm create-profile -n default-sparc -f /export/config/profile.xml -p
default-profile
Profile
default-profile added to database.
That’s it.
Now boot your client machine from network (PXE) to
install through AI Server